
Why You’ll Love This Ice Cream Sandwich Bars
Imagine whipping up a treat that’s simple to make yet packed with joy. This ice cream sandwich bars recipe stands out because it’s easy to prepare, using everyday ingredients that come together quickly for a rewarding dessert. You’ll appreciate how it delivers health benefits through balanced choices, like using wholesome elements that can include essential vitamins without going overboard on sugars.
Plus, its versatility means you can tweak it for different needs, making it a hit for family gatherings or a quick snack. Whether you’re a busy parent or a baking enthusiast, these bars create memorable moments with their creamy texture and delightful flavors that everyone can enjoy.
Key Advantages
- Quick assembly for spontaneous fun.
- Nutritious twists with customizable ingredients.
- Adapts to various diets easily.
- A standout taste from fresh, simple components.
This recipe shines with its unique blend, offering a creamy filling sandwiched between soft layers that make each bite special. For more ideas on frozen treats, check out our guide on homemade mango ice cream for a refreshing variation.
These bars are perfect for home cooks looking to impress without much effort, turning basic ingredients into something extraordinary. Dive into this recipe and see how it can become a staple in your kitchen routine.
Jump To
- 1. Why You’ll Love This Ice Cream Sandwich Bars
- 2. Essential Ingredients for Ice Cream Sandwich Bars
- 3. How to Prepare the Perfect Ice Cream Sandwich Bars: Step-by-Step Guide
- 4. Dietary Substitutions to Customize Your Ice Cream Sandwich Bars
- 5. Mastering Ice Cream Sandwich Bars: Advanced Tips and Variations
- 6. How to Store Ice Cream Sandwich Bars: Best Practices
- 7. FAQs: Frequently Asked Questions About Ice Cream Sandwich Bars
- 8. Ice Cream Sandwich Bars
Essential Ingredients for Ice Cream Sandwich Bars
Gathering the right ingredients is the first step to creating delicious ice cream sandwich bars. Below, you’ll find a complete list pulled from our tested recipe, ensuring you have everything needed for success. This structured list makes it simple to follow along and measure accurately.
Ingredients for Bars
- 8 tablespoons unsalted butter
- 1 1/4 cups packed light or dark brown sugar
- 3/4 teaspoon table salt
- 1 teaspoon vanilla extract
- 3 large eggs
- 1 3/4 cups all-purpose flour
- 1 1/2 teaspoons baking powder
- 1/3 cup chocolate chips or mini chocolate chips
Ingredients for Filling
- 2 cups heavy cream or whipping cream
- 14-ounce can sweetened condensed milk
- 1 teaspoon vanilla extract
- 1/4 teaspoon table salt
- 2/3 cup melted chocolate (optional)
Optional Toppings
- Cocoa nibs
- Sparkling sugar
- Sprinkles
Each item is listed with precise measurements to help you get the texture and flavor just right. For those exploring more dessert options, see our recipe for chocolate-covered strawberries to add variety to your treats.
How to Prepare the Perfect Ice Cream Sandwich Bars: Step-by-Step Guide
Ready to make your own ice cream sandwich bars? Start by preheating your oven, as this sets the stage for a great bake. Follow these steps closely to achieve that ideal balance of soft layers and creamy filling. You’ll find the process straightforward and fun, even if you’re new to baking.
Step-by-Step Directions
- Preheat oven to 350°F (175°C). Line a 13 x 18-inch rimmed baking sheet with parchment paper and lightly grease it for easy removal.
- Melt the butter and whisk in the brown sugar, salt, and vanilla until smooth. Let it cool a bit, then add the eggs all at once and whisk until even.
- Stir in the flour and baking powder just until combined, and once the batter is lukewarm, mix in the chocolate chips. Spread this batter evenly in the prepared pan.
- Bake for 15 to 18 minutes until the bars are set and golden brown, then cool them completely on a wire rack.
- For the filling, beat the heavy cream, sweetened condensed milk, vanilla, and salt in a stand mixer until medium peaks form. If you choose, fold in the melted chocolate.
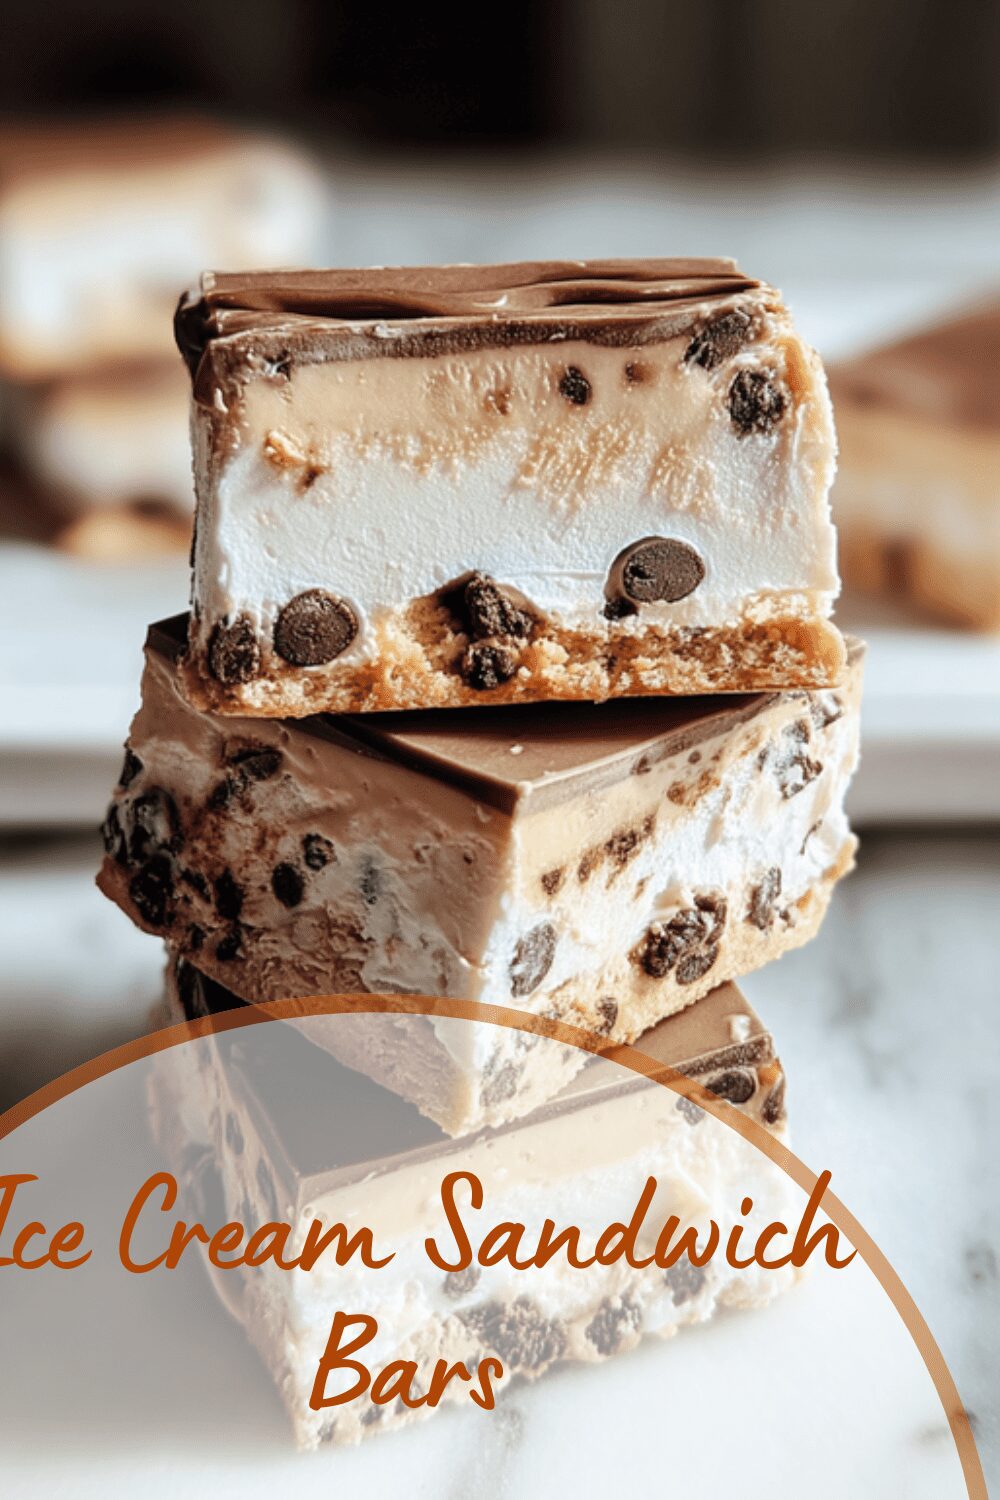
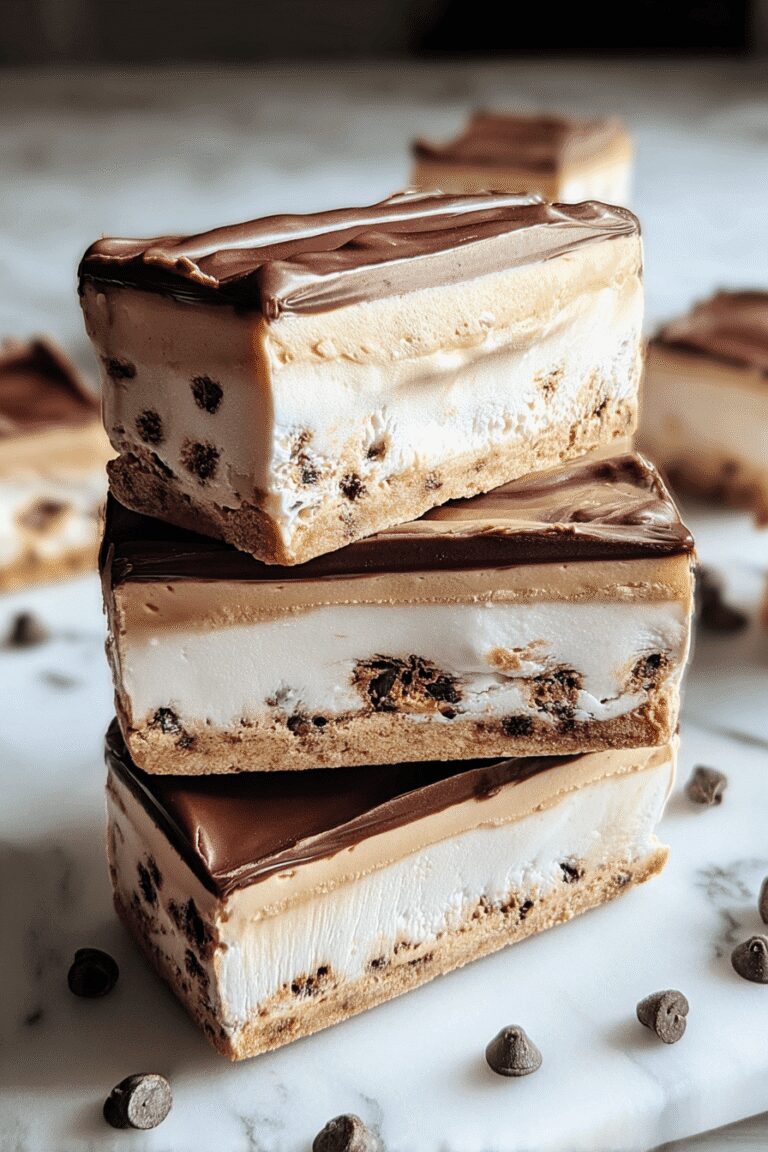
- Cut the cooled bar in half lengthwise to make two rectangles. Line a clean baking sheet with plastic wrap, place one rectangle bottom-side up, spread the filling over it leaving a 1/2-inch border, and top with the second rectangle bottom-side down. Press gently and wrap tightly with the plastic wrap.
- Freeze overnight or for at least 8 hours until firm. Unwrap, trim edges if you like, cut into bars, and dip edges in optional toppings like cocoa nibs before serving.
Preparation takes about 30 minutes of active time, with baking at 15-18 minutes and freezing overnight, totaling around 9 hours. This method ensures your bars turn out perfectly every time.

Dietary Substitutions to Customize Your Ice Cream Sandwich Bars
Making ice cream sandwich bars that fit your lifestyle is simple with a few smart swaps. You can adjust for protein needs or main components by using alternatives that keep the taste intact. For instance, swap dairy ice cream with plant-based options to accommodate various diets.
Custom Options
| Dietary Need | Suggested Substitution |
|---|---|
| Vegan | Use plant-based cream and milk alternatives in the filling. |
| Gluten-Free | Replace all-purpose flour with a gluten-free blend; adjust baking time if needed. |
| Low-Calorie | Opt for light cream and sugar alternatives to cut down on calories. |
These changes let you enjoy the bars while meeting your preferences. Try adding spices or fruits for extra flair, making each batch unique and suited to your table.
Mastering Ice Cream Sandwich Bars: Advanced Tips and Variations
Once you’re comfortable with the basics, take your ice cream sandwich bars to the next level with pro techniques. Use a stand mixer for a smooth dough that bakes evenly and helps maintain the shape. Chilling the dough before baking prevents it from spreading too much, giving you that perfect texture.
Flavor and Presentation Ideas
- Add extracts like mint or almond to the batter for a fresh twist.
- Experiment with ice cream flavors such as coffee or berry to pair with the chocolate chip base.
- Garnish with fresh berries or a light dusting of sugar for an eye-catching finish.
- Make ahead by freezing the bars for up to a month, then thaw as needed for easy treats.
This recipe offers endless ways to customize, turning a simple dessert into something special for any occasion.
These tips build on the core recipe, helping you create bars that impress. Remember, small changes can make a big difference in flavor and look.
How to Store Ice Cream Sandwich Bars: Best Practices
Keeping your ice cream sandwich bars fresh is key to enjoying them later. Store them in the refrigerator for up to two days, but know they might soften a bit. For longer hold, freezing works wonders to lock in that great taste and texture.
Storage Methods
- Wrap bars individually in plastic wrap and place in a freezer-safe container for up to one month.
- Let them thaw at room temperature for a few minutes before serving to get the right consistency.
- Plan for meal prep by portioning them out for quick access during busy weeks.
This approach keeps your treats ready without losing quality, making it easy for busy families. Proper storage ensures every bite is as good as the first.
FAQs: Frequently Asked Questions About Ice Cream Sandwich Bars
What are the main ingredients in ice cream sandwich bars?
Ice cream sandwich bars typically consist of three main components: a layer of ice cream, two outer layers of cookies or wafers, and sometimes a chocolate or flavored coating. The ice cream can be vanilla, chocolate, or other flavors, and is usually kept firm but creamy. The cookie layers provide texture and flavor contrast, often made with chocolate chip, brownie, or graham cracker varieties. Some bars include additional ingredients like nuts or caramel swirls to enhance taste and texture.
How should I store ice cream sandwich bars to keep them fresh?
To keep ice cream sandwich bars fresh and maintain their texture, store them in an airtight container or tightly wrapped in plastic wrap or foil inside the freezer. This prevents freezer burn and absorption of other odors. Keep the temperature at or below 0°F (-18°C). Avoid repeated thawing and refreezing, as this can cause ice crystals and affect creaminess. For best taste, consume within 1-2 months of purchase or preparation.
Can I make homemade ice cream sandwich bars without special equipment?
Yes, homemade ice cream sandwich bars can be made without special appliances. Start by baking or buying your favorite cookies that fit your desired size. Soften your chosen ice cream slightly, then spread it evenly on the cookie base using a spatula. Top with a second cookie and press gently. Wrap each sandwich tightly in plastic wrap and freeze for at least 2 hours until firm. Optional coatings can be added by dipping the firm bars in melted chocolate before refreezing.
Are ice cream sandwich bars suitable for people with dietary restrictions?
Ice cream sandwich bars can be adapted for various dietary needs. For lactose intolerance or dairy allergies, use dairy-free or plant-based ice cream alternatives such as coconut, almond, or soy-based options. Gluten-free cookies or wafers can replace traditional cookies for gluten-sensitive individuals. There are also low-sugar and vegan recipes available. When buying commercially, check ingredient lists and allergen information to make a safe and suitable choice.
How many calories are typically in an ice cream sandwich bar?
The calorie count in an ice cream sandwich bar varies depending on size and ingredients but usually ranges from 150 to 300 calories per bar. Regular versions with chocolate chip cookies and vanilla ice cream often contain around 220 calories. Bars with added chocolate coatings, nuts, or caramel tend to have higher calorie counts. For accurate information, check packaging labels or calculate using ingredient nutritional data if homemade. Serving size impacts total calorie intake.
Ice Cream Sandwich Bars
🍪 Chocolate Chip Cookie Ice Cream Sandwich Bars offer a delightful combination of chewy cookie texture and creamy ice cream, perfect for a refreshing homemade treat.
🍫 This easy recipe lets you enjoy the best of both worlds with a rich chocolate chip base and smooth ice cream filling that’s ideal for parties or a fun dessert at home.
- Total Time: 9 hours
- Yield: About 12 bars
Ingredients
– 8 tablespoons unsalted butter
– 1 1/4 cups packed light or dark brown sugar
– 3/4 teaspoon table salt
– 1 teaspoon vanilla extract
– 3 large eggs
– 1 3/4 cups all-purpose flour
– 1 1/2 teaspoons baking powder
– 1/3 cup chocolate chips or mini chocolate chips
– 2 cups heavy cream or whipping cream
– 14-ounce can sweetened condensed milk
– 1 teaspoon vanilla extract
– 1/4 teaspoon table salt
– 2/3 cup melted chocolate (optional)
– Cocoa nibs
– Sparkling sugar
– Sprinkles
Instructions
1-Preheat oven to 350°F (175°C): Line a 13 x 18-inch rimmed baking sheet with parchment paper and lightly grease it for easy removal.
2-Melt the butter and whisk in the brown sugar, salt, and vanilla until smooth. Let it cool a bit, then add the eggs all at once and whisk until even.
3-Stir in the flour and baking powder just until combined, and once the batter is lukewarm, mix in the chocolate chips. Spread this batter evenly in the prepared pan.
4-Bake for 15 to 18 minutes until the bars are set and golden brown, then cool them completely on a wire rack.
5-For the filling, beat the heavy cream, sweetened condensed milk, vanilla, and salt in a stand mixer until medium peaks form. If you choose, fold in the melted chocolate.
6-Cut the cooled bar in half lengthwise to make two rectangles. Line a clean baking sheet with plastic wrap, place one rectangle bottom-side up, spread the filling over it leaving a 1/2-inch border, and top with the second rectangle bottom-side down. Press gently and wrap tightly with the plastic wrap.
7-Freeze overnight or for at least 8 hours until firm. Unwrap, trim edges if you like, cut into bars, and dip edges in optional toppings like cocoa nibs before serving.
Notes
🍫 Use mini chocolate chips or chop larger chocolate chips to prevent hardness when frozen.
🍦 Substitute the filling with your favorite soft-serve or softened ice cream for variety.
🌾 For gluten-free, swap all-purpose flour with a gluten-free blend and adjust baking time if needed.
- Prep Time: 30 minutes
- Freezing time: At least 8 hours
- Cook Time: 15-18 minutes
- Category: Dessert
- Method: Baking, Freezing, Assembling
Nutrition
- Serving Size: 1 bar


These ice cream sandwich bars look like a perfect summer treat!
I tried using strawberry frozen yogurt instead of vanilla and added a drizzle of dark chocolate – it turned out amazing 😊