
Why You’ll Love This Red Velvet Cheesecake
Imagine sinking your spoon into a slice of red velvet cheesecake that’s creamy and packed with rich flavor, all without turning on the oven. This red velvet cheesecake recipe with creamy texture stands out as a go-to dessert for home cooks who want something special but simple. Whether you’re a busy parent juggling family meals or a baking enthusiast experimenting with new ideas, this no-bake treat offers a perfect balance of ease and indulgence. Let’s dive into why this dessert will quickly become your favorite red velvet cake variation.
- Ease of preparation: This cheesecake recipe is incredibly straightforward, requiring just about 30 minutes of active prep time before chilling. No baking means less fuss and more time to enjoy the process, making it ideal for students or working professionals who need quick wins in the kitchen. Unlike traditional red velvet cheesecakes that demand precise oven timing, this how to make red velvet cheesecake method keeps things simple and stress-free, so you can focus on the fun.
- Health benefits: While it’s a treat, this easy red velvet cheesecake recipe incorporates nutritional elements like protein from cream cheese and antioxidants from dark chocolate, offering a balance that’s kinder to your diet. Each serving provides a good amount of protein and fiber, which can help keep you satisfied without overloading on empty calories. For diet-conscious individuals, it’s a versatile option that fits into a wellness-focused lifestyle, especially when you tweak portions for low-calorie needs.
- Versatility: Adapt this rich flavor red velvet cheesecake to suit various dietary preferences, from gluten-free swaps to vegan alternatives, making it perfect for family gatherings with mixed needs. Seniors and newlyweds might appreciate how it pairs with different toppings or scales down for smaller servings, while travelers can prep it ahead for picnics. Its base allows for endless tweaks, positioning it as a flexible cheesecake recipe that enhances any occasion.
- Distinctive flavor: The deep scarlet red filling delivers a bold chocolate taste combined with velvety creaminess that’s hard to resist, setting it apart from standard red velvet cakes. The use of 70% cocoa chocolate adds an intense, rich layer that elevates every bite, appealing to food enthusiasts who crave complexity without the effort. This signature profile makes it a standout dessert that brings joy and memorable moments to the table.
With these benefits, it’s clear why this red velvet cheesecake recipe with creamy texture is a hit for all skill levels. Now, let’s gather what you need to get started.
Jump To
- 1. Why You’ll Love This Red Velvet Cheesecake
- 2. Essential Ingredients for Red Velvet Cheesecake
- 3. How to Prepare the Perfect Red Velvet Cheesecake: Step-by-Step Guide
- 4. Dietary Substitutions to Customize Your Red Velvet Cheesecake
- 5. Mastering Red Velvet Cheesecake: Advanced Tips and Variations
- 6. How to Store Red Velvet Cheesecake: Best Practices
- 7. FAQs: Frequently Asked Questions About Red Velvet Cheesecake
- 8. Red Velvet Cheesecake
Essential Ingredients for Red Velvet Cheesecake
Gathering the right ingredients is key to creating that perfect red velvet cheesecake. Below, you’ll find a detailed list of everything required, complete with precise measurements and a quick explanation of each item’s role. This ensures your cheesecake turns out with the ideal creamy texture and rich flavor. We’ve also noted special dietary options like vegan substitutes or gluten-free alternatives to make it accessible for everyone.
Base Ingredients
- 200g chocolate sandwich cookies (crushed) – Forms the sturdy base, providing structure and a chocolatey crunch; for gluten-free, use gluten-free cookies.
- 60g unsalted butter, melted – Binds the crumbs together for a firm crust; opt for vegan butter if making a plant-based version.
Filling Ingredients
- 2 tsp unflavored gelatine powder – Helps the filling set without baking; for vegan, swap with agar agar to maintain firmness.
- 2 tbsp water – Used to bloom the gelatine for a smooth, lump-free mixture; keep it minimal for low-calorie adaptations.
- 1 cup heavy cream, cold from fridge – Whipped for lightness and creaminess; substitute with coconut cream for a dairy-free option.
- 500g block cream cheese, softened – Creates the velvety base; use a vegan cream cheese alternative for plant-based diets.
- 3/4 cup caster or superfine sugar – Sweetens the filling evenly; replace with a low-calorie sweetener for diet-conscious tweaks.
- 1 tsp vanilla extract (real extract) – Adds depth and flavor; this is straightforward and works in all variations.
- 150g 70% cocoa chocolate (or dark chocolate), chopped, melted, and cooled until lukewarm with no lumps – Infuses rich chocolate flavor and color; choose semi-sweet for milder taste, and ensure it’s dairy-free for vegan needs.
- 6 tsp red food coloring (liquid or gel; gel is more concentrated) – Gives the bold red hue; use natural beet powder for a healthier, low-calorie alternative.
Whipped Cream Topping Ingredients
- 1 1/4 cups heavy cream, cold – Whips up for a fluffy topping; go with coconut cream for vegan substitutions.
- 3 tbsp caster sugar – Sweetens the topping lightly; use a sugar-free version for low-calorie options.
- 1 tsp vanilla extract – Enhances the topping’s taste; it’s versatile and fits all dietary changes.
Optional Chocolate Topping
- 2 tbsp shaved or grated dark chocolate – Adds a decorative, flavorful finish; select dairy-free chocolate for gluten-free or vegan adaptations.
This list covers all essentials for your red velvet cheesecake, making it easy to shop and prepare. Now, let’s move on to bringing it all together.
How to Prepare the Perfect Red Velvet Cheesecake: Step-by-Step Guide
Creating this red velvet cheesecake is a breeze with these straightforward steps. We’ll walk you through the process, focusing on that creamy texture and rich flavor you love. Remember, this is a no-bake recipe, so it’s perfect for hot days or when you’re short on time. Let’s get started with the basics to ensure your red velvet cheesecake turns out just right.
First Step: Prepare the Pan
Begin by flipping the base of a 20cm/8″ springform pan upside down and butter it lightly. Line it with parchment paper, making sure there’s excess paper overhanging for easy removal later. Then, clip the sides on and butter and line the sides too. This step helps everything release smoothly and keeps your red velvet cheesecake intact.
Second Step: Make the Crust
Next, take your 200g of roughly broken chocolate sandwich cookies and blitz them in a food processor until you get fine crumbs. Add the 60g of melted unsalted butter and pulse briefly to combine. Press this mixture firmly into the prepared pan base to form a solid foundation for your cheesecake recipe.
Third Step: Bloom the Gelatine
Now, sprinkle 2 tsp of unflavored gelatine powder over 2 tbsp of water, stir it evenly, and let it sit for 5 minutes to form a gel. Microwave it for 15 seconds to liquify, give it a stir, and cool for 3-5 minutes until it’s warm but not hot. This ensures a smooth integration into your red velvet cheesecake filling.
Fourth Step: Whip the Cream
Take 1 cup of cold heavy cream from the fridge and beat it until stiff peaks form. This adds airiness to your how to make red velvet cheesecake, making it light and fluffy. For dietary adaptations, use coconut cream if you’re going dairy-free.
Fifth Step: Beat the Cream Cheese Mixture
In a separate bowl, beat 500g of softened block cream cheese with 3/4 cup of caster sugar until it’s smooth and fluffy. Add the gelatine liquid and 1 tsp of vanilla extract, then beat well to combine. This base is crucial for the creamy texture, and you can adjust for lower-fat options here if needed.
Sixth Step: Add Chocolate and Coloring
Melt 150g of 70% cocoa chocolate, let it cool until lukewarm with no lumps, and add it to the mixture along with 6 tsp of red food coloring. Beat everything until you achieve a uniform dark scarlet color. This step really brings out the rich flavor in your easy red velvet cheesecake recipe, so take your time.
Seventh Step: Fold in the Whipped Cream
Gently fold in one-third of the whipped cream first, then carefully add the remaining cream in stages to retain that airiness. For variations, if you’re making it gluten-free, ensure all ingredients align. Pour the filling onto the crust and smooth the surface before refrigerating for at least 6 hours or until set.
Eighth Step: Remove and Decorate
Once set, release the sides of the pan and slide the cake off the base using the parchment paper overhang. Peel off the paper from the sides and underneath. Whip 1 1/4 cups of cold heavy cream with 3 tbsp of caster sugar and 1 tsp of vanilla extract until softly whipped, then decorate the center, leaving a border to show the red filling. Sprinkle on 2 tbsp of shaved dark chocolate for the final touch. If you’re into other ideas, check out our pumpkin cheesecake for more inspiration on creamy desserts.
Ninth Step: Serve and Enjoy
Serve your red velvet cheesecake chilled for the best rich flavor and texture. This final step highlights why this recipe is so beloved it’s straightforward and adaptable. For busy parents, prep it the night before to impress at any gathering.

Dietary Substitutions to Customize Your Red Velvet Cheesecake
Everyone has different needs, so customizing your red velvet cheesecake can make it even more enjoyable. This section offers alternatives for various diets, ensuring you can adapt based on ingredient availability or preferences. We’ll explore these through specific categories to keep things simple and maintain the creamy texture and rich flavor we love.
Protein and Main Component Alternatives
When swapping proteins in your red velvet cheesecake, focus on options that preserve the structure. For plant-based diets, use tofu or cashew-based cream cheese instead of the 500g block cream cheese to keep it creamy. Dairy-free alternatives like almond milk-based cream cheese work well for the filling, though they might make the texture slightly softer, so consider slightly increasing the gelatine. These changes ensure your rich flavor red velvet cheesecake remains delightful without altering baking times, since it’s no-bake.
Vegetable, Sauce, and Seasoning Modifications
Enhance your red velvet cheesecake with tweaks to vegetables, sauces, and seasonings for seasonal flair or dietary restrictions. Instead of red food coloring, try beet powder for a natural color that’s lower in calories and vegan-friendly, which interacts well with the chocolate base. For sauces, swap the whipped cream topping with a fruit-based one, like a light berry sauce for low-calorie needs, and always test small batches first to see how it affects the overall flavor. These modifications keep the cheesecake recipe versatile and exciting.
Mastering Red Velvet Cheesecake: Advanced Tips and Variations
Take your red velvet cheesecake to the next level with these expert tips and creative twists. Whether you’re aiming for a pro finish or experimenting with flavors, these ideas will help. First, let’s talk about techniques that boost your results.
For better texture, control the temperature of ingredients; ensure cream is ice-cold for whipping, as in the filling step, to maintain lightness. A ganache finishing can add elegance, much like in other desserts for more ideas, see our carrot cake cheesecake bars. Flavor variations might include adding orange zest or a white chocolate swirl for a unique twist on the classic red velvet cake.
Presentation is key, so try garnishing with edible flowers or cookie crumbs for visual appeal. For make-ahead options, prepare the base ahead and freeze it, thawing just before adding the filling, ideal for busy schedules. These tips ensure your easy red velvet cheesecake recipe shines every time.
How to Store Red Velvet Cheesecake: Best Practices
Proper storage keeps your red velvet cheesecake fresh and delicious. Start with refrigeration for short-term needs, as it maintains the creamy texture for up to 5 days. Wrap it tightly or use an airtight container to prevent drying out.
For freezing, place slices on a tray first, then wrap securely for up to a month; thaw overnight in the fridge. When reheating, if needed, do so gently to avoid sogginess. These methods make meal prep simple for any red velvet cheesecake lover.
FAQs: Frequently Asked Questions About Red Velvet Cheesecake
What ingredients do I need to make red velvet cheesecake from scratch?
To make red velvet cheesecake, you’ll need cream cheese, sugar, eggs, sour cream or heavy cream, red food coloring, cocoa powder, and vanilla extract. For the crust, graham cracker crumbs combined with melted butter and a pinch of sugar work well. Additionally, some recipes call for a bit of vinegar and baking soda to enhance the red velvet flavor and texture. Make sure to use full-fat cream cheese for the best creamy consistency.
How can I prevent my red velvet cheesecake from cracking?
To avoid cracks, bake your cheesecake in a water bath to maintain even moisture and temperature. Also, bake at a low temperature, typically around 325°F (160°C), and avoid opening the oven door frequently. After baking, allow the cheesecake to cool gradually by first turning off the oven and leaving the door slightly open. Finally, chill it in the refrigerator for several hours or overnight before serving to let it set properly.
Can I substitute gelatin or agar agar to help the cheesecake set?
Yes, if your cheesecake recipe requires extra firmness, you can add gelatin or an agar agar substitute. For gelatin, dissolve about 1 teaspoon in warm water before blending it into the cream cheese mixture. Agar agar can be used as a vegetarian alternative, but since it sets differently, start with a smaller amount and follow package instructions carefully. Adding these helps the cheesecake hold its shape, especially if you use softer cream cheese varieties.
What type of cream cheese works best for red velvet cheesecake?
Block cream cheese is preferable for red velvet cheesecake because it has a firmer texture and less moisture than spreadable tub varieties, resulting in a denser and creamier cheesecake. However, if only spreadable cream cheese is available, you can still use it by reducing added liquid and possibly increasing gelatin slightly to help it set. Always use full-fat cream cheese for richer flavor and better texture.
How long can I store red velvet cheesecake, and what’s the best way to keep it fresh?
Red velvet cheesecake should be stored in the refrigerator and consumed within 4-5 days for optimal freshness. Keep it covered tightly with plastic wrap or in an airtight container to prevent it from drying out or absorbing fridge odors. For longer storage, you can freeze the cheesecake for up to 1 month; wrap it securely in plastic wrap and aluminum foil, and thaw it overnight in the fridge before serving.
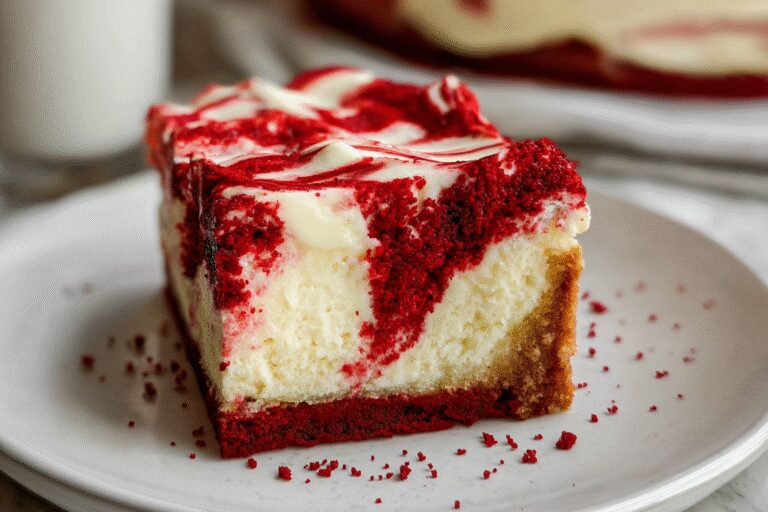
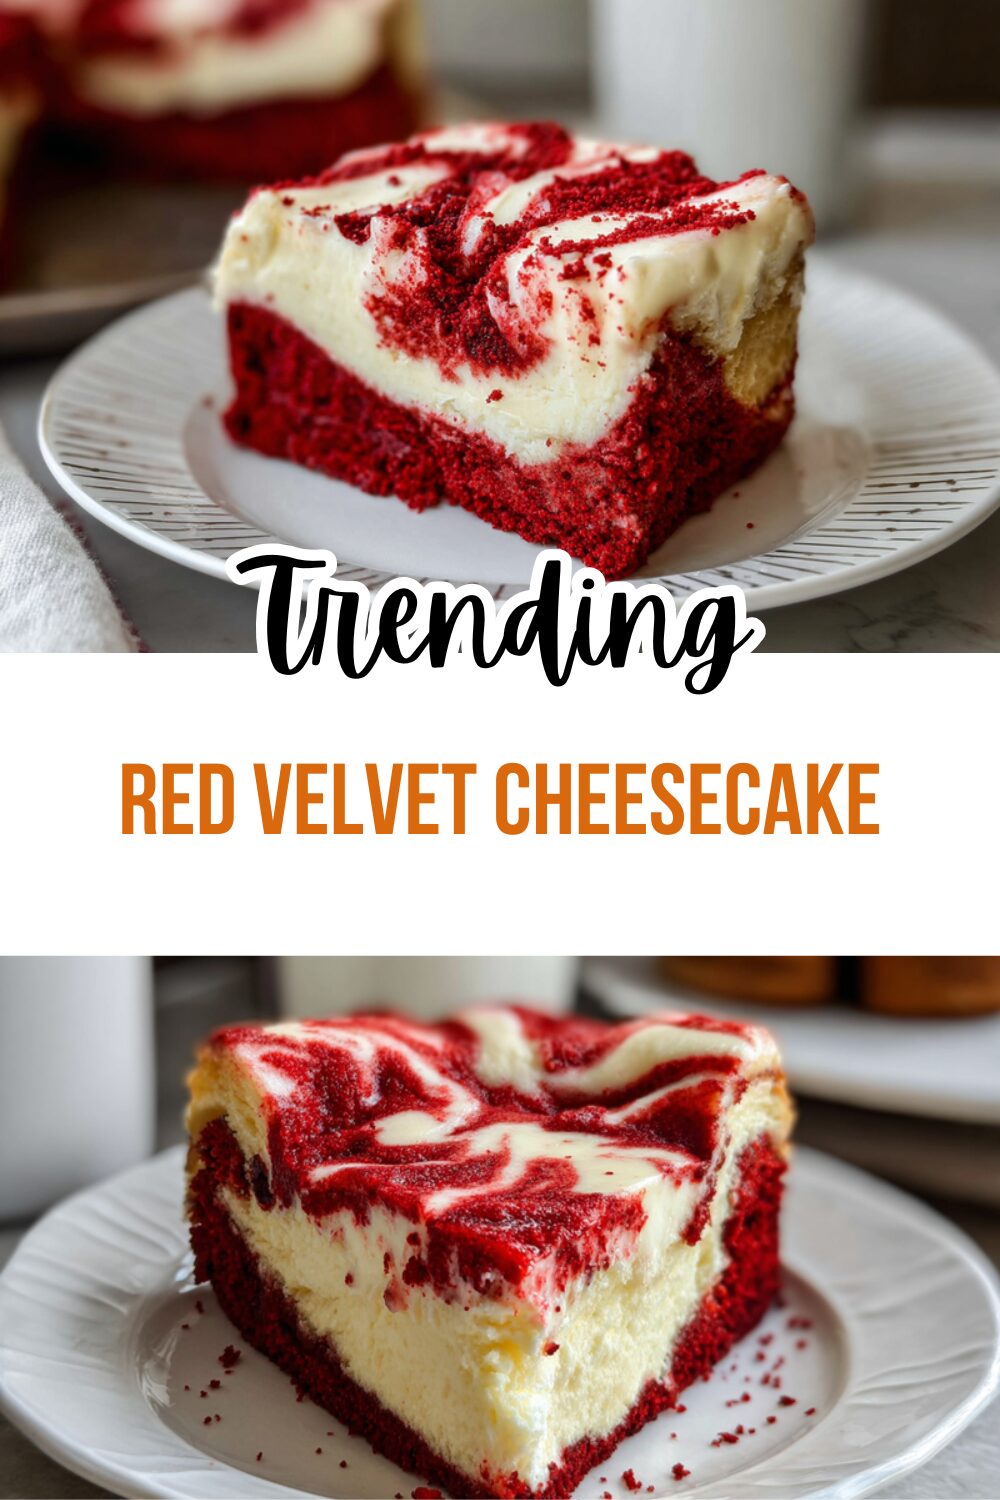
Red Velvet Cheesecake
🍰 This Red Velvet Cheesecake recipe offers a rich chocolate flavor combined with a creamy, velvety texture that impresses any dessert lover.
🎂 It’s a no-bake delight featuring a bold scarlet filling set on a crunchy dark cookie crust, perfect for special occasions or gatherings.
- Total Time: 6 hours 30 minutes
- Yield: 12 slices
Ingredients
– 200g chocolate sandwich cookies (crushed) Forms the sturdy base, providing structure and a chocolatey crunch; for gluten-free, use gluten-free cookies.
– 60g unsalted butter, melted Binds the crumbs together for a firm crust; opt for vegan butter if making a plant-based version.
– 2 tsp unflavored gelatine powder Helps the filling set without baking; for vegan, swap with agar agar to maintain firmness.
– 2 tbsp water Used to bloom the gelatine for a smooth, lump-free mixture; keep it minimal for low-calorie adaptations.
– 1 cup heavy cream, cold from fridge Whipped for lightness and creaminess; substitute with coconut cream for a dairy-free option.
– 500g block cream cheese, softened Creates the velvety base; use a vegan cream cheese alternative for plant-based diets.
– 3/4 cup caster or superfine sugar Sweetens the filling evenly; replace with a low-calorie sweetener for diet-conscious tweaks.
– 1 tsp vanilla extract (real extract) Adds depth and flavor; this is straightforward and works in all variations.
– 150g 70% cocoa chocolate (or dark chocolate), chopped, melted, and cooled until lukewarm with no lumps Infuses rich chocolate flavor and color; choose semi-sweet for milder taste, and ensure it’s dairy-free for vegan needs.
– 6 tsp red food coloring (liquid or gel; gel is more concentrated) Gives the bold red hue; use natural beet powder for a healthier, low-calorie alternative.
– 1 1/4 cups heavy cream, cold Whips up for a fluffy topping; go with coconut cream for vegan substitutions.
– 3 tbsp caster sugar Sweetens the topping lightly; use a sugar-free version for low-calorie options.
– 1 tsp vanilla extract Enhances the topping’s taste; it’s versatile and fits all dietary changes.
– 2 tbsp shaved or grated dark chocolate Adds a decorative, flavorful finish; select dairy-free chocolate for gluten-free or vegan adaptations.
Instructions
1-First Step: Prepare the Pan Begin by flipping the base of a 20cm/8” springform pan upside down and butter it lightly. Line it with parchment paper, making sure there’s excess paper overhanging for easy removal later. Then, clip the sides on and butter and line the sides too. This step helps everything release smoothly and keeps your red velvet cheesecake intact.
2-Second Step: Make the Crust Next, take your 200g of roughly broken chocolate sandwich cookies and blitz them in a food processor until you get fine crumbs. Add the 60g of melted unsalted butter and pulse briefly to combine. Press this mixture firmly into the prepared pan base to form a solid foundation for your cheesecake recipe.
3-Third Step: Bloom the Gelatine Now, sprinkle 2 tsp of unflavored gelatine powder over 2 tbsp of water, stir it evenly, and let it sit for 5 minutes to form a gel. Microwave it for 15 seconds to liquify, give it a stir, and cool for 3-5 minutes until it’s warm but not hot. This ensures a smooth integration into your red velvet cheesecake filling.
4-Fourth Step: Whip the Cream Take 1 cup of cold heavy cream from the fridge and beat it until stiff peaks form. This adds airiness to your how to make red velvet cheesecake, making it light and fluffy. For dietary adaptations, use coconut cream if you’re going dairy-free.
5-Fifth Step: Beat the Cream Cheese Mixture In a separate bowl, beat 500g of softened block cream cheese with 3/4 cup of caster sugar until it’s smooth and fluffy. Add the gelatine liquid and 1 tsp of vanilla extract, then beat well to combine. This base is crucial for the creamy texture, and you can adjust for lower-fat options here if needed.
6-Sixth Step: Add Chocolate and Coloring Melt 150g of 70% cocoa chocolate, let it cool until lukewarm with no lumps, and add it to the mixture along with 6 tsp of red food coloring. Beat everything until you achieve a uniform dark scarlet color. This step really brings out the rich flavor in your easy red velvet cheesecake recipe, so take your time.
7-Seventh Step: Fold in the Whipped Cream Gently fold in one-third of the whipped cream first, then carefully add the remaining cream in stages to retain that airiness. For variations, if you’re making it gluten-free, ensure all ingredients align. Pour the filling onto the crust and smooth the surface before refrigerating for at least 6 hours or until set.
8-Eighth Step: Remove and Decorate Once set, release the sides of the pan and slide the cake off the base using the parchment paper overhang. Peel off the paper from the sides and underneath. Whip 1 1/4 cups of cold heavy cream with 3 tbsp of caster sugar and 1 tsp of vanilla extract until softly whipped, then decorate the center, leaving a border to show the red filling. Sprinkle on 2 tbsp of shaved dark chocolate for the final touch. If you’re into other ideas, check out our pumpkin cheesecake for more inspiration on creamy desserts.
9-Ninth Step: Serve and Enjoy Serve your red velvet cheesecake chilled for the best rich flavor and texture. This final step highlights why this recipe is so beloved it’s straightforward and adaptable. For busy parents, prep it the night before to impress at any gathering.
Notes
🧀 Use block cream cheese rather than spreadable for best texture.
🌈 Quantity of red food coloring is crucial for vibrant color.
❄️ Gelatine must be warm and fully dissolved to avoid lumps and ensure smooth filling.
- Prep Time: 30 minutes
- Chilling time: 6 hours
- Category: Dessert
- Method: No-bake
- Cuisine: American
- Diet: Vegetarian
Nutrition
- Serving Size: 1 slice
- Calories: 540
- Sugar: 29g
- Sodium: 210mg
- Fat: 43g
- Saturated Fat: 25g
- Carbohydrates: 37g
- Fiber: 2g
- Protein: 6g
- Cholesterol: 103mg


