
Why You’ll Love This Pear Pie
Pear pie is a delightful dessert that combines the natural sweetness of fresh pears with warm spices, making it a perfect treat for any occasion. This recipe stands out because it’s incredibly easy to prepare, taking just about 30 minutes of prep time before baking for 50 minutes. You’ll appreciate how it brings together simple ingredients to create a comforting, homemade flavor that’s hard to resist.
One of the biggest draws to this pear pie is its health benefits. Pears are packed with fiber and essential vitamins like vitamin C, helping to support digestion and boost your immune system. Plus, with options to reduce sugar or use whole ingredients, it’s a smarter choice for those watching their calorie intake, as each slice offers around 421 calories and 6 grams of fiber.
- Ease of preparation: This pear pie comes together quickly with straightforward steps, perfect for busy parents or working professionals. The short prep and baking times mean you can whip it up on a weeknight, and the process uses basic kitchen tools that anyone can handle, making it ideal for students or newlyweds starting out.
- Health benefits: Enjoy the nutritional perks, including 341 IU of vitamin A and 6 mg of vitamin C per slice, which support overall wellness. For diet-conscious folks, this recipe adapts easily to lower-sugar options, providing a balance of carbs and protein while keeping things light on the sodium at just 173 mg per serving.
- Versatility: Whether you’re a vegan, gluten-free eater, or looking for low-calorie swaps, this pear pie adjusts seamlessly. It’s great for seniors who want something gentle on the stomach or baking enthusiasts experimenting with flavors, and the spices like cinnamon add a distinctive twist that pairs well with various diets.
- Distinctive flavor: The texture of firm pears like Bartlett or Bosc creates a tender yet structured filling, enhanced by spices such as cinnamon and ginger for a warm, caramelized taste. This sets pear pie apart from other desserts, offering a unique blend that’s not too sweet and pairs beautifully with a crunchy oat topping for added depth.
Throughout, you’ll notice how pear pie integrates into everyday meals, providing a fresh alternative to traditional pies with its moist, flavorful profile. This makes it a go-to for food enthusiasts and travelers seeking comforting home-cooked vibes.
Jump To
- 1. Why You’ll Love This Pear Pie
- 2. Essential Ingredients for Pear Pie
- 3. How to Prepare the Perfect Pear Pie: Step-by-Step Guide
- 4. Dietary Substitutions to Customize Your Pear Pie
- 5. Mastering Pear Pie: Advanced Tips and Variations
- 6. How to Store Pear Pie: Best Practices
- 7. FAQs: Frequently Asked Questions About Pear Pie
- 8. Pear Pie
Essential Ingredients for Pear Pie
Gathering the right ingredients is key to making a delicious pear pie, and this recipe focuses on fresh, simple items that enhance the natural flavors. Each component plays a specific role, from adding sweetness to providing structure, and you can easily adapt for dietary needs like vegan or gluten-free options.
For the Filling
- 6-7 firm pears (peeled and chopped) – Provides the main texture and sweetness, with varieties like Bartlett or Bosc holding their shape during baking.
- 1 tablespoon lemon juice – Helps balance acidity and prevent oxidation, keeping the pears fresh and vibrant.
- 1 tablespoon melted butter – Adds richness and moisture to the filling, though you can swap for plant-based butter in vegan versions.
- 3 tablespoons granulated sugar – Contributes to sweetness and caramelization, enhancing the overall flavor profile.
- 3 tablespoons light brown sugar – Offers a deeper, molasses-like sweetness that complements the spices and pears.
- 3 tablespoons all-purpose flour – Acts as a thickener to absorb excess juices and maintain the filling’s consistency; use gluten-free flour for GF adaptations.
- 1 teaspoon ground cinnamon – Infuses warm spice notes that pair perfectly with pears for a cozy taste.
- 1/4 teaspoon ground ginger – Adds a subtle zing that brightens the filling and supports digestive health.
- 1/8 teaspoon ground cloves – Brings a hint of aromatic depth, though it can be omitted for those who prefer milder flavors.
For the Crumb Topping
- 3/4 cup all-purpose flour – Forms the base of the topping for a crumbly texture; substitute with gluten-free flour if needed.
- 1/2 cup old-fashioned rolled oats – Provides crunch and fiber, making the topping hearty and satisfying.
- 1/2 cup packed light brown sugar – Adds sweetness and helps bind the topping while creating a golden finish.
- 1/4 teaspoon ground cinnamon – Enhances the topping with its warm, spicy aroma that ties into the pear filling.
- 1/8 teaspoon ground nutmeg – Offers a nutty undertone that complements the oats and spices for extra flavor.
- 6 tablespoons salted butter (cut into chunks) – Mixes in to create the crumbly texture; opt for vegan margarine to make it dairy-free.
For special dietary options, consider these tweaks: For vegan pear pie, use plant-based butter and ensure oats are certified gluten-free. Gluten-free versions can swap all flours with a GF blend, while low-calorie adaptations might reduce sugars or use fruit purees to cut down on added sweetness. These changes keep the essence of pear pie intact while making it accessible for everyone.
How to Prepare the Perfect Pear Pie: Step-by-Step Guide
Creating the perfect pear pie starts with proper preparation, ensuring everything goes smoothly from start to finish. Begin by selecting and preparing your pears aim for firm ones like Bosc or Anjou that have a slight give, as they hold up well during baking. Preheat your oven to 375°F (190°C) and get your pie dish ready with a rolled-out crust, which you can chill in the fridge for about 15 minutes to keep it firm.
First Step: Mise en Place
Start by coring and peeling your 6-7 firm pears, then chop them into even pieces for uniform cooking. This step takes around 15-30 minutes, depending on your pears’ ripeness ripe ones in a brown paper bag for 1-3 days if needed. Preheat the oven with a large baking sheet inside to catch any drips, and line your pie pan with the crust, trimming the edges neatly. For gluten-free dough, handle it gently to avoid cracking, and keep it chilled to prevent shrinkage during baking.
Second Step: Explain Filling Assembly
Once your pears are prepped, toss them in a bowl with 1 tablespoon lemon juice, 1 tablespoon melted butter, 3 tablespoons granulated sugar, 3 tablespoons light brown sugar, 3 tablespoons all-purpose flour, 1 teaspoon ground cinnamon, 1/4 teaspoon ground ginger, and 1/8 teaspoon ground cloves. Taste the mixture and adjust sweetness if needed use less sugar for a low-calorie version or a sugar alternative for better control. For vegan variants, swap butter with a plant-based option, ensuring the filling remains juicy yet not overly liquid. Here is the internal link to a related recipe for inspiration: apple salad ideas that can complement your pear pie flavors.
Third Step: Roll and Fit the Crust
Roll out your pie crust on a floured surface, then carefully fit it into the pie pan, pressing it gently against the sides. Chill the dough for another 10-15 minutes to maintain its shape, especially if using gluten-free versions which might be more delicate. Trim any excess dough and crimp the edges for a decorative touch remember, chilling helps prevent the crust from shrinking in the oven, keeping it crisp and golden.
Fourth Step: Assemble the Pie
Pour the pear filling evenly into the chilled crust, making sure it’s spread out for even baking. Dot the top with your prepared crumb topping, which includes 3/4 cup all-purpose flour, 1/2 cup old-fashioned rolled oats, 1/2 cup packed light brown sugar, 1/4 teaspoon ground cinnamon, 1/8 teaspoon ground nutmeg, and 6 tablespoons salted butter mixed in. For dietary needs, use a vegan alternative for the butter, and seal the edges if adding a top crust cut vents to allow steam to escape, or opt for a lattice design for a professional look.
Fifth Step: Bake the Pie
Bake the pie on the preheated baking sheet at 375°F (190°C) for about 50 minutes, or until the filling bubbles and the crust turns golden brown. Watch for signs of doneness like a firm center and caramelized edges adjust baking time by 5-10 minutes for convection ovens or glass pans, which might heat more evenly. If you’re making a low-calorie version, check earlier to avoid over-browning.
Sixth Step: Cool and Set
After baking, let the pie cool on a wire rack for at least 3 hours to allow the filling to thicken fully this step is crucial for the best texture. You can serve it at room temperature or refrigerate for later, which works well for make-ahead meals. For vegan or gluten-free pies, the cooling time remains the same to ensure everything sets properly.
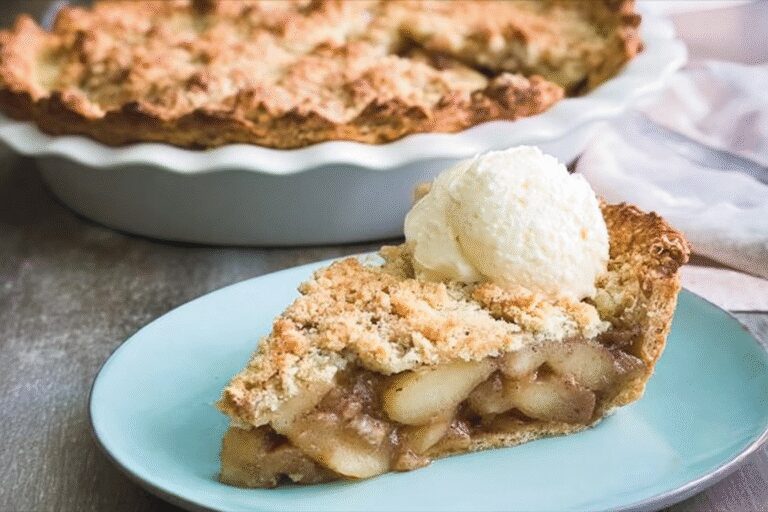
Final Step: Finishing Touches and Serving
Once cooled, add a light dusting of powdered sugar or pair with vanilla ice cream for extra indulgence vegan sorbet is a great alternative. Slice the pie into 8 even portions, with each serving clocking in at around 421 calories. This pear pie is a hit for family gatherings, and you can explore more topping ideas from this external resource: crumble topping techniques to elevate your dessert game.

Dietary Substitutions to Customize Your Pear Pie
Protein and Main Component Alternatives
Swapping ingredients can make your pear pie fit various diets without losing its charm. For instance, replace butter with coconut oil or vegan margarine to keep things creamy and rich while making it dairy-free these options maintain the topping’s texture but add a subtle tropical note. Use arrowroot or tapioca starch instead of all-purpose flour for thickening, which works well for paleo diets and results in a smoother filling. A nut-based crust, like one made from almonds, can substitute traditional dough for added protein, though it might make the pie a bit denser, ideal for nut-free diets if you choose seeds instead.
Vegetable, Sauce, and Seasoning Modifications
Experiment with spices like cardamom or ginger to vary the flavor profile of your pear pie, adding a fresh twist that enhances the fruit’s natural sweetness. Incorporate citrus zest for a zesty lift or try a salted caramel glaze instead of plain sugar for a richer sauce these changes can make the pie juicier and more complex but may require slight adjustments to baking time. For seasonal blends, mix pears with apples or berries, which suits low-calorie preferences and keeps the pie versatile; remember, these swaps are great for gluten-free or vegan eaters when using appropriate bases.
Mastering Pear Pie: Advanced Tips and Variations
Pro Cooking Techniques
To take your pear pie to the next level, try blind-baking the crust for 10 minutes at 375°F to prevent soggy bottoms, a technique that works wonders with GF dough. Control steam by cutting proper vents in the top, and mix pear varieties like Anjou and Bosc for optimal texture adapt for vegan options by using plant-based washes. Glazing the crust with a simple egg mix or its vegan counterpart adds shine and prevents drying out during baking.
Flavor Variations
Add toasted nuts or ginger-citrus peel to the filling for extra crunch and zest, as seen in recipes like this one: brown butter oatmeal cookies for inspiration. Incorporate boozy notes with brandy or try a vanilla-infused base to deepen the flavors of your pear pie, making it adaptable for various dietary needs.
Presentation Tips and Make-Ahead Options
For even slicing, cut pears uniformly and use decorative edges on the crust; par-bake for make-ahead ease and freeze the filling separately for up to 3 months. This keeps pear pie fresh for busy schedules, with adjustments for GF versions ensuring it stays crisp when reheated.
How to Store Pear Pie: Best Practices
Proper storage keeps your pear pie tasting fresh, starting with refrigeration for short-term needs. Cool the pie completely, then cover it loosely with foil or an airtight container and refrigerate for 2-4 days vegan fillings might last a bit longer without dairy. For pies with added elements like custard, check for signs of spoilage earlier.
When freezing for long-term storage, wrap the whole pie or slices tightly in plastic and foil, labeling with the date, and store for up to 2-3 months. Thaw overnight in the fridge and re-crisp the crust in a 325-350°F oven for 10-20 minutes, avoiding the microwave to keep textures intact. Consider batch cooking the filling ahead for meal prep, making pear pie a convenient option for families on the go.

FAQs: Frequently Asked Questions About Pear Pie
Can I make pear pie without cloves, and what are good substitutes?
Yes, you can omit cloves if you or someone in your family doesn’t enjoy the flavor. A common substitute is ground nutmeg, which provides a warm, slightly sweet spice without overpowering the pears. Cinnamon is another popular alternative that pairs well with pear pie. Use about the same amount as the cloves called for in your recipe, adjusting to taste for a balanced flavor.
What type of pears work best for making pear pie?
Firm, slightly tart pears like Bosc, Anjou, or Bartlett are ideal for pear pie because they hold their shape well during baking and offer a nice balance of sweetness and acidity. Avoid very soft or overly ripe pears, as they may turn mushy and release too much liquid, making the pie filling runny.
Can I freeze pear pie, and how should I reheat it?
Yes, pear pie freezes well. Allow the pie to cool completely after baking, then wrap it tightly with plastic wrap and aluminum foil to prevent freezer burn. When ready to enjoy, thaw the pie overnight in the refrigerator and reheat in a preheated oven at 350°F (175°C) for about 15-20 minutes until warmed through and the crust is crisp.
How do I prevent the pear pie crust from becoming soggy?
To avoid soggy crust, try brushing the bottom crust with a thin layer of beaten egg white before adding the filling; this creates a barrier against moisture. Additionally, toss the pear slices with sugar and a small amount of flour or cornstarch to absorb excess juice. Pre-baking the crust (blind baking) slightly before adding the filling can also help keep it crisp.
Can I substitute apples or other fruits in a pear pie recipe?
Absolutely. You can replace pears with apples, peaches, or even a mix of fruits in a pear pie recipe. When using apples, choose sweet-tart varieties like Granny Smith or Honeycrisp. Adjust the sugar and spices accordingly because different fruits have varying sweetness and moisture levels. The crumble topping from a pear pie is also a delicious addition to these fruit variations.
Pear Pie
🍐 This Pear Pie offers a delightful combination of sweet, spiced pears with a crunchy crumb topping, perfect for a comforting homemade dessert.
🥧 With simple steps and classic ingredients, it’s an accessible recipe that delivers rich flavors and a satisfying texture every time.
- Total Time: 4 hours 20 minutes
- Yield: 8 slices 1x
Ingredients
6–7 firm pears peeled and chopped Provides the main texture and sweetness
1 tablespoon lemon juice Helps balance acidity and prevent oxidation
1 tablespoon melted butter Adds richness and moisture to the filling
3 tablespoons granulated sugar Contributes to sweetness and caramelization
3 tablespoons light brown sugar Offers a deeper, molasses-like sweetness
3 tablespoons all-purpose flour Acts as a thickener to absorb excess juices
1 teaspoon ground cinnamon Infuses warm spice notes
1/4 teaspoon ground ginger Adds a subtle zing
1/8 teaspoon ground cloves Brings a hint of aromatic depth
3/4 cup all-purpose flour Forms the base of the topping for a crumbly texture
1/2 cup old-fashioned rolled oats Provides crunch and fiber
1/2 cup packed light brown sugar Adds sweetness and helps bind the topping
1/4 teaspoon ground cinnamon Enhances the topping with its warm, spicy aroma
1/8 teaspoon ground nutmeg Offers a nutty undertone
6 tablespoons salted butter cut into chunks Mixes in to create the crumbly texture
Instructions
1-First Step: Mise en Place: Start by coring and peeling your 6-7 firm pears, then chop them into even pieces for uniform cooking. This step takes around 15-30 minutes, depending on your pears’ ripeness ripe ones in a brown paper bag for 1-3 days if needed. Preheat the oven with a large baking sheet inside to catch any drips, and line your pie pan with the crust, trimming the edges neatly. For gluten-free dough, handle it gently to avoid cracking, and keep it chilled to prevent shrinkage during baking.
2-Second Step: Explain Filling Assembly: Once your pears are prepped, toss them in a bowl with 1 tablespoon lemon juice, 1 tablespoon melted butter, 3 tablespoons granulated sugar, 3 tablespoons light brown sugar, 3 tablespoons all-purpose flour, 1 teaspoon ground cinnamon, 1/4 teaspoon ground ginger, and 1/8 teaspoon ground cloves. Taste the mixture and adjust sweetness if needed use less sugar for a low-calorie version or a sugar alternative for better control. For vegan variants, swap butter with a plant-based option, ensuring the filling remains juicy yet not overly liquid. Here is the internal link to a related recipe for inspiration: apple salad ideas that can complement your pear pie flavors.
3-Third Step: Roll and Fit the Crust: Roll out your pie crust on a floured surface, then carefully fit it into the pie pan, pressing it gently against the sides. Chill the dough for another 10-15 minutes to maintain its shape, especially if using gluten-free versions which might be more delicate. Trim any excess dough and crimp the edges for a decorative touch remember, chilling helps prevent the crust from shrinking in the oven, keeping it crisp and golden.
4-Fourth Step: Assemble the Pie: Pour the pear filling evenly into the chilled crust, making sure it’s spread out for even baking. Dot the top with your prepared crumb topping, which includes 3/4 cup all-purpose flour, 1/2 cup old-fashioned rolled oats, 1/2 cup packed light brown sugar, 1/4 teaspoon ground cinnamon, 1/8 teaspoon ground nutmeg, and 6 tablespoons salted butter mixed in. For dietary needs, use a vegan alternative for the butter, and seal the edges if adding a top crust cut vents to allow steam to escape, or opt for a lattice design for a professional look.
5-Fifth Step: Bake the Pie: Bake the pie on the preheated baking sheet at 375°F (190°C) for about 50 minutes, or until the filling bubbles and the crust turns golden brown. Watch for signs of doneness like a firm center and caramelized edges adjust baking time by 5-10 minutes for convection ovens or glass pans, which might heat more evenly. If you’re making a low-calorie version, check earlier to avoid over-browning.
6-Sixth Step: Cool and Set: After baking, let the pie cool on a wire rack for at least 3 hours to allow the filling to thicken fully this step is crucial for the best texture. You can serve it at room temperature or refrigerate for later, which works well for make-ahead meals. For vegan or gluten-free pies, the cooling time remains the same to ensure everything sets properly.
7-Final Step: Finishing Touches and Serving: Once cooled, add a light dusting of powdered sugar or pair with vanilla ice cream for extra indulgence vegan sorbet is a great alternative. Slice the pie into 8 even portions, with each serving clocking in at around 421 calories. This pear pie is a hit for family gatherings, and you can explore more topping ideas from this external resource: crumble topping techniques to elevate your dessert game.
Notes
🍐 Use firm pears like Bartlett, Anjou, or Bosc for best texture.
❄️ Pie can be made ahead, refrigerated, or frozen (crust and filling separately or baked whole).
🌰 Add chopped pecans to crumb topping for extra crunch and flavor.
- Prep Time: 30 minutes
- Cooling time: 3 hours
- Cook Time: 50 minutes
- Category: Dessert, Pie
- Method: Baking
- Cuisine: American
Nutrition
- Serving Size: 1 slice
- Calories: 421
- Sugar: 35g
- Sodium: 173mg
- Fat: 16g
- Saturated Fat: 8g
- Carbohydrates: 68g
- Fiber: 6g
- Protein: 4g
- Cholesterol: 26mg


