
Introduction to Peanut Butter Balls
Welcome to a delightful world where simplicity meets deliciousness. The peanut butter balls recipe is a stellar choice for everyone, whether you’re a busy parent, a student, or a culinary enthusiast. These no-bake delights are not only incredibly easy to make but also vegan and gluten-free, with health benefits that appeal to diet-conscious individuals. Get ready to savor the rich, creamy taste of peanut butter complemented by a smooth chocolate coating. Packed with flavor and crunch, peanut butter balls are perfect for gift-giving and holiday cookie trays. Let’s dive into the charming flavors and joy they bring!
Jump To
- 1. Introduction to Peanut Butter Balls
- 2. Benefits and Advantages of Peanut Butter Balls
- 3. Ingredients Overview
- 4. How to Prepare the Perfect Peanut Butter Balls: Step-by-Step Guide
- 5. Mastering Peanut Butter Balls: Advanced Tips and Variations
- 6. How to Store Peanut Butter Balls: Best Practices
- 7. Nutritional Value of Peanut Butter Balls
- 8. FAQs: Frequently Asked Questions About Peanut Butter Balls
- 9. Peanut Butter Balls Recipe
Benefits and Advantages of Peanut Butter Balls
Peanut butter balls stand out due to their ease of preparation and delightful taste that caters to a variety of diets. These treats require minimal ingredients, saving both time and effort, which makes them ideal for professionals and home cooks alike. Rich in protein and healthy fats, peanut butter provides long-lasting energy, making the balls a nutritious snack option. Additionally, their versatility allows endless customization, from using different chocolates to incorporating diverse add-ins. Whether you’re planning a holiday feast or looking for a quick indulgence, the balance of sweet and salty in these goodies makes them unforgettable!

Ingredients Overview
Essential Ingredients for Peanut Butter Balls
Creating peanut butter balls is straightforward, requiring just a few key ingredients that most home cooks already have in their pantry. Here’s a detailed list of essential ingredients to ensure your peanut butter balls turn out perfectly:
- Creamy Peanut Butter: The star ingredient, providing the rich, nutty flavor that forms the core of these balls.
- Butter: Softened to room temperature, it adds a rich, creamy texture. You can opt for salted or unsalted depending on your taste preference.
- Powdered Sugar: This ingredient sweetens the mixture and helps the peanut butter balls hold their shape.
- Vanilla Extract: A splash of vanilla enhances the flavor, adding a warm, aromatic undertone.
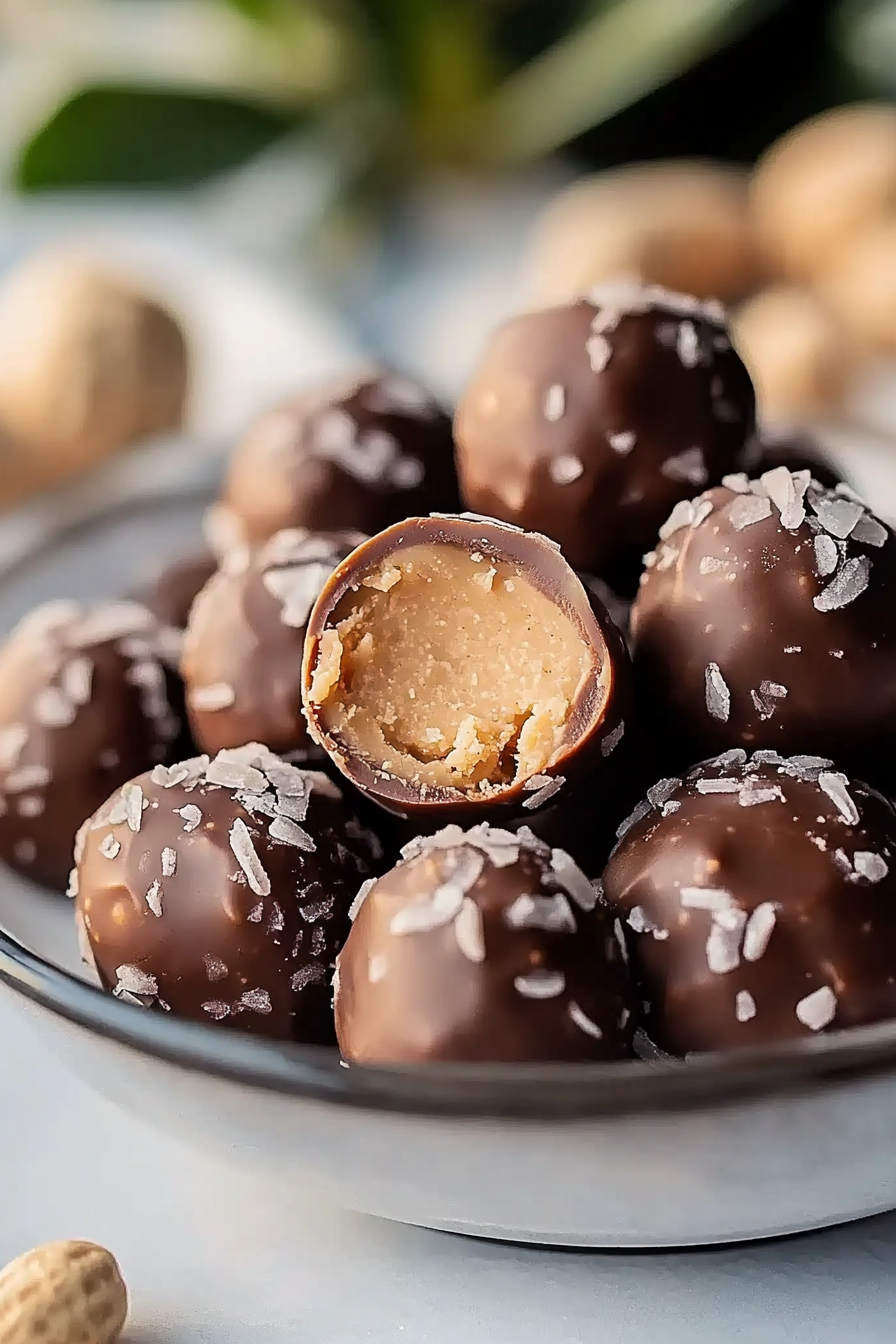
- Chocolate Coating: Typically semi-sweet chocolate or candy melts are used for a glossy, sweet outer layer. Adding a teaspoon of vegetable oil can help in ensuring a smooth coating.
Optional ingredients add texture and a twist to the traditional recipe:
- Graham Cracker Crumbs: These crumbs can be mixed into the batter for structure and added flavor.
- Rice Cereal: A crunchy element that gives the balls a pleasant texture.
Dietary Substitutions to Customize Your Peanut Butter Balls
For those with specific dietary needs, here are some substitutions and alternatives to maintain flavor and texture:
- Vegan Peanut Butter Balls: Use vegan butter and vegan chocolate chips. Ensure your sugar is vegan-friendly too.
- Gluten-Free Variation: Ensure that all ingredients, particularly the peanut butter and additional elements like graham cracker crumbs or cereal, are labeled gluten-free.
- Low-Calorie Option: Substitute regular peanut butter with a low-calorie or reduced-fat version, and use dark chocolate for coating.
Each of these substitutions allows you to enjoy peanut butter balls while tailoring the recipe to your personal or dietary preferences. For further culinary inspiration, check out our Chocolate Chip Cookie Dough Dip.
How to Prepare the Perfect Peanut Butter Balls: Step-by-Step Guide
Creating perfect peanut butter balls is a delightful and rewarding process. Here’s a step-by-step guide to ensure success:
First Step: Combine the Ingredients
In a large bowl, combine the creamy peanut butter, softened butter, powdered sugar, and vanilla extract. Mix thoroughly until you achieve a smooth and creamy consistency. This forms the delicious base of your peanut butter balls.
Second Step: Refrigerate the Mixture
Once your mixture is well-combined, chill it in the refrigerator for about 15-30 minutes. Chilling is crucial as it helps to firm up the mixture, making it easier to roll into balls later on.
Third Step: Roll into Balls
After chilling, take the mixture out of the fridge. Using your hands or a small cookie scoop, form the mixture into 1-inch balls, placing them on a baking sheet lined with parchment paper. If desired, add in optional ingredients like graham cracker crumbs or rice cereal at this stage.
Fourth Step: Chill Again
Place the rolled balls back into the refrigerator for another 15-20 minutes. Adequately chilling these balls ensures they maintain their shape during the chocolate coating process.
Fifth Step: Melt the Chocolate
While the balls are chilling, melt your semi-sweet chocolate or candy melts. Use a heat-proof bowl set over a pot of simmering water, or microwave in short bursts, stirring frequently to avoid overheating. Adding a small amount of vegetable oil will help the chocolate achieve a smooth consistency.
Sixth Step: Dip the Balls in Chocolate
Using forks or a candy dipping tool, carefully dip each ball into the melted chocolate, ensuring even coverage. Allow excess chocolate to drip off before placing the balls back on the lined baking sheet.
Seventh Step: Decorate and Final Chill
If desired, decorate your chocolate-coated peanut butter balls with sprinkles or an extra drizzle of chocolate. Return the balls to the refrigerator to set the chocolate layer completely, which should take about 30 minutes.
Following these steps will give you delectable peanut butter balls ready to enjoy or gift. Store properly for optimal freshness. Explore more dessert ideas, such as our Nutella Bread Bombs, to expand your culinary repertoire.
Mastering Peanut Butter Balls: Advanced Tips and Variations
Creating the perfect peanut butter balls requires not just a good recipe but also the right techniques and creative variations. Mastering these tips can significantly enhance the texture and taste, turning a simple treat into a gourmet experience.
Advanced Tips for Perfect Peanut Butter Balls
To start, using processed peanut butter instead of natural types is crucial. Processed peanut butter provides a smoother texture and holds better when mixed with other ingredients. Before mixing, ensure your butter is softened to room temperature—this will make the blending process much smoother.
When it comes to dipping in chocolate, adding a teaspoon of vegetable oil to melted chocolate can make the coating process easier, especially if you want a thin, even layer. Use forks or dipping tools instead of fingers to avoid fingerprints and ensure each ball is evenly coated. If you’re aiming for a professional look, consider decorating your peanut butter balls with a drizzle of white chocolate or sprinkles for added visual appeal.
Experiment with Exciting Variations
For those who love tweaking recipes, consider replacing creamy peanut butter with almond or cashew butter for a different flavor profile. Adding crushed pretzels or Rice Krispies can introduce a delightful crunch and vary the texture. For a candy-like experience, try alternating semi-sweet chocolate with milk or dark chocolate.
Create holiday-themed versions by adding colored sprinkles or festive nuts. If you prefer to keep it healthy, experiment with using sunflower seed butter and dark chocolate with a high cacao percentage. Each new variation offers a unique twist, making these treats versatile enough to cater to all taste preferences.
How to Store Peanut Butter Balls: Best Practices
Proper storage of peanut butter balls is essential to maintain their freshness and flavor. By following these storage best practices, you can ensure your treats are always ready to enjoy.
Refrigeration and Short-Term Storage
Once your peanut butter balls are prepared and coated, allow them to chill properly. Store the finished treats in an airtight container in the refrigerator. They can last up to two weeks when stored under these conditions. Ensure that there are layers of parchment paper between the balls to prevent them from sticking together.
Freezing for Longer Shelf Life
If you plan to store peanut butter balls for an extended period, freezing is the best option. After the chocolate coating hardens, place them in a freezer-safe container, again using parchment paper to separate the layers. These can be stored in the freezer for up to a month.
When you’re ready to enjoy them, simply thaw them in the refrigerator for a few hours. Avoid shocking them with abrupt temperature changes as this can affect the texture of the chocolate coating.

Nutritional Value of Peanut Butter Balls
Peanut butter balls are not only a delightful sweet treat but also pack a punch when it comes to nutrition. These bites offer a substantial amount of energy, making them a suitable option for a quick boost during a busy day. Let’s take a closer look at what these tiny powerhouses provide nutritionally.
Caloric Content and Macronutrients
Each peanut butter ball typically contains around 100 calories. This number can vary slightly depending on the exact ingredients and serving size, so be mindful of portion control if you’re watching your calorie intake. Additionally, these treats offer a balanced mix of macronutrients:
- Fat: Primarily healthy fats from peanut butter, each serving contains about 6-8 grams of fat. These fats are critical for a range of bodily functions and help keep you feeling full.
- Protein: Peanut butter is a good source of protein. Each ball provides approximately 3-4 grams, helping with muscle repair and growth.
- Carbohydrates: The sugar content, mainly from powdered sugar, contributes to around 9 grams of carbohydrates per ball. This, along with an optional chocolate coating, provides the quick energy boost.
Vitamins and Minerals
While indulging in these treats, you can benefit from a selection of vitamins and minerals present in the ingredients:
- Vitamin E: Found in peanuts, this antioxidant supports skin health and immune function.
- Magnesium: Essential for muscle and nerve function, magnesium is also present in small amounts.
- Iron and Potassium: Both are integral to maintaining healthy blood cells and regulating fluid balance.
For those following specific dietary plans, consider integrating these peanut butter balls into a balanced diet. If you wish to control sugar and calorie intake further, explore modifications and alternatives in our recipe section.
FAQs: Frequently Asked Questions About Peanut Butter Balls
Why are my peanut butter balls too soft?
If you find that your peanut butter balls are turning out too soft, it’s likely due to either insufficient chilling time or not using enough dry ingredients like powdered sugar or graham cracker crumbs. Ensure the mixture is well-chilled before forming balls, and consider adding more dry ingredients if needed.
Can I use crunchy peanut butter instead of creamy peanut butter?
Absolutely! Using crunchy peanut butter can add an interesting texture to your peanut butter balls. Just be mindful that the consistency might change slightly, and you may need additional mixing to bind everything together.
How long do peanut butter balls keep in the refrigerator and freezer?
Peanut butter balls can be stored in an airtight container in the refrigerator for about 1-2 weeks. If you wish to keep them longer, freezing is an excellent option, and they will remain fresh for up to one month. Ensure they are well-coated and packed to avoid freezer burn.
What type of chocolate is best for coating peanut butter balls?
While semi-sweet chocolate is the most commonly used for its balance of sweetness and bitterness, feel free to experiment with other types like dark chocolate or milk chocolate, depending on your taste preference. Candy melts are also an option for a smoother finish.
For more tips and creative variations in creating your peanut butter balls, explore additional resources like this fascinating read on Buckeye candies.
Print
Peanut Butter Balls Recipe
🍫✨ Indulge in these rich, chocolate-dipped Peanut Butter Balls – a no-bake treat that’s perfect for holidays, gift-giving, or satisfying your sweet tooth! ✨🥜
🎁❄️ With a creamy, nutty center and a smooth chocolate coating, they’re easy to make, freezer-friendly, and taste just like Reese’s – a must-try delight! ❄️🍬
- Total Time: 30 minutes
Ingredients
Creamy peanut butter
Butter (softened)
Powdered sugar
Vanilla extract
(Optional) Graham cracker crumbs
(Optional) Rice cereal
Semi-sweet chocolate or candy melts
(Optional) Sprinkles for decoration
(Optional) Additional chocolate for drizzling
(Optional) Vegetable oil for thinning chocolate
Instructions
1. Soften butter to room temperature.
2. In a mixing bowl, combine peanut butter, softened butter, powdered sugar, and vanilla extract.
3. Mix until smooth and well combined.
4. If desired, add optional ingredients like graham cracker crumbs or rice cereal for texture.
5. Roll the mixture into small balls, about 1 inch in diameter.
6. Place the peanut butter balls on a lined baking sheet.
7. Chill in the refrigerator for at least 30 minutes to firm up.
8. Melt semi-sweet chocolate or candy melts in a microwave or double boiler.
9. Add a little vegetable oil if the chocolate needs thinning for easier dipping.
10. Use forks or dipping tools to dip each peanut butter ball into the melted chocolate.
11. Let excess chocolate drip off before placing dipped balls back on the lined baking sheet.
12. Optionally, decorate with sprinkles or drizzle with additional melted chocolate.
13. Chill again until the chocolate coating is fully set.
14. Store peanut butter balls in the refrigerator for up to 1-2 weeks or freeze for up to 1 month.
15. Serve and enjoy as a rich, no-bake treat perfect for holidays or gift-giving.
Notes
Use processed peanut butter instead of natural varieties to get a smoother texture and prevent the mixture from becoming too oily or dry.
Chill the peanut butter balls before dipping them in chocolate to help them hold their shape and make coating easier.
Add a small amount of vegetable oil to melted chocolate to create a smoother consistency for dipping.
- Prep Time: 30
- Category: Dessert
- Method: No Bake
- Cuisine: American


