
Why You’ll Love This Peanut Butter Oreo Bars
If you’re looking for a Peanut Butter Oreo Bars recipe that’s as easy as it is delicious, you’ve come to the right place. These bars blend the classic crunch of Oreo cookies with the creamy goodness of peanut butter, making them a hit for busy parents or anyone craving a quick homemade treat. With minimal prep and options for all dietary needs, it’s no wonder they’re a favorite among home cooks and baking enthusiasts alike.
One of the best parts about Peanut Butter Oreo Bars is how fast they come together.Ease of preparation stands out, as these bars are ready in under 30 minutes with just a few simple steps. Crushing Oreo cookies and melting butter creates a simple crust, while mixing creamy peanut butter with powdered sugar or cream cheese forms an easy spreadable filling. No specialized equipment required just a food processor or a zip-top bag and rolling pin so making these feels fast and approachable for bakers of any skill level. The recipe scales well and includes quick oven time or chill-only options for no-bake variations.
Beyond the speed, these bars offer some health benefits that make them stand out. While indulgent, they provide protein and healthy fats from natural peanut butter, plus calcium if dairy ingredients are used. Substituting natural peanut butter and reduced-sugar sweeteners lowers added sugar and increases heart-healthy monounsaturated fats. Portions control and ingredient swaps, like using Greek yogurt or low-fat cream cheese, make these easier to fit into balanced meal plans without losing the classic Oreo-peanut butter flavor.
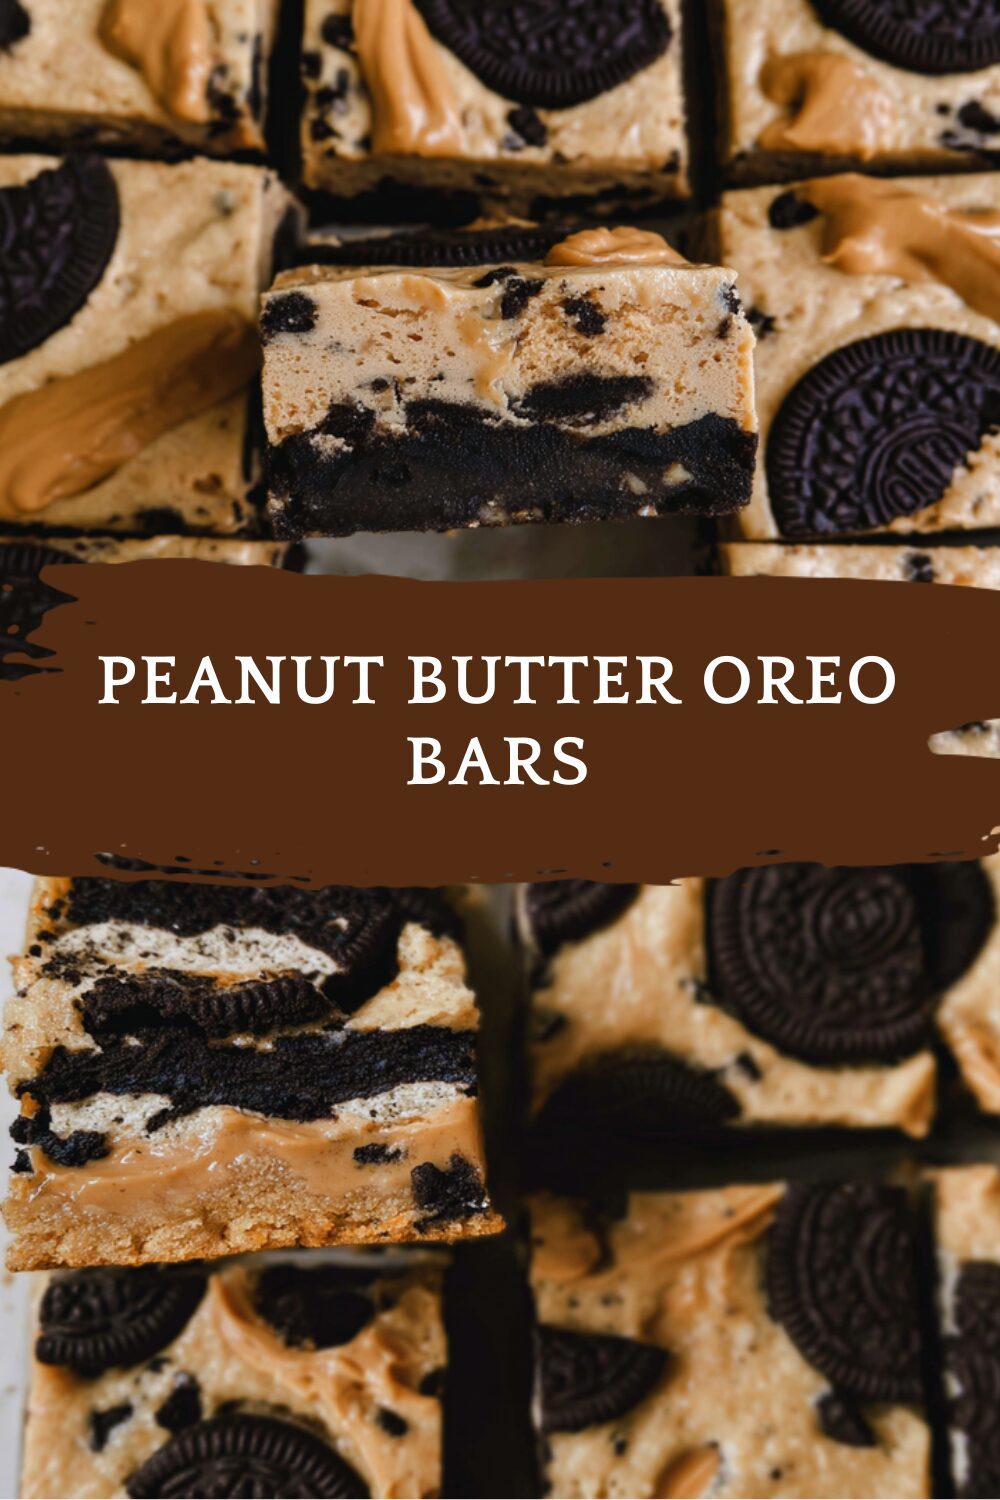
Plus, the versatility of Quick Peanut Butter Oreo Bars lets you adapt them to fit any lifestyle. This recipe works for dietary needs, such as using vegan cookies and dairy-free chocolate for a plant-based version, or swapping gluten-free sandwich cookies for those avoiding gluten. The base, filling, and topping are modular, letting you tweak texture and sweetness to your liking. Finally, the distinctive flavor profile creates a craveable sweet-salty mix that sets Homemade Peanut Butter Oreo Bars apart from everyday desserts. The contrast of crunchy Oreo cookie crust and silky peanut butter filling, finished with a glossy chocolate layer, makes every bite unforgettable.
Jump To
- 1. Why You’ll Love This Peanut Butter Oreo Bars
- 2. Essential Ingredients for Peanut Butter Oreo Bars
- 3. How to Prepare the Perfect Peanut Butter Oreo Bars: Step-by-Step Guide
- 4. Dietary Substitutions to Customize Your Peanut Butter Oreo Bars
- 5. Mastering Peanut Butter Oreo Bars: Advanced Tips and Variations
- 6. How to Store Peanut Butter Oreo Bars: Best Practices
- 7. FAQs: Frequently Asked Questions About Peanut Butter Oreo Bars
- 8. Peanut Butter Oreo Bars
Essential Ingredients for Peanut Butter Oreo Bars
Gathering the right ingredients is key to making perfect Peanut Butter Oreo Bars. This section breaks down everything you need, focusing on precise measurements to ensure your recipe turns out just right. Below is a structured list of all the essentials, pulled directly from the recipe details for easy reference.
- 24 Oreo cookies (about 360 g / 12 15 cookies per standard 14.3 oz pack) – Crushed to form the crunchy base and provide the classic Oreo flavor for these Peanut Butter Oreo Bars.
- 1/2 cup (115 g) unsalted butter, melted – Binds the crushed cookies into a firm crust and adds richness; use coconut oil for dairy-free bars.
- 1 cup (240 g) creamy peanut butter – The main flavor and protein source; provides moisture and the signature peanut taste.
- 8 oz (225 g) cream cheese, softened – Adds creaminess and stabilizes the filling; can be swapped for vegan cream cheese in dairy-free versions.
- 1 cup (120 g) powdered sugar – Sweetens and helps thicken the peanut butter layer; replace with erythritol or powdered monk fruit for a lower-calorie option.
- 1 tsp vanilla extract – Enhances depth of flavor and balances sweetness.
- 1 cup (170 g) semi-sweet chocolate chips – Melted for the glossy top layer that seals the bars and adds chocolate contrast; use dairy-free chips for vegan brownies.
- 2 tbsp heavy cream or non-dairy milk – Smooths the melted chocolate and controls pourability.
- For Special Dietary Options, consider these adjustments: Use dairy-free margarine or coconut oil instead of butter, plant-based cream cheese, vegan sandwich cookies, and dairy-free chocolate chips for vegan versions. Swap regular sandwich cookies for certified gluten-free ones and check labels for low-calorie options like natural lower-sugar peanut butter or powdered erythritol.
How to Prepare the Perfect Peanut Butter Oreo Bars: Step-by-Step Guide
First Steps and Preparation
Getting started with Peanut Butter Oreo Bars is simple and fun. Begin by preheating the oven to 350°F (175°C) if you’re baking the crust, or line an 8×8-inch (20×20 cm) baking pan with parchment paper for a no-bake option. Measure out your ingredients like 24 Oreo cookies, 1/2 cup melted butter, 1 cup peanut butter, and the rest to keep things organized. For adaptations, have plant-based butter or gluten-free cookies ready to make Homemade Peanut Butter Oreo Bars that suit everyone’s needs.
Creating the Oreo Crust
Now, let’s make the base that gives these bars their signature crunch. Place the Oreo cookies in a food processor and pulse to fine crumbs, or use a zip-top bag and a rolling pin for a hands-on approach. Mix the crumbs with melted butter until evenly moistened, then press firmly into the pan. You can chill it for 10 minutes or bake for 8 10 minutes at 350°F to set it, creating a sturdy foundation for your Quick Peanut Butter Oreo Bars.
Next up is the filling, which brings everything together.
Mixing and Assembling the Layers
In a bowl, beat softened cream cheese until smooth, then add peanut butter and powdered sugar to form a spreadable mix. For lower-calorie options, swap in erythritol or Greek yogurt. Spread this over the cooled crust, smooth it out, and prepare the chocolate topping by melting chocolate chips with cream. Finally, pour the chocolate over the top and chill everything for 1 2 hours. Once set, cut into bars and enjoy the tasty results of your Peanut Butter Oreo dessert.
| Step | Key Action | Tips for Success |
|---|---|---|
| 1. Preheat | Set oven to 350°F | Use parchment for easy release |
| 2. Crust | Crush and press | Chill for firmness |
| 3. Filling | Mix and spread | Adjust for dietary needs |
| 4. Topping | Melt and layer | Chill to set |

Dietary Substitutions to Customize Your Peanut Butter Oreo Bars
One great thing about Peanut Butter Oreo Bars is how easy they are to tweak for different preferences. Whether you’re aiming for more protein or a nut-free version, these swaps keep the bars tasty and inclusive. For instance, try swapping peanut butter for almond butter to add a milder flavor while maintaining that creamy texture.
- Protein alternatives: Use natural peanut butter or fold in protein powder for a boost.
- Nut-free options: Go with sunflower seed butter to keep the recipe allergy-friendly.
- Flavor adds: Mix in spices like cinnamon for a warm twist.
This flexibility makes Quick Peanut Butter Oreo Bars perfect for family gatherings, as everyone can enjoy their own version.For more ideas on similar treats, check out our recipe for peanut butter chocolate molten lava cake that pairs great flavors. Also, learn more about healthy baking with this external resource on wellness in cooking.
Mastering Peanut Butter Oreo Bars: Advanced Tips and Variations
Pro Techniques for Better Results
To take your Homemade Peanut Butter Oreo Bars to the next level, focus on details like using a food processor for fine crumbs. Tempering chocolate ensures a shiny finish, and chilling between layers keeps everything neat. These tips help create bars that look and taste professional without much extra effort.
Fun Flavor Ideas
Experiment with variations, such as adding pumpkin spice for fall or toasted coconut for a tropical vibe. Presentation matters too, so garnish with sea salt or a drizzle for eye-catching results. Plus, you can make these ahead and freeze them for convenience, making Peanut Butter Oreo dessert ideal for busy schedules. For a related treat, visit our guide on carrot cake cheesecake bars.
How to Store Peanut Butter Oreo Bars: Best Practices
Proper storage keeps your Peanut Butter Oreo Bars fresh and delicious. Refrigerate them in an airtight container for up to 5 days, using parchment to separate layers. For longer keep, freeze for three months and thaw in the fridge. This way, you can enjoy Quick Peanut Butter Oreo Bars anytime, perfect for meal prep or snacks. When serving, let them sit out briefly for the best texture, and always label for dietary notes.
FAQs: Frequently Asked Questions About Peanut Butter Oreo Bars
Print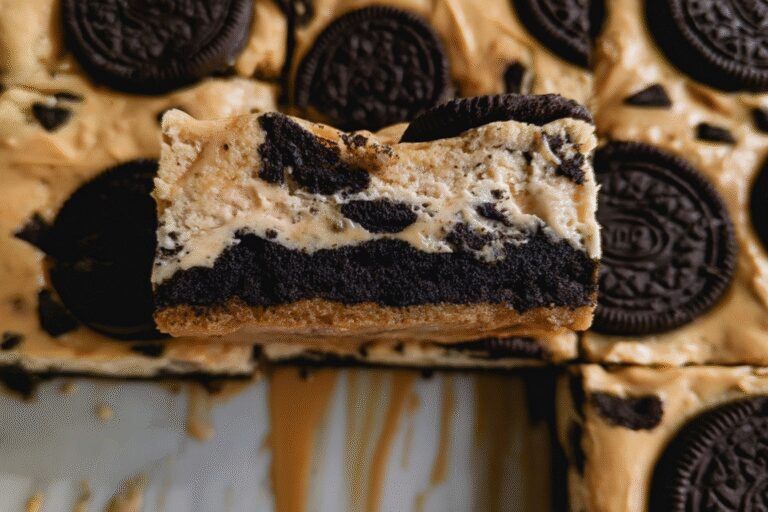
Peanut Butter Oreo Bars
🥪 Experience the perfect combination of creamy peanut butter and crunchy Oreo cookies in these quick homemade bars that deliver an irresistible sweet and salty flavor in every bite
🍪 These easy-to-make dessert bars are perfect for last-minute gatherings, game nights, or when you need a satisfying treat that combines two favorite flavors into one delicious bar
- Total Time: 1 hour 35 minutes
- Yield: 16 bars
Ingredients
– 24 Oreo cookies Crushed to form the crunchy base and provide the classic Oreo flavor
– 1/2 cup unsalted butter Binds the crushed cookies into a firm crust and adds richness
– 1 cup creamy peanut butter The main flavor and protein source; provides moisture and the signature peanut taste
– 8 oz cream cheese Adds creaminess and stabilizes the filling
– 1 cup powdered sugar Sweetens and helps thicken the peanut butter layer
– 1 tsp vanilla extract Enhances depth of flavor and balances sweetness
– 1 cup semi-sweet chocolate chips Melted for the glossy top layer that seals the bars and adds chocolate contrast
– 2 tbsp heavy cream or non-dairy milk Smooths the melted chocolate and controls pourability
Instructions
1-Getting started with Peanut Butter Oreo Bars is simple and fun. Begin by preheating the oven to 350°F (175°C) if you’re baking the crust, or line an 8×8-inch (20×20 cm) baking pan with parchment paper for a no-bake option. Measure out your ingredients like 24 Oreo cookies, 1/2 cup melted butter, 1 cup peanut butter, and the rest to keep things organized. For adaptations, have plant-based butter or gluten-free cookies ready to make Homemade Peanut Butter Oreo Bars that suit everyone’s needs.
2-Now, let’s make the base that gives these bars their signature crunch. Place the Oreo cookies in a food processor and pulse to fine crumbs, or use a zip-top bag and a rolling pin for a hands-on approach. Mix the crumbs with melted butter until evenly moistened, then press firmly into the pan. You can chill it for 10 minutes or bake for 8 10 minutes at 350°F to set it, creating a sturdy foundation for your Quick Peanut Butter Oreo Bars.
3-In a bowl, beat softened cream cheese until smooth, then add peanut butter and powdered sugar to form a spreadable mix. For lower-calorie options, swap in erythritol or Greek yogurt. Spread this over the cooled crust, smooth it out, and prepare the chocolate topping by melting chocolate chips with cream. Finally, pour the chocolate over the top and chill everything for 1 2 hours. Once set, cut into bars and enjoy the tasty results of your Peanut Butter Oreo dessert.
Notes
🥜 Use creamy peanut butter for the best texture – crunchy peanut butter can make the bars difficult to cut and may affect the smooth consistency
🍪 Don’t overmix the Oreo pieces into the peanut butter mixture – you want distinct chunks of Oreo throughout the bars for better texture and flavor distribution
❄️ For cleaner cuts, chill the bars in the refrigerator for 30 minutes before slicing – this helps the peanut butter mixture set firmly and prevents crumbling
- Prep Time: 10 minutes
- Cooling Time: 1 hour
- Cook Time: 25 minutes
- Category: Dessert
- Method: Baking
- Cuisine: American
- Diet: Vegetarian
Nutrition
- Serving Size: 1 bar
- Calories: 245
- Sugar: 16g
- Sodium: 185mg
- Fat: 15g
- Saturated Fat: 6g
- Unsaturated Fat: 8g
- Trans Fat: 0g
- Carbohydrates: 23g
- Fiber: 1g
- Protein: 6g
- Cholesterol: 10mg


