
Why You’ll Love This Monster Cookies
If you’re a fan of simple, satisfying treats that bring the whole family together, these monster cookies are a game-changer! They combine chewy oats and rich peanut butter for a texture that’s just irresistible. Not only are they packed with flavor, but they’re also quick to whip up, making them perfect for busy days.
One big plus is how easy they are to prepare. Just mix a few basic ingredients and pop them in the oven, and you’re done in under 30 minutes! Plus, the health benefits shine through with ingredients like oats that add fiber to keep you feeling full longer. You can tweak them for different diets, like using nut-free alternatives, so everyone can enjoy them.
- Ease of preparation: These cookies come together in just 15 minutes of prep, ideal for busy parents or students who need something fast and fuss-free. No fancy tools required, just a bowl and a spoon, and you’ll have homemade goodies ready to bake!
- Health benefits: With rolled oats providing fiber and a touch of protein from peanut butter, these treats support steady energy without overloading on sugar. They’re a smarter choice for diet-conscious folks, offering about 191 calories per cookie while sneaking in nutrients like potassium and iron.
- Versatility: Adapt these to fit your needs, whether it’s going gluten-free or vegan by swapping ingredients. That makes them great for food enthusiasts exploring new flavors or newlyweds starting their kitchen adventures together.
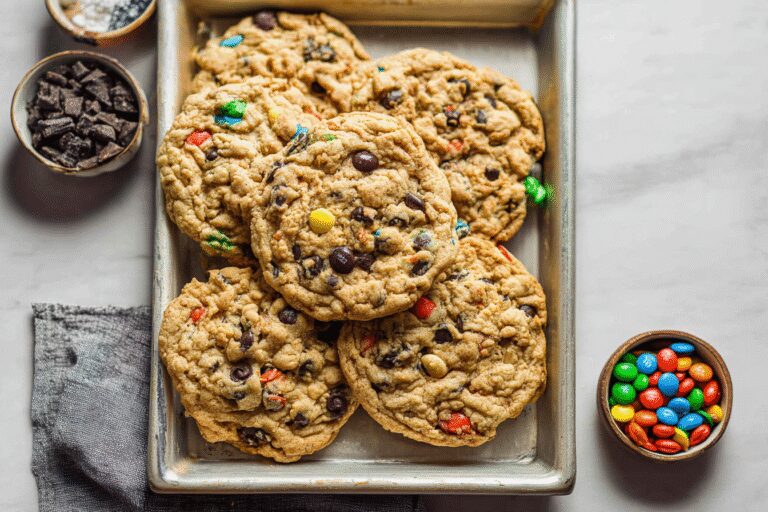
- Distinctive flavor: The mix of chocolate chips and candy-coated pieces creates a colorful, chunky bite that’s far from ordinary. It’s like a party in every cookie, perfect for baking enthusiasts who love that satisfying crunch and chew!
This recipe stands out because it’s not just tasty it’s a fun way to get kids involved in the kitchen. Picture your family munching on these warm, thick delights after school. For more ideas on oat-based treats, check out our brown butter oatmeal choc chip cookies for another easy favorite.
Jump To
- 1. Why You’ll Love This Monster Cookies
- 2. Essential Ingredients for Monster Cookies
- 3. How to Prepare the Perfect Monster Cookies: Step-by-Step Guide
- 4. Protein and Main Component Alternatives
- 5. Vegetable, Sauce, and Seasoning Modifications
- 6. Mastering Monster Cookies: Advanced Tips and Variations
- 7. How to Store Monster Cookies: Best Practices
- 8. FAQs: Frequently Asked Questions About Monster Cookies
- 9. Monster Cookies
Essential Ingredients for Monster Cookies
When it comes to making the perfect monster cookies, picking the right ingredients is key to that chewy, flavorful result. Each one plays a role in creating those thick, colorful treats that everyone loves. Let’s break it down so you can see exactly what makes this recipe tick.
This section focuses on the main ingredients with their precise measurements, plus some tips on why they’re important. We’ll also touch on special dietary options to make these cookies adaptable for all kinds of eaters. Remember, accurate measuring ensures your cookies turn out just right every time!
Main Ingredients with Measurements and Benefits
- 1/2 cup butter (115 g) – This provides the rich base that makes the cookies soft and spread just enough; using room temperature butter helps it mix smoothly for a better texture.
- 1/2 cup granulated sugar (100 g) – Adds sweetness and helps with browning, giving those edges a delightful crisp while balancing the flavors in the dough.
- 1/2 cup brown sugar (110 g) – Brings moisture and a deep, caramel-like taste that enhances the chewiness; it’s what makes these cookies extra irresistible.
- 1/2 cup peanut butter (130 g) – Infuses a nutty richness and binds everything together; it’s packed with protein, making this a slightly more filling treat.
- 1 large egg – Acts as a binder to hold the dough together and adds structure; it also contributes to that soft, tender center we all crave.
- 1 teaspoon vanilla extract (5 ml) – Boosts the overall flavor with a warm, aromatic note that ties all the ingredients together beautifully.
- 1 cup all-purpose flour (120 g) – Forms the structure of the cookie; spoon it into the cup and level it off to avoid dense results.
- 1 1/4 cups rolled oats (112 g) – Adds chewiness and fiber, which is great for heart health here’s where you can learn more about the benefits of oats from experts.
- 1/4 teaspoon salt (1.5 g) – Enhances all the flavors without overpowering, making sure your cookies aren’t bland.
- 1/2 teaspoon baking powder (2 g) – Helps the cookies rise just a bit for that perfect thickness.
- 1/2 teaspoon baking soda (2.5 g) – Works with the acids in the dough to create lift and that golden color.
- 3/4 cup candy-coated chocolate pieces (130 g) – These add fun colors and a sweet crunch, turning ordinary cookies into monster delights.
- 1/2 cup chocolate chips (90 g) – Provides melty pockets of chocolate that make every bite exciting and gooey.
Special Dietary Options
For those with specific needs, here are some easy swaps:
- Vegan: Swap the butter for a plant-based alternative like coconut oil (115 g) and use a flax egg (1 tablespoon ground flaxseed mixed with 3 tablespoons water) instead of the egg to keep things dairy-free and animal-free.
- Gluten-free: Replace the all-purpose flour with a gluten-free blend (120 g) and ensure the oats are certified gluten-free to maintain that chewy texture.
- Low-calorie: Reduce sugars slightly, say to 1/4 cup each (50 g granulated and 55 g brown), and opt for dark chocolate chips (90 g) which have less sugar, while keeping the oats for added fiber.
| Ingredient Category | Dietary Swap | Benefit |
|---|---|---|
| Base (Butter and Egg) | Vegan options | Allows more people to enjoy without allergens |
| Flour and Oats | Gluten-free choices | Supports digestive health for sensitive eaters |
| Sugars and Add-ins | Low-calorie tweaks | Helps with weight management while staying tasty |
How to Prepare the Perfect Monster Cookies: Step-by-Step Guide
Ready to bake some monster cookies that are thick, chewy, and full of fun? This guide walks you through each step with clear instructions, so even if you’re new to baking, you’ll feel like a pro. We’ll cover everything from prepping your ingredients to the final cooling, with timings and temperatures included.
First Step: Gather and Prep Your Ingredients
Start by getting all your ingredients ready to make things smooth. Measure out 1/2 cup butter (115 g), 1/2 cup granulated sugar (100 g), and the rest as listed. Let the butter and egg sit at room temperature for about 10 minutes. This prep takes roughly 5 minutes and sets you up for success.
Second Step: Cream the Butter and Sugars
In a large bowl, cream the 1/2 cup butter (115 g) with 1/2 cup granulated sugar (100 g) and 1/2 cup brown sugar (110 g) for 2-3 minutes until it’s light and fluffy. Use a hand mixer or stand mixer for this it makes the dough easier to work with and ensures even texture.
Third Step: Add the Wet Ingredients
Mix in 1/2 cup peanut butter (130 g) until it’s fully blended, then beat in 1 large egg and 1 teaspoon vanilla extract (5 ml). This step should take about 1 minute and helps create that rich, cohesive dough we love.
Fourth Step: Combine the Dry Ingredients
In another bowl, whisk together 1 cup all-purpose flour (120 g), 1 1/4 cups rolled oats (112 g), 1/4 teaspoon salt (1.5 g), 1/2 teaspoon baking powder (2 g), and 1/2 teaspoon baking soda (2.5 g). Gradually add this to the wet mixture, stirring just until combined to avoid over-mixing.
Fifth Step: Mix in the Add-Ins
Fold in 3/4 cup candy-coated chocolate pieces (130 g) and 1/2 cup chocolate chips (90 g) by hand. This keeps the chunks intact for that monster effect and takes about 1 minute.
Sixth Step: Preheat and Shape the Dough
Preheat your oven to 350°F (175°C) while you drop tablespoon-sized balls of dough onto baking sheets lined with parchment paper. Space them about 2 inches apart to allow for spreading. Chilling the dough for 15-30 minutes here can help keep them thick it’s a great tip for best results!
Seventh Step: Bake the Cookies
Bake for 10-12 minutes until the edges are set but the centers are still soft. Keep an eye on them after 10 minutes to prevent over-baking. This step is crucial for that chewy texture, and it locks in all the flavors.
Final Step: Cool and Enjoy
Remove the cookies from the oven and let them cool on the baking sheet for 5-10 minutes; they’ll firm up as they rest. Once cooled, transfer to a wire rack. Serve them warm with a glass of milk for the ultimate treat! If you’re looking for more cookie inspiration, try our peanut butter chocolate molten lava cake for a decadent twist.
Remember, baking is all about joy my family always smiles when these come out of the oven, and I bet yours will too!
Protein and Main Component Alternatives
Swapping the main components in monster cookies can make them fit different diets or what you have on hand. For instance, if peanut butter isn’t your thing, try almond butter (130 g) for a milder nutty flavor that still keeps things creamy and protein-packed.
- Use sunflower seed butter (130 g) for a nut-free option, which works great for allergies while maintaining that binding effect.
- Swap rolled oats with quick oats (112 g) if you prefer a softer texture, or use quinoa flakes for added protein without gluten.
- For the chocolate chips, opt for white chocolate chips (90 g) to change up the taste, offering a lighter, sweeter alternative.
Vegetable, Sauce, and Seasoning Modifications
Even though these are cookies, you can get creative with add-ins like dried fruits or spices for variety. For example, add a handful of dried cherries instead of some candy pieces to bring in a fruity twist that pairs well with the oats.
- Swap candy-coated pieces for chopped nuts or seeds to add crunch and healthy fats, adjusting quantities to 130 g for balance.
- Use cinnamon (1/2 teaspoon) as a seasoning for a warm, seasonal flavor that complements the peanut butter without overpowering.
- For a sauce-like element, drizzle melted chocolate over cooled cookies for extra indulgence, keeping it light to maintain the chewy base.
Mastering Monster Cookies: Advanced Tips and Variations
Taking your monster cookies to the next level is easy with these pro tips! Start with advanced techniques like chilling the dough to control spreading and ensure thick, chewy results. Let’s dive into flavor variations and more to make your baking even better.
Pro Cooking Techniques
- Always measure flour by spooning it in to prevent packing, which can make cookies tough.
- Experiment with mixing methods, like using a food processor for the dry ingredients, to get a finer blend.
Flavor Variations
- Add coconut flakes (50 g) for a tropical twist, blending well with the chocolate chips for new taste adventures.
- Incorporate pumpkin spice (1 teaspoon) in fall for a seasonal flavor that pairs perfectly with the oats.
Presentation Tips
Garnish with a sprinkle of sea salt before baking for a fancy finish that enhances the sweetness.
Make-Ahead Options
- Freeze dough balls for up to 3 months and bake as needed, adding 2-4 minutes to the time just preheat to 350°F (175°C) when ready!
- Prep the dry ingredients ahead and store them in a sealed container for quick assembly on busy days.
How to Store Monster Cookies: Best Practices
Keeping your monster cookies fresh is simple with the right storage methods. Let’s cover the basics to maintain that chewy goodness whether you’re storing for a day or longer.
- Refrigeration: Store in an airtight container for up to two weeks; this keeps them soft and prevents staleness.
- Freezing: Wrap individually and freeze for up to three months; thaw at room temperature for the best texture.
- Reheating: Warm in the oven at 300°F (150°C) for 5 minutes to refresh without losing crunch.
- Meal prep considerations: Make a big batch and portion them out for easy snacks throughout the week.

FAQs: Frequently Asked Questions About Monster Cookies
Why are Monster Cookies called “Monster” Cookies?
Monster Cookies are called “Monster” Cookies mainly because they contain a large mix of ingredients that create a chunky and colorful appearance. Commonly, they include peanut butter, oats, chocolate chips, and M&M candies, which give them a hefty, “monster-sized” look and texture. The name reflects how packed and sizable these cookies are, rather than resembling actual monsters.
How can I prevent Monster Cookies from spreading too much while baking?
To keep Monster Cookies from spreading, use precise ingredient measurements and make sure butter and eggs are at room temperature before mixing. Chilling the dough for 15-30 minutes helps the fats firm up, reducing cookie spread during baking. Also, avoid over-mixing to maintain the dough’s texture, which keeps cookies thick and chewy.
What makes Monster Cookies different from regular chocolate chip cookies?
Monster Cookies stand out because they combine several ingredients like oats, peanut butter, and M&M candies, unlike regular chocolate chip cookies that mostly have just chocolate chips and standard cookie dough. The addition of oats adds chewiness, peanut butter adds richness, and M&Ms provide color and crunch—making them more textured and visually appealing.
Can I substitute ingredients in a Monster Cookie recipe for allergies or preferences?
Yes, you can substitute ingredients in Monster Cookies to suit allergies or taste preferences. For example, use sunflower seed butter or almond butter instead of peanut butter. Replace oats with gluten-free oats for gluten sensitivity. Swap M&Ms for dairy-free chocolate chips or other candies. Just keep in mind these changes can affect texture and flavor slightly.
How long do Monster Cookies stay fresh, and what’s the best way to store them?
Monster Cookies stay fresh for up to 5 days when stored in an airtight container at room temperature. For longer storage, keep them in the refrigerator for up to two weeks or freeze them for up to three months. When freezing, separate layers with parchment paper to prevent sticking, and thaw at room temperature before serving for best texture.
Monster Cookies
🍪 Monster Cookies are thick, chewy, and loaded with oats, peanut butter, and chocolate for a satisfying treat.
🎉 This recipe is perfect for those who want playful, colorful cookies that are easy to make and fun to eat.
- Total Time: 25 minutes
Ingredients
– 1/2 cup butter (115 g)
– 1/2 cup granulated sugar (100 g)
– 1/2 cup brown sugar (110 g)
– 1/2 cup peanut butter (130 g)
– 1 large egg
– 1 teaspoon vanilla extract (5 ml)
– 1 cup all-purpose flour (120 g)
– 1 1/4 cups rolled oats (112 g)
– 1/4 teaspoon salt (1.5 g)
– 1/2 teaspoon baking powder (2 g)
– 1/2 teaspoon baking soda (2.5 g)
– 3/4 cup candy-coated chocolate pieces (130 g)
– 1/2 cup chocolate chips (90 g)
Instructions
1-First Step: Gather and Prep Your Ingredients Start by getting all your ingredients ready to make things smooth. Measure out 1/2 cup butter (115 g), 1/2 cup granulated sugar (100 g), and the rest as listed. Let the butter and egg sit at room temperature for about 10 minutes. This prep takes roughly 5 minutes and sets you up for success.
2-Second Step: Cream the Butter and Sugars In a large bowl, cream the 1/2 cup butter (115 g) with 1/2 cup granulated sugar (100 g) and 1/2 cup brown sugar (110 g) for 2-3 minutes until it’s light and fluffy. Use a hand mixer or stand mixer for this it makes the dough easier to work with and ensures even texture.
3-Third Step: Add the Wet Ingredients Mix in 1/2 cup peanut butter (130 g) until it’s fully blended, then beat in 1 large egg and 1 teaspoon vanilla extract (5 ml). This step should take about 1 minute and helps create that rich, cohesive dough we love.
4-Fourth Step: Combine the Dry Ingredients In another bowl, whisk together 1 cup all-purpose flour (120 g), 1 1/4 cups rolled oats (112 g), 1/4 teaspoon salt (1.5 g), 1/2 teaspoon baking powder (2 g), and 1/2 teaspoon baking soda (2.5 g). Gradually add this to the wet mixture, stirring just until combined to avoid over-mixing.
5-Fifth Step: Mix in the Add-Ins Fold in 3/4 cup candy-coated chocolate pieces (130 g) and 1/2 cup chocolate chips (90 g) by hand. This keeps the chunks intact for that monster effect and takes about 1 minute.
6-Sixth Step: Preheat and Shape the Dough Preheat your oven to 350°F (175°C) while you drop tablespoon-sized balls of dough onto baking sheets lined with parchment paper. Space them about 2 inches apart to allow for spreading. Chilling the dough for 15-30 minutes here can help keep them thick it’s a great tip for best results!
7-Seventh Step: Bake the Cookies Bake for 10-12 minutes until the edges are set but the centers are still soft. Keep an eye on them after 10 minutes to prevent over-baking. This step is crucial for that chewy texture, and it locks in all the flavors.
8-Final Step: Cool and Enjoy Remove the cookies from the oven and let them cool on the baking sheet for 5-10 minutes; they’ll firm up as they rest. Once cooled, transfer to a wire rack. Serve them warm with a glass of milk for the ultimate treat! If you’re looking for more cookie inspiration, try our peanut butter chocolate molten lava cake for a decadent twist.
Notes
🧂 Measure flour by spooning into the cup and leveling off to avoid packing.
🧈 Use room temperature butter and eggs for best texture and spreading.
❄️ Chill dough for 15-30 minutes before baking to prevent excessive spreading.
- Prep Time: 15 minutes
- Cook Time: 10 minutes
- Category: Dessert
- Method: Baking
- Cuisine: American
Nutrition
- Calories: 191
- Sugar: 14 g
- Sodium: 114 mg
- Fat: 9 g
- Saturated Fat: 4 g
- Carbohydrates: 23 g
- Fiber: 1 g
- Protein: 3 g
- Cholesterol: 18 mg


