
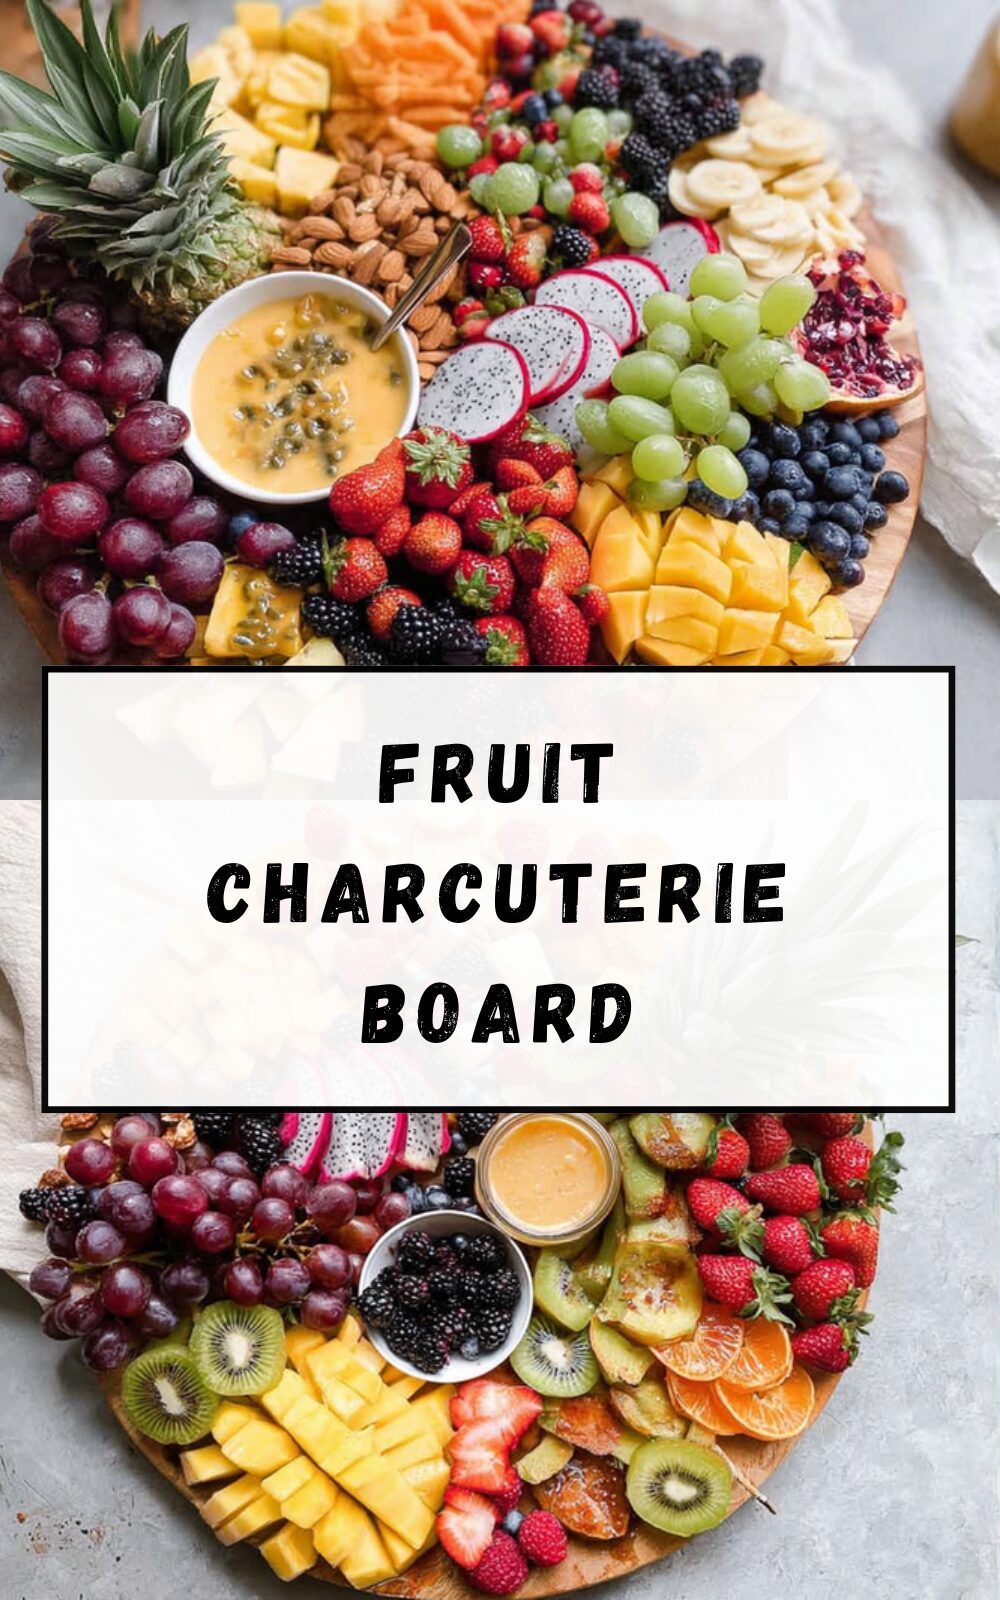
Why You’ll Love This Fruit Charcuterie Board
Imagine gathering around a table filled with bright, fresh fruits that make every occasion feel special! This fruit charcuterie board is super simple to put together and offers a fun way to enjoy healthy snacks with family and friends. You’ll love how it brings colors and flavors to life, making it perfect for parties or even a quiet night in. Let me share why this setup stands out as a go-to choice for home cooks like you.
Benefits of This Easy Fruit Charcuterie Board
- Ease of Preparation: Whipping up this fruit charcuterie board takes just 20 minutes, so it’s ideal for busy parents and working pros who want something quick without any fuss. You simply wash, slice, and arrange the fruits, which means less time in the kitchen and more time enjoying the moment. This how to make a fruit charcuterie board approach keeps things straightforward, letting you focus on what matters most.
- Health Benefits: Packed with vitamins and nutrients, this fruit grazing board is a smart pick for diet-conscious folks and health enthusiasts. For example, fruits like blueberries and strawberries provide a boost of vitamin C that supports your immune system, while the fiber helps keep you full and energized. Check out the health benefits of pineapple to see how it adds even more goodness to your fruit and cheese board wait, actually, this one’s all about fruits!
- Versatility: Whether you’re hosting a party or prepping a light snack, this healthy charcuterie board adapts to all kinds of events and tastes. It’s easy to tweak for different dietary needs, like going vegan with fresh fruits only, and it pairs well with various meals. Think of it as the best fruits for a charcuterie board that fits into your routine, from family brunches to quick bites for students.
- Distinctive Flavor: The mix of sweet and tangy fruits creates a burst of taste that’s hard to beat, making your fruit board for a party a real crowd-pleaser. Juicy mangoes and crisp grapes offer a refreshing twist that stands out from regular snacks, adding excitement to every bite. You’ll find this easy fruit board arrangement brings a fun vibe, perfect for impressing guests with minimal effort.
As you can see, this fruit charcuterie board isn’t just food; it’s a simple joy that fits into busy lives while packing in flavor and health perks. Dive into creating one, and you’ll see why it’s become a favorite for so many.
Jump To
- 1. Why You’ll Love This Fruit Charcuterie Board
- 2. Essential Ingredients for Fruit Charcuterie Board
- 3. How to Prepare the Perfect Fruit Charcuterie Board: Step-by-Step Guide
- 4. Dietary Substitutions to Customize Your Fruit Charcuterie Board
- 5. Mastering Fruit Charcuterie Board: Advanced Tips and Variations
- 6. How to Store Fruit Charcuterie Board: Best Practices
- 7. FAQs: Frequently Asked Questions About Fruit Charcuterie Board
- 8. Fruit Charcuterie Board
Essential Ingredients for Fruit Charcuterie Board
Gathering the right ingredients is key to building a stunning fruit charcuterie board that looks and tastes amazing. Let’s break down what you’ll need, focusing on fresh picks that make setup a breeze. This section covers main ingredients with their exact measurements, plus tips on why they’re great and how to adapt for special diets.
Main Ingredients List
- 1 large pineapple – This forms the base of your board and adds a sweet, tropical flavor that everyone loves for its juicy texture.
- 2 cups green grapes, washed – These provide a crisp, refreshing bite and help balance the sweeter fruits with their mild taste.
- 2 cups red grapes, washed – Offering a pop of color and sweetness, these are perfect for adding variety and visual appeal to your fruit platter.
- 2 medium mangoes, peeled and sliced/diced – Their creamy texture and sweet flavor make them a standout choice, providing a tropical twist to the mix.
- 1 cup blueberries, washed – Packed with antioxidants, these little berries bring a burst of flavor and make your board look vibrant and inviting.
- 1 cup raspberries, washed – These add a tart-sweet element and help create that eye-catching display with their bright red color.
- 3-4 kiwis, peeled and sliced – With their zesty taste, kiwis offer a fresh contrast and are great for adding variety in shapes on your fruit grazing board.
- 1 cup blackberries, washed – These berries contribute a deep, rich flavor and enhance the overall health benefits of your healthy charcuterie setup.
- 1 cup strawberries, hulled and halved/quartered – Sweet and juicy, strawberries are a classic pick that make any fruit charcuterie board feel festive.
- 1-2 star fruits, sliced – Their unique star shape adds fun and a subtle sweetness, making your arrangement even more special.
- 8-10 kumquats, sliced – These tiny citrus fruits bring a zingy flavor and are perfect for those who enjoy a bit of tang in their fruit and cheese board.
- 1 pink dragonfruit, peeled and sliced/diced – This exotic fruit adds a beautiful pink hue and mild sweetness, turning your board into a work of art.
- 2-3 oranges, peeled and segmented/sliced – Full of vitamin C, oranges provide a citrusy kick and help keep things light and refreshing.
- 1 cup vanilla yogurt (for dip) – This creates a creamy base for your dip, offering a smooth contrast to the fruits; you can mix it with other items for extra flavor.
- 1/4 cup honey or maple syrup (for dip) – Used to sweeten the dip, this helps enhance the natural tastes without overpowering them.
- 1/2 teaspoon vanilla extract (for dip) – Adds a warm, aromatic note to your dip, making it even more irresistible.
- 1 cup plain or vanilla yogurt (alternative for dip) – A simple swap if you want something straightforward and equally delicious.
- 1 cup whipped cream (another dip option) – For a lighter, airy dip that pairs wonderfully with the fruits on your fruit charcuterie board.
- Optional: Cinnamon for sprinkling – Just a dash brings warmth and spice, elevating the overall flavor profile.
Special Dietary Options
- Vegan: All fruits listed are naturally plant-based, so stick with maple syrup in the dip and skip any dairy-based whipped cream for a fully vegan fruit board for a party.
- Gluten-free: This recipe is inherently gluten-free since it uses only fresh fruits and simple dip ingredients; double-check for any added nuts or extras.
- Low-calorie: Choose fruits like berries and kiwis which are lower in sugar, and opt for plain yogurt in the dip to keep things light for your healthy charcuterie board.
For more ideas on balancing flavors, check out our recipe for pineapple-infused dishes that might inspire your next creation.
How to Prepare the Perfect Fruit Charcuterie Board: Step-by-Step Guide
Ready to dive into making your own fruit charcuterie board? It’s easier than you think and loads of fun! Follow these steps to create a beautiful, tasty setup that will wow your guests. We’ll keep it simple, focusing on how to make a fruit charcuterie board that’s both eye-catching and delicious.
Gathering Your Supplies
First Step: Start by gathering all your fruits and tools on a clean surface. Wash everything thoroughly to ensure freshness this sets the stage for your easy fruit board arrangement and keeps it hygienic.
Second Step: Slice the pineapple in half lengthwise and carefully scoop out the flesh, leaving a sturdy shell. This creates a fun bowl for your fruits and adds that tropical vibe to your fruit charcuterie board.
Prepping the Fruits
Third Step: Wash and prepare the rest of the fruits as needed peel and slice the mangoes, kiwis, and oranges, and hull the strawberries. Aim for a mix of shapes and sizes to make your best fruits for a charcuterie board pop on the plate.
Fourth Step: Cut the reserved pineapple flesh into bite-sized pieces and set aside. This step ensures you have plenty of variety while keeping prep time under 20 minutes total.
Arranging Everything
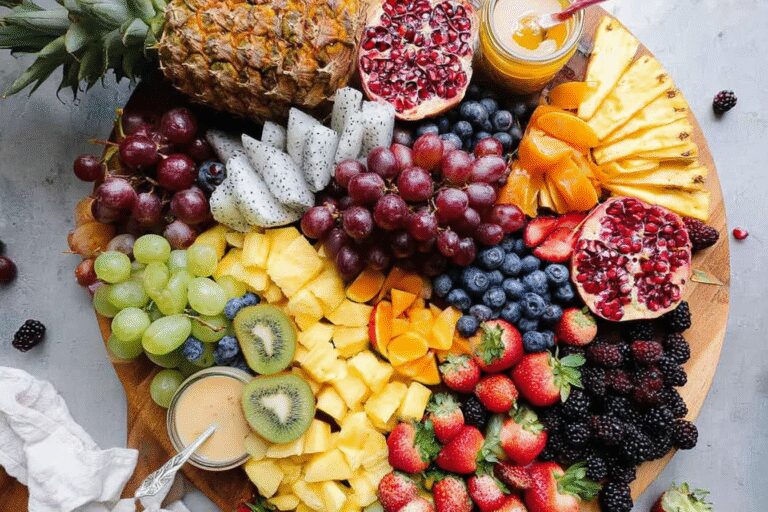
Fifth Step: Place the pineapple shell upright on your board as the centerpiece. Arrange the other fruits around it in colorful clusters, mixing greens, reds, and yellows for visual interest on your fruit and cheese board though here it’s all about the fruits!
Sixth Step: For the dip, mix 1 cup vanilla yogurt with 1/4 cup honey and 1/2 teaspoon vanilla extract in a bowl. If you prefer something different, use plain yogurt or whipped cream instead, adapting for dietary needs like vegan options.
Final Touches
Seventh Step: Sprinkle a bit of cinnamon on the dip for extra flavor and place the bowl next to the fruits. This final touch makes your healthy charcuterie board ready to serve and encourages everyone to dig in.
Eighth Step: Serve immediately for the freshest taste, and remember this what to put on a fruit board setup works great for parties or as a quick snack. The whole process is adaptable, like swapping fruits based on the season for your fruit grazing board.
If you’re looking for more fresh ideas, try our honey garlic recipes that pair well with fruits for a sweet-savory mix.

Dietary Substitutions to Customize Your Fruit Charcuterie Board
Making your fruit charcuterie board fit your needs is a breeze with a few smart swaps. Whether you’re watching calories or following a special diet, these changes keep things tasty and fun. Let’s look at ways to tweak the main ingredients and add-ons.
Protein and Main Component Alternatives
For the fruits, try swapping mangoes with peaches if they’re in season, as they offer a similar sweetness for diet-conscious individuals. If someone avoids citrus, replace oranges with melon slices to maintain that fresh vibe on your fruit charcuterie board.
Vegetable, Sauce, and Seasoning Modifications
Add veggies like cucumber slices for a crunchy twist, or use a yogurt-based dip with less honey for low-calorie options. For vegans, swap whipped cream with coconut cream to keep the flavors light and adaptable.
Mastering Fruit Charcuterie Board: Advanced Tips and Variations
Taking your fruit charcuterie board to the next level is all about fun tricks and creative ideas. Here are some pro tips to make it even better for your gatherings. You’ll impress everyone with these easy upgrades!
Pro Cooking Techniques and Flavor Variations
Use varied cutting styles for more texture, like dicing some fruits and leaving others whole. For flavor, mix in herbs like mint for a fresh twist on your healthy charcuterie board.
How to Store Fruit Charcuterie Board: Best Practices
Keeping your fruit charcuterie board fresh is key for enjoying leftovers. Let’s cover quick storage tips to maintain that great taste. You’ll want to handle it right for the best results.
Refrigeration Tips
Store cut fruits in an airtight container in the fridge for up to 2 days to keep them crisp on your fruit charcuterie board.
FAQs: Frequently Asked Questions About Fruit Charcuterie Board
What is a fruit charcuterie board and how is it different from a regular charcuterie board?
A fruit charcuterie board is a visually appealing arrangement of various fresh fruits, often paired with dips like yogurt or whipped cream. Unlike a traditional charcuterie board that features meats and cheeses, a fruit board focuses solely on sweet and juicy seasonal fruits, offering a refreshing, colorful alternative. It emphasizes variety in textures and flavors, such as berries, tropical fruits, and citrus, making it ideal for guests seeking a lighter, healthier snack option.
What types of fruits work best on a fruit charcuterie board?
The best fruits for a charcuterie board are fresh, ripe, and varied in color and texture. Common choices include grapes, strawberries, blueberries, kiwi, pineapple, mango, raspberries, blackberries, oranges, and star fruit. Incorporating both sliced and whole fruits adds visual interest, while selecting seasonal fruits ensures peak flavor and freshness. Exotic options like dragonfruit or kumquats can add an eye-catching and flavorful twist.
What materials are recommended for serving a fruit charcuterie board?
Popular materials for fruit charcuterie boards include wood, marble, and slate. Wooden boards provide a warm and rustic look, marble offers a sleek and cool surface ideal for serving fresh fruit, and slate adds a modern touch with easy cleanup. The choice depends largely on your personal style and how you want to present the fruit, but any of these options will make your board visually attractive and functional.
How should I prepare and arrange fruit on a charcuterie board for best presentation?
To create an inviting fruit charcuterie board, slice some fruits like kiwi and oranges while leaving others whole, such as grapes and berries, for texture variety. Arrange fruits loosely in small piles or clusters, mixing colors and shapes to enhance visual appeal. Add rounds or star-shaped slices for interest, and consider leaving some fruit on the vine for a natural look. Including small bowls of dips like yogurt or whipped cream completes the board.
Can I pair a fruit charcuterie board with other foods or beverages?
Yes, fruit charcuterie boards pair wonderfully with light cheeses, nuts, and honey for added flavors and textures. For beverages, try serving with champagne, sparkling water, or fruity cocktails to complement the sweetness. Adding a fruit dip such as Greek yogurt or whipped cream encourages guests to enjoy the variety in different ways and enhances the overall tasting experience.
Fruit Charcuterie Board
🍍 Fruit Charcuterie: Simple Steps to Build the Perfect Platter brings vibrant colors and fresh flavors to your table, making it an eye-catching and healthy option.
🍓 This recipe is easy to assemble and versatile, perfect for any occasion from casual snacking to festive celebrations.
- Total Time: 20 minutes
- Yield: Serves 6-8 1x
Ingredients
1 large pineapple
2 cups green grapes, washed
2 cups red grapes, washed
2 medium mangoes, peeled and sliced/diced
1 cup blueberries, washed
1 cup raspberries, washed
3–4 kiwis, peeled and sliced
1 cup blackberries, washed
1 cup strawberries, hulled and halved/quartered
1–2 star fruits, sliced
8–10 kumquats, sliced
1 pink dragonfruit, peeled and sliced/diced
2–3 oranges, peeled and segmented/sliced
1 cup vanilla yogurt for dip
1/4 cup honey or maple syrup for dip
1/2 teaspoon vanilla extract for dip
1 cup plain or vanilla yogurt for dip
1 cup whipped cream for dip
Cinnamon for sprinkling
Instructions
1-First Step: Start by gathering all your fruits and tools on a clean surface. Wash everything thoroughly to ensure freshness this sets the stage for your easy fruit board arrangement and keeps it hygienic.
2-Second Step: Slice the pineapple in half lengthwise and carefully scoop out the flesh, leaving a sturdy shell. This creates a fun bowl for your fruits and adds that tropical vibe to your fruit charcuterie board.
3-Third Step: Wash and prepare the rest of the fruits as needed peel and slice the mangoes, kiwis, and oranges, and hull the strawberries. Aim for a mix of shapes and sizes to make your best fruits for a charcuterie board pop on the plate.
4-Fourth Step: Cut the reserved pineapple flesh into bite-sized pieces and set aside. This step ensures you have plenty of variety while keeping prep time under 20 minutes total.
5-Fifth Step: Place the pineapple shell upright on your board as the centerpiece. Arrange the other fruits around it in colorful clusters, mixing greens, reds, and yellows for visual interest on your fruit and cheese board though here it’s all about the fruits!
6-Sixth Step: For the dip, mix 1 cup vanilla yogurt with 1/4 cup honey and 1/2 teaspoon vanilla extract in a bowl. If you prefer something different, use plain yogurt or whipped cream instead, adapting for dietary needs like vegan options.
7-Seventh Step: Sprinkle a bit of cinnamon on the dip for extra flavor and place the bowl next to the fruits. This final touch makes your healthy charcuterie board ready to serve and encourages everyone to dig in.
8-Eighth Step: Serve immediately for the freshest taste, and remember this what to put on a fruit board setup works great for parties or as a quick snack. The whole process is adaptable, like swapping fruits based on the season for your fruit grazing board.
Notes
🌈 Create visual interest by using varied fruit shapes, sizes, and colors.
🍍 Keep pineapple leaves attached for added texture and a natural look.
🥭 Slice bananas and apples immediately before serving to prevent browning.
- Prep Time: 20 minutes
- Category: Appetizer
- Method: Assembling
- Cuisine: Various
- Diet: Vegetarian
Nutrition
- Serving Size: 1 cup fruit mixture
- Calories: 78 kcal
- Sugar: 13 g
- Sodium: 15 mg
- Fat: 1 g
- Saturated Fat: 0.1 g
- Unsaturated Fat: 0.14 g
- Trans Fat: 0 g
- Carbohydrates: 18 g
- Fiber: 3 g
- Protein: 1 g
- Cholesterol: 1 mg


