
Why You’ll Love This Tres Leches Cake
If you have been searching for a dessert that impresses everyone at the table without requiring hours in the kitchen, this Tres Leches Cake is exactly what you need. This classic Latin American treat has become a beloved favorite for good reason, and my simple recipe makes it accessible even for beginner bakers. Here is why this soaked delight deserves a spot in your recipe collection:
- Ease of preparation: Despite its luxurious taste and impressive presentation, tres leches cake is surprisingly simple to make. The sponge requires no butter or oil, relying on whipped egg whites for its airy texture. With just 25 to 35 minutes of baking time and straightforward steps, even busy parents and working professionals can whip up this crowd-pleaser.
- Health benefits: This cake offers nutritional value you might not expect from a dessert. Each serving provides 9g of protein from eggs and milk, plus 242mg of calcium for strong bones. The eggs contribute essential vitamins and minerals, making each slice more satisfying than your average cake.
- Versatility: Whether you need a make-ahead dessert for a party or a sweet treat for your family, this recipe adapts beautifully. It can be prepared 1-2 days ahead for better flavor absorption, and gluten-free flour works perfectly for those with dietary restrictions. Top it with fresh strawberries or keep it classic with just cinnamon.
- Distinctive flavor: The three-milk soaking mixture creates an ultra-moist, melt-in-your-mouth texture unlike any other cake. The combination of evaporated milk, sweetened condensed milk, and whole milk strikes the perfect balance between sweetness and creaminess, while the light sponge absorbs all those wonderful flavors without becoming soggy.
Jump To
- 1. Why You’ll Love This Tres Leches Cake
- 2. Essential Ingredients for Tres Leches Cake
- 3. How to Prepare the Perfect Tres Leches Cake: Step-by-Step Guide
- 4. Dietary Substitutions to Customize Your Tres Leches Cake
- 5. Mastering Tres Leches Cake: Advanced Tips and Variations
- 6. How to Store Tres Leches Cake: Best Practices
- 7. FAQs: Frequently Asked Questions About Tres Leches Cake
- 8. Tres Leches Cake
Essential Ingredients for Tres Leches Cake
Before you begin baking, gather all your ingredients for this delicious tres leches cake. Having everything measured and ready makes the process smooth and enjoyable. Here is everything you will need:
Cake Ingredients
- 1 cup all-purpose flour – Forms the structure of the sponge; can be substituted with gluten-free flour if needed
- 1 1/2 teaspoons baking powder – Creates lift and airiness in the cake
- 1/4 teaspoon salt – Balances the sweetness and enhances flavors
- 5 large eggs (separated) – Eggs provide protein and structure; whites are whipped for the signature airy texture
- 1 cup sugar (divided: 3/4 cup for yolks, 1/4 cup for whites) – Sweetens the cake and stabilizes the egg whites
- 1/3 cup whole milk – Adds moisture to the batter
- 1 teaspoon vanilla extract – Infuses warm, aromatic flavor throughout the cake
Milk Mixture (Three Milks)
- 12 ounce can evaporated milk – Provides richness without added sweetness
- 14 ounce can sweetened condensed milk – Delivers sweetness and creamy texture
- 1/4 cup whole milk – Lightens the mixture for better absorption
Whipped Topping
- 1 pint heavy whipping cream – Creates fluffy, luscious topping
- 3 tablespoons sugar – Sweetens the whipped cream
- 1/2 teaspoon vanilla extract – Adds aromatic flavor to the topping
- Ground cinnamon – For sprinkling on top
Special Dietary Options
For those with dietary restrictions, here are simple swaps you can make:
- Gluten-free: Substitute the all-purpose flour with a 1:1 gluten-free flour blend without affecting the texture
- Lower sugar: Reduce the sugar in the cake by 2 tablespoons, though this may slightly affect the texture
How to Prepare the Perfect Tres Leches Cake: Step-by-Step Guide
Creating this tres leches cake at home is simpler than you might think. Follow these detailed steps for a dessert that will have everyone asking for seconds. The entire process takes about 2 hours and 10 minutes, including chilling time.
Step 1: Prepare Your Oven and Dry Ingredients
Preheat your oven to 350 degrees F. This temperature ensures even baking without drying out the cake. While the oven heats, grab a medium bowl and combine 1 cup all-purpose flour, 1 1/2 teaspoons baking powder, and 1/4 teaspoon salt. Whisk them together until well blended, then set aside. This mixture will form the foundation of your light sponge.
Step 2: Separate and Beat the Eggs
Carefully separate 5 large eggs into two bowls. One bowl will hold the yolks, and the other will hold the whites. Make sure no yolk gets into the whites, or they will not whip properly. Using an electric mixer, beat the egg yolks with 3/4 cup of sugar until the mixture turns pale yellow and becomes slightly thick. This usually takes about 2-3 minutes. Add 1/3 cup whole milk and 1 teaspoon vanilla extract to the yolk mixture, then stir gently until combined.
Step 3: Combine Yolk Mixture with Flour
Gradually stir the yolk mixture into the flour mixture. Use a gentle folding motion and mix just until combined. Overmixing can make the cake tough, so stop as soon as no dry flour remains visible. The batter will be thick and yellow at this stage, but do not worry; the egg whites will lighten everything up in the next step.
Step 4: Whip the Egg Whites
This is the most important step for achieving that signature light and airy texture. Beat the egg whites on high speed until stiff peaks form. This means when you lift the beaters, the egg whites should stand straight up without drooping. Gradually add the remaining 1/4 cup sugar while continuing to beat. The sugar helps stabilize the whites and gives them a glossy appearance. This step usually takes about 3-4 minutes.
Step 5: Fold Whites into the Batter
Now comes the delicate part. Carefully fold the whipped egg whites into the batter in three additions. Use a spatula and a gentle folding motion, cutting through the center and scraping up from the bottom. Turn the bowl as you fold to incorporate everything evenly. The goal is to keep as much air in the mixture as possible, so take your time. The final batter should be light, fluffy, and uniform in color.
Step 6: Bake the Cake
Pour the batter into an ungreased 9×13 pan and smooth out the top with your spatula. The pan should not be greased because the cake needs something to cling to as it rises. Bake for 25 to 35 minutes, checking at the 25-minute mark. The cake is done when a toothpick inserted in the center comes out clean. Let the cake cool completely in the pan before moving to the next step.
Step 7: Prepare and Pour the Milk Mixture
While the cake cools, make the three-milk mixture. In a bowl or pitcher, combine the 12 ounce can of evaporated milk, 14 ounce can of sweetened condensed milk, and 1/4 cup whole milk. Stir until well blended. Once the cake has cooled completely, use a fork to poke holes all over the surface. The holes allow the milk mixture to soak into every part of the cake.
Slowly pour the milk mixture over the cake, making sure to cover all edges and corners. Take your time with this step to ensure even absorption. Some liquid may pool on top initially, but it will soak in during refrigeration.
Step 8: Refrigerate and Soak
Cover the cake and refrigerate for at least 1 hour, though overnight soaking gives the best results. The longer it sits, the more flavor the cake absorbs. This make-ahead quality makes tres leches cake perfect for parties and gatherings.
Step 9: Make the Whipped Topping
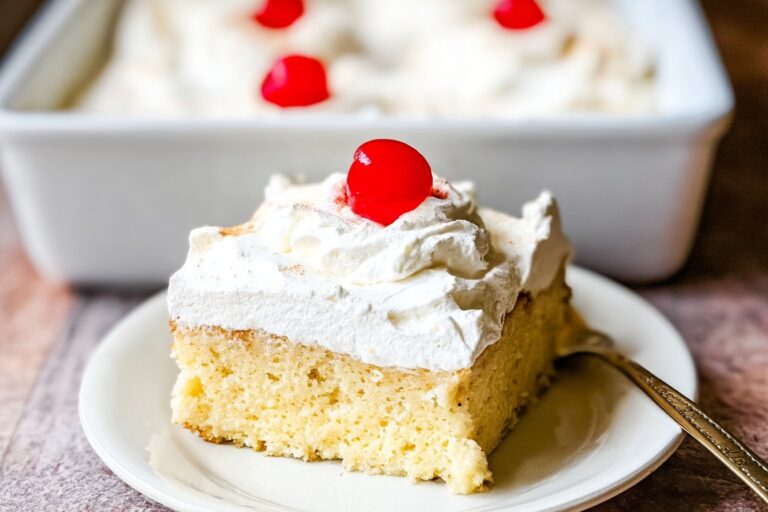
Just before serving, whip 1 pint of heavy whipping cream with 3 tablespoons sugar and 1/2 teaspoon vanilla extract until stiff peaks form. Spread this fluffy topping over the chilled cake and sprinkle with ground cinnamon. For an extra special presentation, serve with fresh strawberries on top. Each slice serves 12 people, making this cake ideal for celebrations.
| Preparation Stage | Time Required | Temperature |
|---|---|---|
| Prep Time | 1 hour 30 minutes | Room temperature |
| Bake Time | 25-35 minutes | 350°F (175°C) |
| Chilling Time | 1 hour minimum | Refrigerator |
| Total Time | ~2 hours 10 minutes | – |
| Servings | 12 slices | – |

Dietary Substitutions to Customize Your Tres Leches Cake
One of the best things about this tres leches cake recipe is how easily it adapts to different dietary needs. Whether you are cooking for someone with gluten sensitivity or simply want to try something different, these substitutions will help you create a cake everyone can enjoy.
Protein and Main Component Alternatives
The primary structural element in this cake comes from eggs, making it naturally flour-light but not suitable for those with egg allergies. If you need an egg-free version, aquafaba (the liquid from a can of chickpeas) can replace the egg whites when whipped. Use 3 tablespoons of aquafaba per egg white. For the yolks, a mixture of 1 tablespoon cornstarch and 2 tablespoons water per yolk works as a binder, though the texture will be slightly different.
For those avoiding dairy, this recipe presents a challenge since milk is the star. However, you can create a dairy-free version by using coconut evaporated milk, sweetened condensed coconut milk, and a non-dairy milk alternative like almond or oat milk. The whipped cream can be made from coconut cream whipped with sugar and vanilla. If you enjoy other creamy desserts, you might also like this vanilla custard cream squares recipe.
Flour and Sweetener Modifications
Gluten-free bakers will be happy to know that this tres leches cake recipe works beautifully with a 1:1 gluten-free flour substitute. The cake contains no butter or oil, so the texture relies more on the whipped egg whites than on gluten development. This makes it one of the easiest cakes to adapt without sacrificing quality.
For those watching their sugar intake, you can reduce the sugar in the cake portion by about 2 tablespoons. The milk mixture must remain as written since the sweetened condensed milk provides essential texture and moisture. However, you could experiment with low-sugar condensed milk alternatives available at health food stores.
Pro tip: When making dietary substitutions, change only one ingredient at a time. This way, if something does not work as expected, you will know exactly which modification caused the issue.
Mastering Tres Leches Cake: Advanced Tips and Variations
Once you have mastered the basic recipe, you can start experimenting with flavors and techniques to make this tres leches cake truly your own. Here are some pro tips and creative variations to try.
Pro Cooking Techniques
The key to a perfect tres leches cake lies in the egg whites. Make sure your bowl and beaters are completely clean and dry before whipping. Even a tiny drop of water or yolk can prevent the whites from reaching their full volume. If your egg whites are not forming stiff peaks after 5 minutes, you may have gotten some yolk in them. In that case, start fresh with new whites.
When poking holes in the cooled cake, use a fork rather than a skewer. The fork creates smaller holes that allow for more even absorption. Poke about 50-60 times across the surface, making sure to reach the edges and corners where the milk tends to pool.
Flavor Variations
While classic tres leches cake is delicious on its own, you can add interesting flavors to customize it:
- Coffee tres leches: Add 1 tablespoon of instant espresso powder to the milk mixture for a mocha twist
- Coconut tres leches: Replace the whole milk in the mixture with coconut milk and top with toasted coconut flakes
- Chocolate tres leches: Dust the top with cocoa powder instead of cinnamon or add chocolate shavings
- Seasonal fruit: Top with mangoes in summer, or try spiced poached pears in fall
Presentation Tips
A beautifully presented tres leches cake can be the centerpiece of any dessert table. For clean slices, dip your knife in hot water and wipe it clean between each cut. This prevents the whipped cream from smearing. Garnish with fresh strawberries, a sprinkle of cinnamon, and perhaps a mint leaf for a pop of color.
For parties, consider making individual servings in small glass dishes or mason jars. This eliminates the need for slicing and creates an elegant presentation. For another showstopping dessert option, check out this pumpkin cheesecake recipe.
Make-Ahead Options
This tres leches cake is ideal for busy hosts because it actually improves when made 1-2 days ahead. The extra soaking time allows the flavors to develop fully. Simply bake and soak the cake, then refrigerate covered. Add the whipped cream topping just before serving to keep it fresh and fluffy. You can also freeze the baked cake (before adding milk) for up to 3 months, making it perfect for advance party prep.
How to Store Tres Leches Cake: Best Practices
Proper storage is essential for maintaining the quality and safety of your tres leches cake. Since this dessert contains dairy products and eggs, following these guidelines will keep it fresh and delicious.
Refrigeration Guidelines
Store your tres leches cake covered in the refrigerator for 3-5 days. Use plastic wrap pressed directly onto the surface of the whipped cream, or transfer slices to an airtight container. The cake stays moist due to the milk soaking, so you do not need to worry about it drying out. However, keep it away from strong-smelling foods in your refrigerator, as the sponge can absorb odors.
Never leave tres leches cake at room temperature for longer than 2 hours. The combination of milk, eggs, and cream creates an environment where bacteria can grow quickly. If you are serving the cake at a party, keep it chilled until serving time and return leftovers to the refrigerator promptly.
Freezing Instructions
For longer storage, you can freeze the baked cake before adding the milk mixture. Cool the cake completely, wrap it tightly in plastic wrap followed by aluminum foil, and place it in a freezer-safe bag. Label with the date and freeze for up to 3 months. Thaw overnight in the refrigerator before adding the milk mixture and whipped topping.
Avoid freezing the cake after adding the milk mixture, as it can become watery when thawed. The whipped cream also does not freeze well and should always be made fresh.
Reheating and Serving
Tres leches cake is traditionally served cold, so reheating is not necessary. In fact, warming it can make the texture too soft and pudding-like. If you prefer a slightly warmer cake, let individual slices sit at room temperature for about 15 minutes before serving. For the best experience, always add the whipped cream topping just before serving and keep any leftovers refrigerated.

FAQs: Frequently Asked Questions About Tres Leches Cake
What is tres leches cake?
Tres leches cake, which translates to “three milks cake,” is a light sponge cake soaked in a mixture of three milks: evaporated milk, sweetened condensed milk, and whole milk. Originating from Latin America, particularly Nicaragua and Mexico, it’s famous for its ultra-moist, melt-in-your-mouth texture without being soggy. The sponge is made by folding whipped egg whites into a batter of egg yolks, sugar, flour, baking powder, milk, and vanilla—no butter or oil needed. After baking, poke holes in the cooled cake and slowly pour the milk mixture over it, letting it absorb fully in the fridge. Top with whipped cream and fresh fruit like strawberries for serving. This crowd-pleasing dessert serves 12-15 and is perfect for parties. (92 words)
How do you make tres leches cake from scratch?
Start with a sponge: Preheat oven to 350°F (175°C). Whisk 1 cup flour, 1 tsp baking powder, and 1/4 tsp salt. Beat 5 egg yolks with 3/4 cup sugar until pale, add 1/4 cup milk and 1 tsp vanilla. Fold in flour mix. Whip 5 egg whites with 1/4 cup sugar to stiff peaks, then fold into batter. Bake in a greased 9×13 pan for 25-30 minutes until toothpick clean. Cool, poke holes, mix 12 oz evaporated milk, 14 oz sweetened condensed milk, 1/4 cup whole milk, and pour over. Refrigerate 4+ hours. Whip 2 cups heavy cream with 1/4 cup sugar and 1/2 tsp vanilla for topping. Slice and serve chilled. Yields 12 servings. (118 words)
Can you make tres leches cake ahead of time?
Yes, tres leches cake is ideal for making ahead—prepare it 1-2 days in advance for best results. The flavors deepen as the sponge fully absorbs the three-milk mixture overnight. Bake and soak the cake, then refrigerate covered. Add the whipped cream topping just before serving to keep it fresh and fluffy. It stays moist and delicious for up to 3 days in the fridge. This makes it perfect for gatherings; simply portion and garnish with fruit on the day of. Avoid making the topping more than a few hours early, as it can deflate. Pro tip: Label with date to track freshness. (98 words)
How do you store tres leches cake?
Store tres leches cake covered in the refrigerator to maintain its moisture and freshness—it lasts 3-5 days. Use plastic wrap pressed directly on the surface or an airtight container to prevent drying or absorbing fridge odors. If topped with whipped cream, cover loosely after it sets. For best texture, keep it chilled until serving, as warming makes it overly soft. Do not leave at room temperature longer than 2 hours to avoid spoilage from the dairy milks. Slice only what you need; leftovers reheat slightly in microwave for 10 seconds if desired, but cold is traditional. Freezing extends life further. (102 words)
Can you freeze tres leches cake?
Yes, freeze tres leches cake for up to 3 months, but freeze the plain baked sponge before adding milks for best results. Cool completely, wrap tightly in plastic wrap and foil, or place in a freezer bag. Thaw overnight in the fridge, then poke holes and pour the milk mixture over it—refrigerate 4+ hours to soak. Adding milks before freezing can make it watery upon thawing. Whipped cream does not freeze well, so add fresh after thawing. This method preserves the light texture. Label with freeze date. Ideal for batch prepping holiday desserts. (96 words)
Tres Leches Cake
🥮 Savor ultra-moist tres leches cake soaked in three milks for melt-in-your-mouth tenderness and authentic flavor.
🥛 Effortless sponge perfect for parties – chills ahead for stress-free celebrations!
- Total Time: 2 hours 10 minutes
- Yield: 12 servings
Ingredients
– 1 cup all-purpose flour Forms the structure of the sponge
– 1 1/2 teaspoons baking powder Creates lift and airiness in the cake
– 1/4 teaspoon salt Balances the sweetness and enhances flavors
– 5 large eggs (separated) Eggs provide protein and structure; whites are whipped for the signature airy texture
– 1 cup sugar (divided: 3/4 cup for yolks, 1/4 cup for whites) Sweetens the cake and stabilizes the egg whites
– 1/3 cup whole milk Adds moisture to the batter
– 1 teaspoon vanilla extract Infuses warm, aromatic flavor throughout the cake
– 12 ounce can evaporated milk Provides richness without added sweetness
– 14 ounce can sweetened condensed milk Delivers sweetness and creamy texture
– 1/4 cup whole milk Lightens the mixture for better absorption
– 1 pint heavy whipping cream Creates fluffy, luscious topping
– 3 tablespoons sugar Sweetens the whipped cream
– 1/2 teaspoon vanilla extract Adds aromatic flavor to the topping
– Ground cinnamon For sprinkling on top
Instructions
1-Step 1: Prepare Your Oven and Dry Ingredients Preheat your oven to 350 degrees F. This temperature ensures even baking without drying out the cake. While the oven heats, grab a medium bowl and combine 1 cup all-purpose flour, 1 1/2 teaspoons baking powder, and 1/4 teaspoon salt. Whisk them together until well blended, then set aside. This mixture will form the foundation of your light sponge.
2-Step 2: Separate and Beat the Eggs Carefully separate 5 large eggs into two bowls. One bowl will hold the yolks, and the other will hold the whites. Make sure no yolk gets into the whites, or they will not whip properly. Using an electric mixer, beat the egg yolks with 3/4 cup of sugar until the mixture turns pale yellow and becomes slightly thick. This usually takes about 2-3 minutes. Add 1/3 cup whole milk and 1 teaspoon vanilla extract to the yolk mixture, then stir gently until combined.
3-Step 3: Combine Yolk Mixture with Flour Gradually stir the yolk mixture into the flour mixture. Use a gentle folding motion and mix just until combined. Overmixing can make the cake tough, so stop as soon as no dry flour remains visible. The batter will be thick and yellow at this stage, but do not worry; the egg whites will lighten everything up in the next step.
4-Step 4: Whip the Egg Whites This is the most important step for achieving that signature light and airy texture. Beat the egg whites on high speed until stiff peaks form. This means when you lift the beaters, the egg whites should stand straight up without drooping. Gradually add the remaining 1/4 cup sugar while continuing to beat. The sugar helps stabilize the whites and gives them a glossy appearance. This step usually takes about 3-4 minutes.
5-Step 5: Fold Whites into the Batter Now comes the delicate part. Carefully fold the whipped egg whites into the batter in three additions. Use a spatula and a gentle folding motion, cutting through the center and scraping up from the bottom. Turn the bowl as you fold to incorporate everything evenly. The goal is to keep as much air in the mixture as possible, so take your time. The final batter should be light, fluffy, and uniform in color.
6-Step 6: Bake the Cake Pour the batter into an ungreased 9×13 pan and smooth out the top with your spatula. The pan should not be greased because the cake needs something to cling to as it rises. Bake for 25 to 35 minutes, checking at the 25-minute mark. The cake is done when a toothpick inserted in the center comes out clean. Let the cake cool completely in the pan before moving to the next step.
7-Step 7: Prepare and Pour the Milk Mixture While the cake cools, make the three-milk mixture. In a bowl or pitcher, combine the 12 ounce can of evaporated milk, 14 ounce can of sweetened condensed milk, and 1/4 cup whole milk. Stir until well blended. Once the cake has cooled completely, use a fork to poke holes all over the surface. The holes allow the milk mixture to soak into every part of the cake. Slowly pour the milk mixture over the cake, making sure to cover all edges and corners. Take your time with this step to ensure even absorption. Some liquid may pool on top initially, but it will soak in during refrigeration.
8-Step 8: Refrigerate and Soak Cover the cake and refrigerate for at least 1 hour, though overnight soaking gives the best results. The longer it sits, the more flavor the cake absorbs. This make-ahead quality makes tres leches cake perfect for parties and gatherings.
9-Step 9: Make the Whipped Topping Just before serving, whip 1 pint of heavy whipping cream with 3 tablespoons sugar and 1/2 teaspoon vanilla extract until stiff peaks form. Spread this fluffy topping over the chilled cake and sprinkle with ground cinnamon. For an extra special presentation, serve with fresh strawberries on top. Each slice serves 12 people, making this cake ideal for celebrations.
Notes
🍴 No butter needed – egg whites create light, airy sponge texture.
🔪 Poke dense holes with fork for maximum milk absorption.
❄️ Chill overnight for deepest flavor infusion and perfect slice.
- Prep Time: 30 minutes
- Chilling: 1 hour (or overnight)
- Cook Time: 25-35 minutes
- Category: Dessert
- Method: Baking
- Cuisine: Latin American
- Diet: Vegetarian
Nutrition
- Serving Size: 1 slice
- Calories: 433
- Sugar: 41g
- Sodium: 171mg
- Fat: 22g
- Saturated Fat: 13g
- Unsaturated Fat: 9g
- Trans Fat: 0g
- Carbohydrates: 50g
- Fiber: 1g
- Protein: 9g
- Cholesterol: 152mg


