
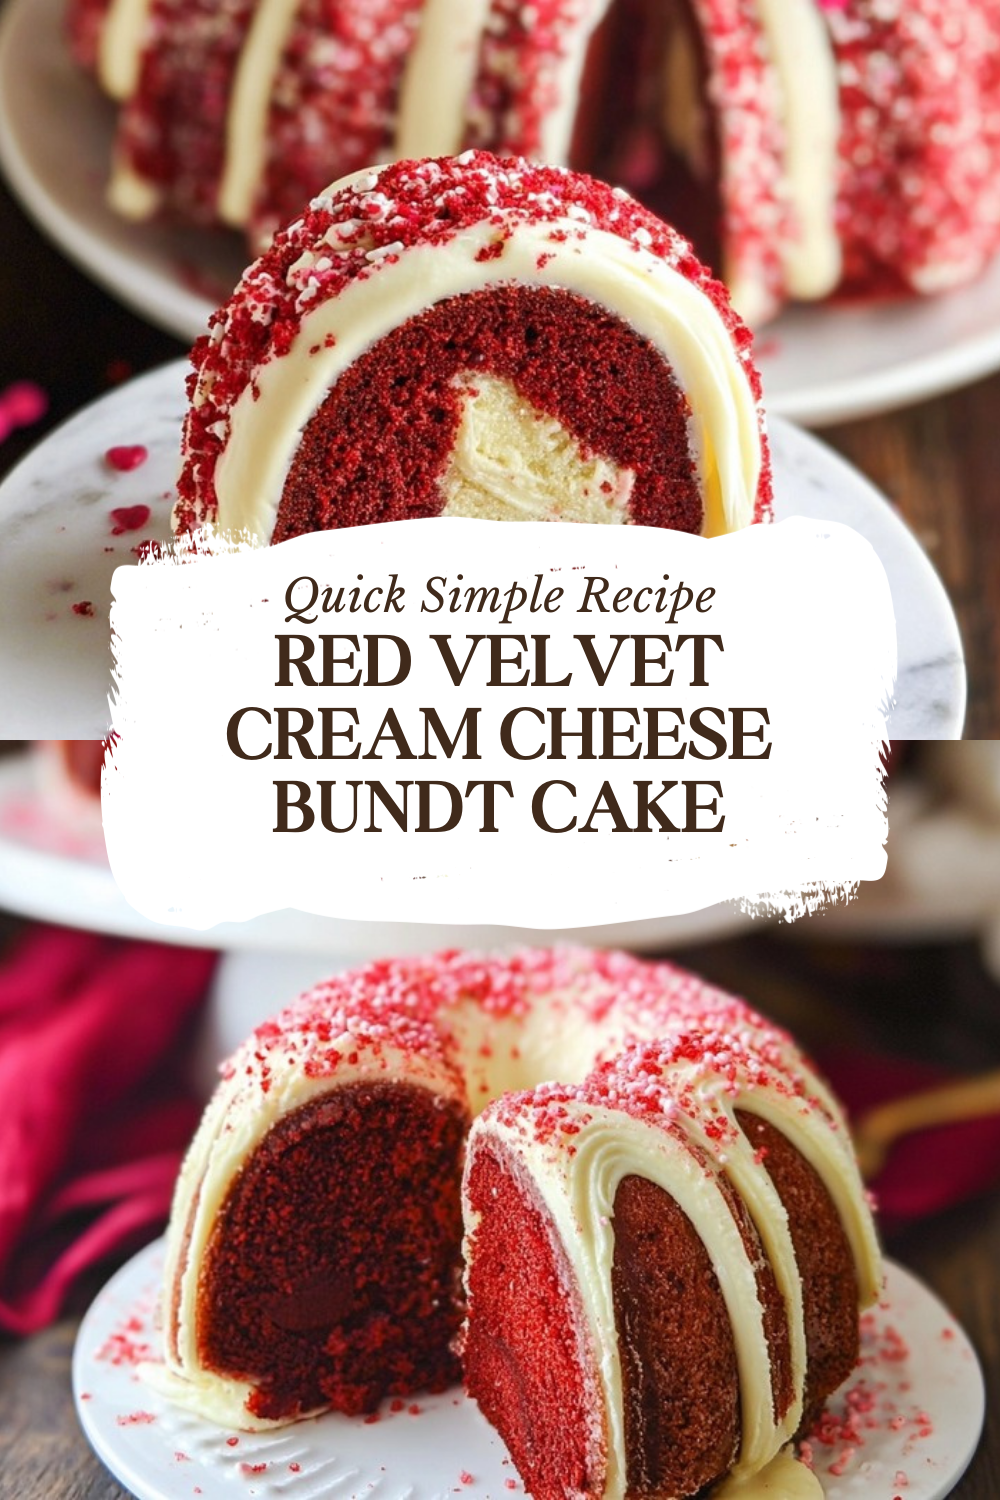
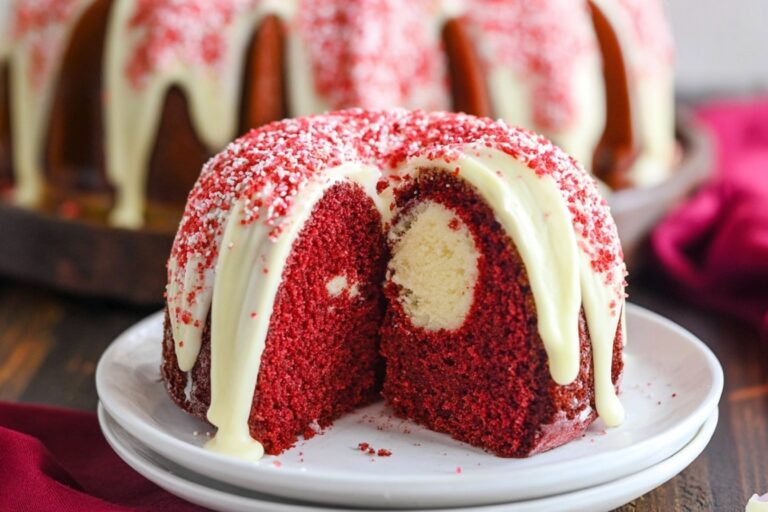
Why You’ll Love This Red Velvet Cream Cheese Bundt Cake
There’s something truly magical about a red velvet cream cheese Bundt cake that makes it perfect for almost any occasion. Whether you’re celebrating a birthday, hosting a holiday gathering, or simply craving a slice of something special, this cake delivers on every level. The striking red color makes it a showstopper on any dessert table, while the tender crumb and creamy swirl keep everyone coming back for seconds.
This recipe stands out for several wonderful reasons that make it a favorite among home bakers:
- Ease of preparation: Despite its impressive appearance, this red velvet Bundt cake comes together with straightforward ingredients and simple mixing techniques. You don’t need fancy equipment or professional skills just a couple of bowls, a whisk, and a Bundt pan. The entire preparation takes only 30 minutes, making it manageable even on busy weekends.
- Stunning presentation: The beautiful swirl of cream cheese running through the center creates an elegant marbled effect when sliced. Drizzled with a tangy cream cheese glaze and optional sprinkles, this cake looks like it came from a bakery without requiring any decorating skills.
- Irresistible flavor combination: The subtle cocoa flavor of red velvet paired with tangy cream cheese creates that classic taste everyone loves. The buttermilk keeps the cake incredibly moist, while the vinegar and baking soda work together to create a tender, velvety texture that lives up to the cake’s name.
- Make-ahead friendly: This cream cheese Bundt cake actually tastes better after resting overnight, allowing the flavors to develop fully. You can bake it a day ahead and glaze it just before serving, making party planning much less stressful.
Jump To
- 1. Why You’ll Love This Red Velvet Cream Cheese Bundt Cake
- 2. Essential Ingredients for Red Velvet Cream Cheese Bundt Cake
- 3. How to Prepare the Perfect Red Velvet Cream Cheese Bundt Cake: Step-by-Step Guide
- 4. Dietary Substitutions to Customize Your Red Velvet Cream Cheese Bundt Cake
- 5. Mastering Red Velvet Cream Cheese Bundt Cake: Advanced Tips and Variations
- 6. How to Store Red Velvet Cream Cheese Bundt Cake: Best Practices
- 7. FAQs: Frequently Asked Questions About Red Velvet Cream Cheese Bundt Cake
- 8. Red Velvet Cream Cheese Bundt Cake
Essential Ingredients for Red Velvet Cream Cheese Bundt Cake
Creating the perfect red velvet cream cheese Bundt cake requires three component parts: the luscious cream cheese filling, the tender red velvet cake, and the drizzly cream cheese glaze. Each element plays a crucial role in the final result, so let’s break down exactly what you’ll need.
Cream Cheese Filling Ingredients
The swirl of cream cheese running through this cake adds wonderful tanginess and moisture to every bite:
- 12 oz cream cheese at room temperature The star of the filling, providing tangy richness and a smooth, creamy texture
- 1/2 cup granulated sugar Sweetens the filling to balance the natural tanginess of the cream cheese
- 2 tablespoons buttermilk at room temperature Thins the filling slightly and adds subtle tang
- 1 large egg at room temperature Binds the filling together so it sets properly during baking
- 1 teaspoon vanilla extract Adds warm, aromatic flavor to complement the cream cheese
Red Velvet Cake Ingredients
These ingredients create the signature tender crumb and subtle chocolate flavor of classic red velvet:
- 2 1/2 cups all-purpose flour Provides structure while keeping the cake tender
- 3 tablespoons unsweetened cocoa powder Gives red velvet its subtle chocolate flavor; according to Healthline, cocoa powder also contains beneficial antioxidants
- 1 teaspoon baking soda Works with the vinegar to create lift and tenderness
- 1 teaspoon kosher salt Balances sweetness and enhances all flavors
- 1 3/4 cups granulated sugar Sweetens the cake without making it overly sweet
- 1 1/4 cups vegetable oil Creates an incredibly moist cake that stays fresh for days
- 1 cup buttermilk at room temperature Adds tanginess and tenderness; the acid activates the baking soda
- 2 teaspoons vanilla extract Rounds out the flavor profile
- 1 teaspoon white vinegar Reacts with baking soda for additional lift and authentic red velvet taste
- 2 large eggs at room temperature Provide structure and richness
- 3 tablespoons red liquid food coloring Creates the signature vibrant red color
- Baking spray with flour Essential for easy release from the intricate Bundt pan design
Cream Cheese Glaze Ingredients
This simple glaze adds sweetness and makes the cake look absolutely professional:
- 2 oz cream cheese at room temperature Creates a tangy, creamy glaze base
- 1 1/2 cups powdered sugar Provides sweetness and creates the perfect drizzling consistency
- 1/4 cup buttermilk at room temperature plus more if needed Thins the glaze to your desired consistency
- 1 tablespoon salted butter melted Adds richness and helps the glaze set
- 1/2 teaspoon vanilla extract Enhances the overall flavor
- Pink and white sprinkles for decorating (optional) Add a festive touch for special occasions
How to Prepare the Perfect Red Velvet Cream Cheese Bundt Cake: Step-by-Step Guide
Making this stunning red velvet cream cheese Bundt cake is easier than you might think. Follow these detailed steps, and you’ll have a gorgeous dessert that looks impressive and tastes even better. The entire process takes about 2 hours from start to finish, with just 30 minutes of active preparation time.
Step 1: Prepare Your Oven and Pan
Start by preheating your oven to 350°F. This temperature allows the cake to bake evenly without browning too quickly on the outside. While the oven heats, generously spray your 10-cup Bundt pan with baking spray that contains flour. Getting into all the nooks and crannies of the pan’s design is essential for easy release later. Pay special attention to the center tube and any decorative ridges.
Step 2: Create the Cream Cheese Filling
In a mixing bowl, combine 12 oz of room temperature cream cheese, 1/2 cup granulated sugar, and 2 tablespoons buttermilk. Beat these ingredients on medium speed until completely smooth with no lumps remaining. This usually takes about 2 minutes. Add 1 large egg and 1 teaspoon vanilla extract, then beat until well combined. The filling should be silky and pourable but not too thin. Set this aside while you prepare the cake batter.
Step 3: Mix the Dry Ingredients
In a large bowl, whisk together the dry ingredients: 2 1/2 cups all-purpose flour, 3 tablespoons unsweetened cocoa powder, 1 teaspoon baking soda, and 1 teaspoon kosher salt. Whisking rather than stirring helps aerate the flour and ensures the leavening agents are evenly distributed throughout. This step prevents pockets of baking soda in your finished cake. Set this bowl aside.
Step 4: Prepare the Wet Ingredients
In a separate large bowl, whisk together 1 3/4 cups granulated sugar and 1 1/4 cups vegetable oil until combined. Add 1 cup buttermilk, 2 teaspoons vanilla extract, 1 teaspoon white vinegar, and 2 large eggs. Whisk everything together until smooth and fully incorporated. The mixture will look slightly separated at first but will come together with continued whisking.
Step 5: Add the Signature Red Color
Stir 3 tablespoons of red liquid food coloring into your wet ingredients. Mix thoroughly until the color is uniform throughout the mixture. The batter will take on that beautiful deep red hue that makes red velvet so recognizable. Don’t worry if it looks very bright the color deepens during baking.
Step 6: Combine Wet and Dry Ingredients
Gradually add the flour mixture to the wet ingredients, mixing just until combined. This is a crucial step: overmixing develops gluten and creates a tough, dense cake. Use a spatula or wooden spoon and fold gently, stopping as soon as no dry streaks of flour remain. The batter will be thick and rich.
Step 7: Assemble the Cake Layers
Pour about 3 cups of the red batter into your prepared Bundt pan and spread it evenly across the bottom. This creates a barrier between the filling and the pan. Next, spoon the cream cheese filling over the batter, leaving a 1/2-inch border around the edges and center tube. This border prevents the filling from touching the pan directly, which could cause sticking or burning.
Carefully top with the remaining cake batter, spreading it gently to cover the filling completely. Smooth the top with your spatula, then tap the pan firmly on the counter a few times to release any trapped air bubbles. This simple step prevents ugly holes in your finished cake.
Step 8: Bake and Cool
Bake the cake for 1 hour to 1 hour 10 minutes, or until a wooden pick inserted in the center comes out clean. The cream cheese swirl may make testing slightly tricky, so insert your tester in a few different spots. If the cake starts browning too quickly, you can tent it loosely with foil during the last 15 minutes.
Let the cake cool in the pan for exactly 30 minutes no more, no less. This timing allows the structure to set while preventing condensation from making the cake soggy. After 30 minutes, invert the cake onto a serving plate. Allow it to cool completely, which takes at least 2 hours, before adding the glaze.
Step 9: Prepare and Add the Glaze
In a small bowl, whisk together 2 oz softened cream cheese, 1 1/2 cups powdered sugar, 1/4 cup buttermilk, 1 tablespoon melted butter, and 1/2 teaspoon vanilla extract until completely smooth. Add more buttermilk, a teaspoon at a time, if you want a thinner drizzle. Pour or spoon the glaze over your completely cooled cake, letting it cascade down the sides naturally. Add sprinkles while the glaze is still wet if using them. Let the cake set for 20 minutes before slicing.

Dietary Substitutions to Customize Your Red Velvet Cream Cheese Bundt Cake
While this classic red velvet cream cheese swirl Bundt cake recipe is perfect as written, you might need to adapt it for dietary restrictions or ingredient availability. Here are some tested substitutions that maintain the cake’s delicious taste and texture.
Gluten-Free Adaptations
For a gluten-free version of this easy red velvet cream cheese Bundt cake, substitute the all-purpose flour with a high-quality gluten-free flour blend designed for baking. Look for blends that contain xanthan gum, which helps replace the binding properties of gluten. Measure carefully, as gluten-free flours can behave differently than wheat flour. The texture may be slightly more dense, but the flavor will remain excellent. Always check that your cocoa powder and other ingredients are certified gluten-free if serving someone with celiac disease.
Dairy-Free and Vegan Options
Creating a dairy-free version requires several substitutions but is certainly possible. Replace the buttermilk with a mixture of your favorite plant-based milk plus 1 teaspoon of vinegar per cup let it sit for 5 minutes to curdle slightly. Use dairy-free cream cheese alternatives for both the filling and glaze; these have improved tremendously in recent years. Substitute the butter in the glaze with coconut oil or a vegan butter stick. For the eggs, a flax egg (1 tablespoon ground flaxseed mixed with 3 tablespoons water per egg) works well, though the texture may be slightly different.
Lower Sugar Modifications
If you’re watching your sugar intake, you can reduce the granulated sugar in the cake by up to 1/4 cup without significantly affecting the texture. For the filling, use a sugar substitute designed for baking, following the package instructions for equivalent sweetness. The glaze can be made with a powdered sugar alternative, though you may need to adjust the liquid slightly. Keep in mind that sugar contributes to moisture and browning, so lower-sugar versions may not have quite the same color or stay fresh as long.
Mastering Red Velvet Cream Cheese Bundt Cake: Advanced Tips and Variations
Once you’ve mastered the basic red velvet Bundt cake with cream cheese, you might want to try some creative variations or refine your technique for even better results. These tips come from extensive testing and will help you achieve bakery-quality results at home.
Professional Baking Techniques
The secret to a perfectly moist red velvet swirl cake lies in proper ingredient temperature. Always bring your cream cheese, eggs, and buttermilk to room temperature before beginning. Cold ingredients don’t combine properly, leading to lumpy batters and uneven textures. If you’re short on time, cut cold cream cheese into small cubes and let it sit for 15 minutes, or place eggs in warm water for 5 minutes.
Another pro tip is to measure your flour correctly. Spoon the flour into your measuring cup and level it off with a knife rather than scooping directly with the cup. Scooping packs the flour down, which can add up to 25% more flour than intended and create a dry, dense cake.
Flavor Variations to Try
While classic red velvet is hard to beat, consider these delicious variations. For a deeper chocolate flavor, add 1-2 more tablespoons of cocoa powder. Create a mocha version by dissolving 1 tablespoon of instant espresso powder in the buttermilk before adding it to the batter. For a festive holiday twist, add 1/2 teaspoon of almond extract to the cake batter or sprinkle chopped pecans over the glaze.
If you love the cream cheese cupcakes on our site, you could even fold finely grated carrots into the cream cheese filling for a carrot cake-red velvet hybrid that’s absolutely unique.
Presentation Ideas
Transform your cream cheese swirl Bundt cake into a stunning centerpiece with simple decorative touches. Fresh berries arranged around the base add color and freshness. A dusting of cocoa powder through a stencil creates an elegant pattern on the glaze. For special occasions, pipe additional cream cheese frosting around the top and decorate with red velvet cake crumbs or chocolate shavings.
Make-Ahead Strategies
This cake is ideal for entertaining because it stores beautifully. Bake the cake up to one day ahead, cool completely, and wrap tightly in plastic wrap. Leave it at room temperature, then glaze just before serving. The unglazed cake can be frozen for up to two months wrap it in two layers of plastic wrap and one layer of aluminum foil. Thaw at room temperature for several hours or overnight in the refrigerator, then glaze as directed. If you’re planning to serve this alongside our popular pumpkin cheesecake for a dessert spread, you can bake both a day ahead and glaze them just before your guests arrive.
How to Store Red Velvet Cream Cheese Bundt Cake: Best Practices
Proper storage keeps your homemade red velvet cream cheese Bundt cake recipe tasting fresh and delicious for days. Because this cake contains cream cheese in both the filling and glaze, it requires slightly different handling than a plain cake.
Room Temperature Storage
You can store the glazed cake at room temperature for up to 2 days if your kitchen stays relatively cool. Cover it with a cake dome or tent it loosely with plastic wrap, being careful not to touch the glaze. The cake stays moist thanks to the oil and buttermilk, so it won’t dry out quickly. However, if your kitchen is warm or humid, refrigerate the cake after the first day.
Refrigeration Guidelines
For longer storage, refrigerate your cake for up to 4 days. Wrap slices individually in plastic wrap, then place them in an airtight container. This prevents the cake from absorbing refrigerator odors and keeps it moist. The cream cheese components will firm up in the refrigerator, so remove slices 30-60 minutes before serving to bring them to room temperature. The flavor and texture are always best at room temperature.
Freezing Instructions
This cake freezes exceptionally well, making it perfect for advance preparation. Wrap the completely cooled, unglazed cake in two layers of plastic wrap, then wrap it in aluminum foil or place it in a large freezer bag. Label with the date and freeze for up to two months. Thaw the wrapped cake at room temperature for several hours or overnight in the refrigerator. Glaze the thawed cake just before serving for the best presentation. Individual slices can also be frozen wrap each one separately, then thaw as needed.
| Storage Method | Duration | Best Practices |
|---|---|---|
| Room Temperature | 1-2 days | Cover with cake dome; avoid warm spots |
| Refrigerator | Up to 4 days | Wrap slices individually; bring to room temp before serving |
| Freezer | Up to 2 months | Freeze unglazed; wrap in plastic and foil; thaw before glazing |
FAQs: Frequently Asked Questions About Red Velvet Cream Cheese Bundt Cake
How do I prevent my red velvet cream cheese Bundt cake from sticking to the pan?
Preventing sticking starts with proper pan prep. Choose a 10-12 cup Bundt pan and spray it generously with baking spray that includes flour, like Baker’s Joy, covering every crevice, including the center tube. Dust lightly with flour if needed and tap out excess. Pour in the batter smoothly without overfilling—fill about 2/3 full. Bake as directed, then cool the cake in the pan on a wire rack for 20-30 minutes. This allows it to firm up and shrink slightly from the sides. Gently loosen edges with a thin knife or spatula, then invert onto a plate. If it resists, place a warm towel over the pan for 5 minutes to loosen. Never cool fully in the pan, as condensation causes sticking. These steps ensure clean release every time. (98 words)
Can I freeze red velvet cream cheese Bundt cake?
Yes, freezing works great for red velvet cream cheese Bundt cake, preserving its moist texture for up to 2-3 months. First, bake and cool the cake completely on a wire rack—about 2 hours. Wrap the unglazed cake tightly in two layers of plastic wrap to block air, then in aluminum foil or a freezer bag. Label with the date. For slices, flash-freeze individually on a tray first, then wrap. Thaw overnight in the fridge or 2-3 hours at room temperature. Glaze and serve once thawed to avoid sogginess. Avoid freezing glazed cake, as cream cheese frosting can weep. This method keeps the cake fresh-tasting for unexpected guests or make-ahead baking. (112 words)
How long do I bake red velvet cream cheese Bundt cake?
Bake red velvet cream cheese Bundt cake in a preheated 350°F oven for 50-60 minutes, depending on pan size and oven variations. A 10-12 cup pan typically needs 55 minutes. Test doneness with a toothpick inserted near the center—it should come out clean or with moist crumbs, not wet batter. The cream cheese swirl may make the center slightly denser, so check multiple spots. If browning too fast, tent loosely with foil after 40 minutes. Cool in pan 30 minutes before inverting. Factors like altitude or batter humidity can add 5-10 minutes—always rely on the toothpick test over time. This ensures a moist, evenly baked cake without dry edges. (104 words)
What’s the best way to store red velvet cream cheese Bundt cake?
Store leftover red velvet cream cheese Bundt cake covered at room temperature for up to 2 days in an airtight container or cake dome to maintain moisture. For longer storage, refrigerate slices wrapped in plastic wrap inside a container for 5-7 days—the cream cheese keeps it fresh but chills firm the texture. Bring to room temperature 30-60 minutes before serving for best flavor. Avoid stacking slices directly to prevent sticking. In warm climates, refrigerate immediately after cooling to avoid spoilage. For optimal taste, glaze just before serving as cream cheese frosting softens quickly. These tips keep your cake tender and delicious. (98 words)
Why use cream cheese in red velvet Bundt cake and how do I add it?
Cream cheese adds a tangy, creamy contrast to the rich cocoa and buttermilk flavors in red velvet Bundt cake, creating a swirled ribbon that stays moist without overpowering. Prepare a simple filling: beat 8 oz softened cream cheese, 1/4 cup sugar, 1 egg, and 1 tsp vanilla until smooth. Spoon half the red velvet batter into the prepared pan, dollop cream cheese mixture in the center, then top with remaining batter. Swirl lightly with a knife for marbling. Bake as usual. Use full-fat cream cheese for best texture—it won’t curdle or sink. This easy step elevates the cake’s indulgence. (102 words)
Red Velvet Cream Cheese Bundt Cake
❤️ Moist red velvet bundt cake swirls luscious cream cheese ribbon for tangy-sweet contrast – stunning holiday showstopper serves 12 effortlessly!
🎂 Freezes 2 months fridge 4 days, glaze day-of for glossy perfection impressive yet foolproof baking win.
- Total Time: 4 hours 30 minutes
- Yield: 12 servings
Ingredients
– 12 oz cream cheese at room temperature
– 1/2 cup granulated sugar
– 2 tablespoons buttermilk at room temperature
– 1 large egg at room temperature
– 1 teaspoon vanilla extract
– 2 1/2 cups all-purpose flour
– 3 tablespoons unsweetened cocoa powder
– 1 teaspoon baking soda
– 1 teaspoon kosher salt
– 1 3/4 cups granulated sugar
– 1 1/4 cups vegetable oil
– 1 cup buttermilk at room temperature
– 2 teaspoons vanilla extract
– 1 teaspoon white vinegar
– 2 large eggs at room temperature
– 3 tablespoons red liquid food coloring
– 2 oz cream cheese at room temperature
– 1 1/2 cups powdered sugar
– 1/4 cup buttermilk at room temperature plus more if needed
– 1 tablespoon salted butter melted
– 1/2 teaspoon vanilla extract
– Pink and white sprinkles for decorating (optional)
Instructions
1-Step 1: Prepare Your Oven and Pan Start by preheating your oven to 350°F. This temperature allows the cake to bake evenly without browning too quickly on the outside. While the oven heats, generously spray your 10-cup Bundt pan with baking spray that contains flour. Getting into all the nooks and crannies of the pan’s design is essential for easy release later. Pay special attention to the center tube and any decorative ridges.
2-Step 2: Create the Cream Cheese Filling In a mixing bowl, combine 12 oz of room temperature cream cheese, 1/2 cup granulated sugar, and 2 tablespoons buttermilk. Beat these ingredients on medium speed until completely smooth with no lumps remaining. This usually takes about 2 minutes. Add 1 large egg and 1 teaspoon vanilla extract, then beat until well combined. The filling should be silky and pourable but not too thin. Set this aside while you prepare the cake batter.
3-Step 3: Mix the Dry Ingredients In a large bowl, whisk together the dry ingredients: 2 1/2 cups all-purpose flour, 3 tablespoons unsweetened cocoa powder, 1 teaspoon baking soda, and 1 teaspoon kosher salt. Whisking rather than stirring helps aerate the flour and ensures the leavening agents are evenly distributed throughout. This step prevents pockets of baking soda in your finished cake. Set this bowl aside.
4-Step 4: Prepare the Wet Ingredients In a separate large bowl, whisk together 1 3/4 cups granulated sugar and 1 1/4 cups vegetable oil until combined. Add 1 cup buttermilk, 2 teaspoons vanilla extract, 1 teaspoon white vinegar, and 2 large eggs. Whisk everything together until smooth and fully incorporated. The mixture will look slightly separated at first but will come together with continued whisking.
5-Step 5: Add the Signature Red Color Stir 3 tablespoons of red liquid food coloring into your wet ingredients. Mix thoroughly until the color is uniform throughout the mixture. The batter will take on that beautiful deep red hue that makes red velvet so recognizable. Don’t worry if it looks very bright the color deepens during baking.
6-Step 6: Combine Wet and Dry Ingredients Gradually add the flour mixture to the wet ingredients, mixing just until combined. This is a crucial step: overmixing develops gluten and creates a tough, dense cake. Use a spatula or wooden spoon and fold gently, stopping as soon as no dry streaks of flour remain. The batter will be thick and rich.
7-Step 7: Assemble the Cake Layers Pour about 3 cups of the red batter into your prepared Bundt pan and spread it evenly across the bottom. This creates a barrier between the filling and the pan. Next, spoon the cream cheese filling over the batter, leaving a 1/2-inch border around the edges and center tube. This border prevents the filling from touching the pan directly, which could cause sticking or burning. Carefully top with the remaining cake batter, spreading it gently to cover the filling completely. Smooth the top with your spatula, then tap the pan firmly on the counter a few times to release any trapped air bubbles. This simple step prevents ugly holes in your finished cake.
8-Step 8: Bake and Cool Bake the cake for 1 hour to 1 hour 10 minutes, or until a wooden pick inserted in the center comes out clean. The cream cheese swirl may make testing slightly tricky, so insert your tester in a few different spots. If the cake starts browning too quickly, you can tent it loosely with foil during the last 15 minutes. Let the cake cool in the pan for exactly 30 minutes no more, no less. This timing allows the structure to set while preventing condensation from making the cake soggy. After 30 minutes, invert the cake onto a serving plate. Allow it to cool completely, which takes at least 2 hours, before adding the glaze.
9-Step 9: Prepare and Add the Glaze In a small bowl, whisk together 2 oz softened cream cheese, 1 1/2 cups powdered sugar, 1/4 cup buttermilk, 1 tablespoon melted butter, and 1/2 teaspoon vanilla extract until completely smooth. Add more buttermilk, a teaspoon at a time, if you want a thinner drizzle. Pour or spoon the glaze over your completely cooled cake, letting it cascade down the sides naturally. Add sprinkles while the glaze is still wet if using them. Let the cake set for 20 minutes before slicing.
Notes
🧴 Thoroughly spray Bundt with flour baking spray; avoid sticking disasters.
⏳ Cool exactly 30 min in pan before inverting – prevents moisture sogginess.
❄️ Freeze unglazed up to 2 months; thaw room temp then glaze fresh.
- Prep Time: 30 minutes
- Cooling & Setting: 2 hours 50 minutes
- Cook Time: 1 hour 10 minutes
- Category: Dessert
- Method: Bake
- Cuisine: American
- Diet: Vegetarian
Nutrition
- Serving Size: 1 slice
- Calories: 620 kcal
- Sugar: 48g
- Sodium: 420mg
- Fat: 36g
- Saturated Fat: 12g
- Unsaturated Fat: 24g
- Trans Fat: 0g
- Carbohydrates: 68g
- Fiber: 1g
- Protein: 8g
- Cholesterol: 105mg


