
Why You’ll Love This Raspberry Thumbprint Cookies
Author: Camille Hayes
My blog shares my passion for cooking by offering a variety of recipes that are simple and accessible to everyone. My ambition is to inspire readers to explore new flavors, cook with joy, and create memorable moments around the table.
- Ease of preparation: Raspberry Thumbprint Cookies are a quick, no-fuss bake that comes together in about 25 minutes total. With simple steps like creaming butter and sugar and pressing a thumb indent, this raspberry thumbprint cookies recipe is perfect for busy parents, students, or anyone short on time.
- Health benefits: Made with real raspberries or your favorite jam, these jam-filled cookies provide a touch of fruit and bright flavor. Raspberries contain vitamins and fiber, and the recipe’s straightforward ingredient list makes it easy to tweak for lower-calorie or allergen-friendly versions.
- Versatility: This raspberry thumbprint cookies base works with many fillings and swaps. Use other jams, add lemon zest or almond extract in place of vanilla, or switch to gluten-free flour to suit dietary needs while keeping the same buttery cookie texture.
- Distinctive flavor: The soft, buttery shortbread base paired with a tart jam center creates a classic contrast of textures and tastes that makes these raspberry thumbprint cookies a crowd-pleaser for cookie exchanges, gifts, or afternoon tea.
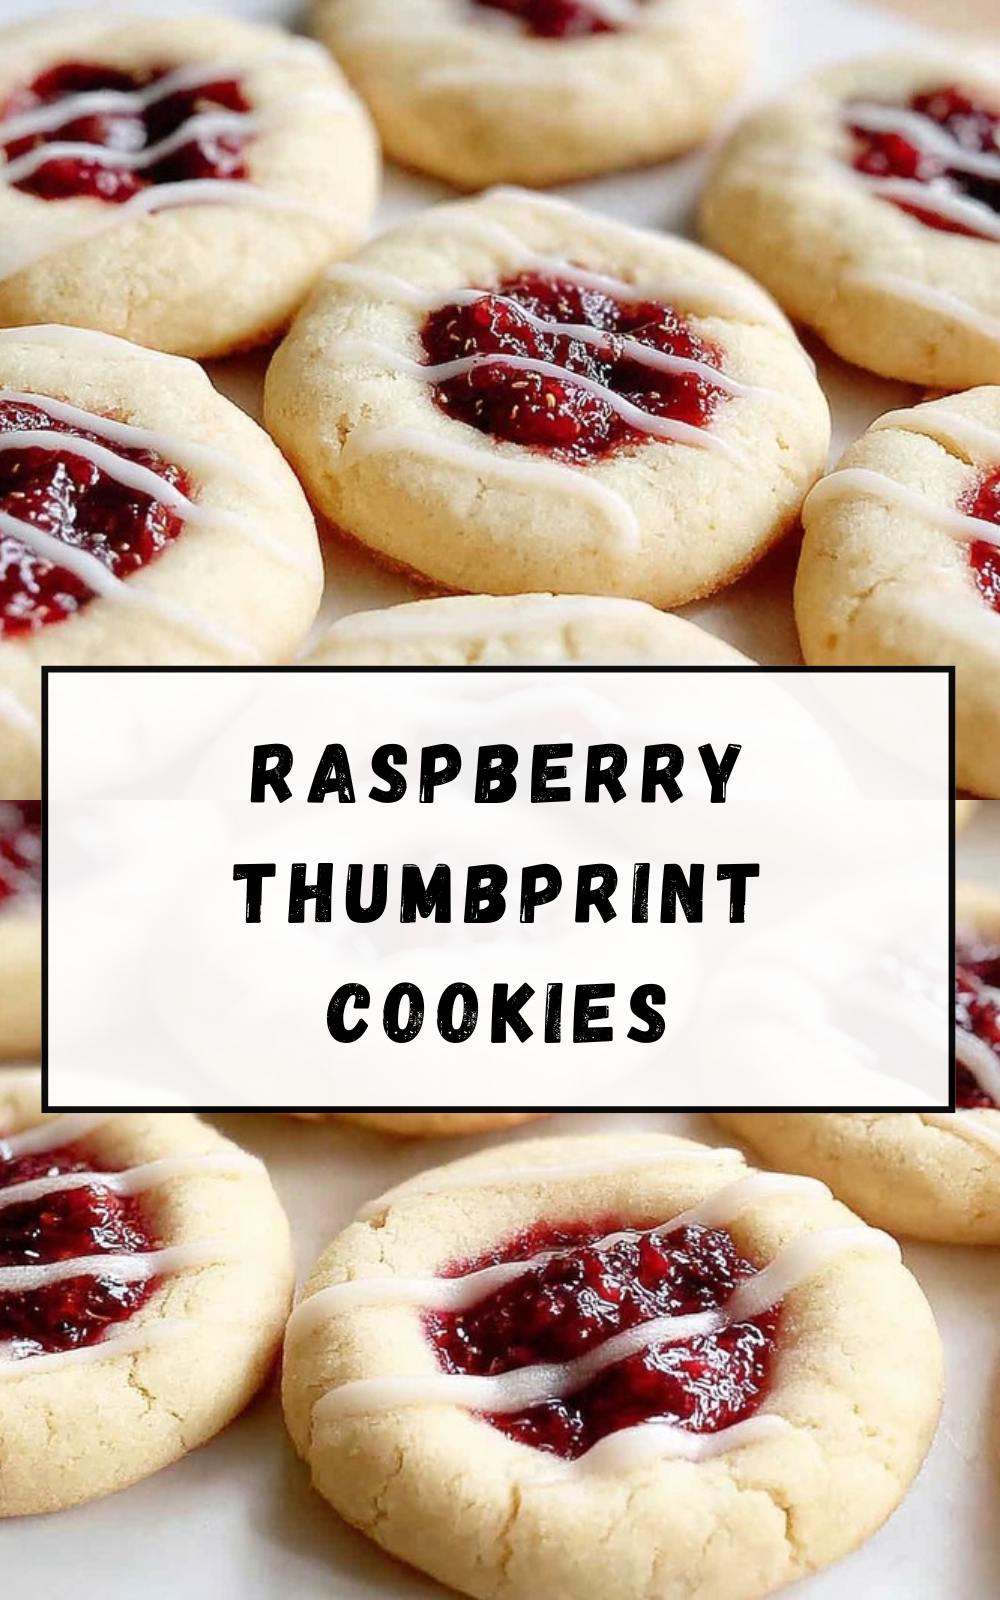
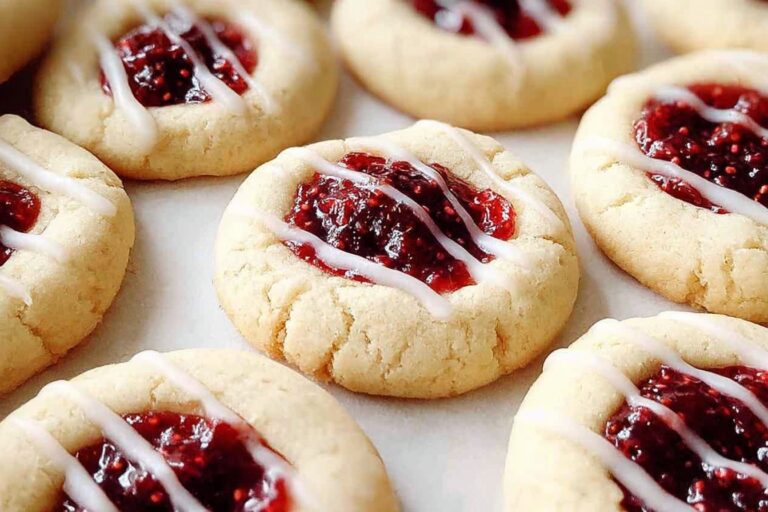
These cookies feature a buttery, soft texture that melts in the mouth with a sweet raspberry jam center.
Jump To
- 1. Why You’ll Love This Raspberry Thumbprint Cookies
- 2. Essential Ingredients for Raspberry Thumbprint Cookies
- 3. How to Prepare the Perfect Raspberry Thumbprint Cookies: Step-by-Step Guide
- 4. Dietary Substitutions to Customize Your Raspberry Thumbprint Cookies
- 5. Mastering Raspberry Thumbprint Cookies: Advanced Tips and Variations
- 6. How to Store Raspberry Thumbprint Cookies: Best Practices
- 7. Nutritional Information
- 8. Tips and Tricks
- 9. FAQs: Frequently Asked Questions About Raspberry Thumbprint Cookies
- 10. Raspberry Thumbprint Cookies
Essential Ingredients for Raspberry Thumbprint Cookies
Below is a clear, structured list of every ingredient used in this raspberry thumbprint cookies recipe. Each ingredient is shown with the precise measurement first, followed by the ingredient name and a short note about its role.
- 1 cup softened butter (2 sticks) – Provides the rich, buttery base and tender texture that defines these thumbprint cookies.
- 2/3 cup white granulated sugar – Sweetens the dough and helps with slight browning and structure.
- 2 egg yolks – Add richness and help bind the dough; save the egg whites for other uses like meringues.
- 1 teaspoon vanilla extract (can substitute with 1 teaspoon almond extract or add lemon zest for brightness) – Adds aromatic depth; almond or lemon zest are optional swaps for flavor variety.
- 1/2 teaspoon kosher salt – Balances sweetness and tightens flavor; if using salted butter, add an extra pinch only if needed.
- 2 1/3 cups all-purpose flour (spooned into cup and leveled) – Forms the cookie structure; spooning and leveling gives the right flour amount for tender cookies.
- 1/2 cup raspberry jam (any jam flavor can be used) – Fills the thumbprint indent and provides the bright, fruity center. Seedless jam reduces the chance of a gritty texture.
Special Dietary Options
- Vegan: Replace butter with 1 cup vegan butter and swap egg yolks for 1/4 cup applesauce plus 1 tablespoon ground flaxseed mixed with 3 tablespoons water (let sit 5 minutes). Use a vegan jam.
- Gluten-free: Use a 1-to-1 gluten-free all-purpose flour blend in place of the 2 1/3 cups all-purpose flour. Add 1/4 teaspoon xanthan gum if your blend does not contain it to help with structure.
- Low-calorie: Reduce sugar slightly or use a granular sugar substitute formulated for baking in place of the 2/3 cup sugar, and choose a no-sugar-added jam. Expect a small change in texture.
How to Prepare the Perfect Raspberry Thumbprint Cookies: Step-by-Step Guide
First Step: Prep and mise en place
Preheat your oven to 350°F and line two baking sheets with parchment paper. Measure all ingredients precisely: spoon and level the 2 1/3 cups of all-purpose flour so the dough has the right texture. Having a small cookie scoop and a teaspoon ready will speed up the process and create evenly sized cookies.
Second Step: Cream butter and sugar
In a large mixing bowl, add 1 cup softened butter (2 sticks) and 2/3 cup white granulated sugar. Using a handheld or stand mixer on medium speed, cream until the mixture is pale and slightly fluffy, about 2 to 3 minutes. Properly creamed butter and sugar trap small air pockets for a light cookie crumb.
Third Step: Add egg yolks and flavoring
Add the 2 egg yolks one at a time, beating well between additions so each yolk is fully incorporated. Stir in 1 teaspoon vanilla extract. If you prefer, substitute the vanilla with 1 teaspoon almond extract or add a little lemon zest for a brighter finish. Mixing yolks in slowly keeps the dough smooth and avoids breaking the emulsion.
Fourth Step: Combine dry ingredients
Gradually add 1/2 teaspoon kosher salt and the 2 1/3 cups all-purpose flour to the bowl. Mix on low speed or fold in by hand until the dough comes together and there are no dry streaks of flour. The dough should be soft but not sticky; if it seems too wet because of warm butter, chill for 10 minutes.
Fifth Step: Shape the cookies
- Using a small cookie scoop, form the dough into even-sized balls and place them on the prepared baking sheets about 2 inches apart so the cookies have room to spread.
- Press your thumb or the back of a small spoon into the center of each cookie without pressing all the way through to make an indent. Aim for an indent about 1/2 inch deep so it will hold the jam while baking.
Sixth Step: Fill and bake
Spoon about a teaspoon of raspberry jam into each indented center. Using 1/2 cup raspberry jam total should cover the batch; if you prefer more jam, add a little extra but avoid overfilling so the jam does not run. Bake the trays for 12 to 15 minutes, rotating pans halfway through if your oven has hot spots. Cookies are done when the edges are lightly browned underneath.
Final Step: Cool and serve
Cool the cookies on the baking sheets for 10 minutes after removing them from the oven, then transfer to a wire rack to cool completely. Cooling on the sheet helps the cookies set so they keep their shape. Once cooled, store or serve as desired. These raspberry thumbprint cookies pair wonderfully with tea or a light dessert spread.
Timing Summary
- Prep Time: 10 minutes
- Cook Time: 15 minutes
- Total Time: 25 minutes
Notes on adaptations: For gluten-free or vegan options, follow the ingredient swaps listed earlier and follow the same steps. If using frozen dough balls, press the indents before freezing and add a couple of minutes to bake time when baking from frozen.

Dietary Substitutions to Customize Your Raspberry Thumbprint Cookies
Protein and Main Component Alternatives
If you need to swap major ingredients in this raspberry thumbprint cookies recipe, here are reliable alternatives that keep texture and flavor close to the original.
- Butter: Use vegan stick butter 1:1 for a dairy-free version. Expect similar flavor and texture if you use a high-quality vegan butter.
- Egg yolks: Replace the 2 egg yolks with a flax “egg” blend for vegan needs: mix 2 tablespoons ground flaxseed with 6 tablespoons water, let thicken, and use in place of yolks. Note: the texture will be slightly denser.
- All-purpose flour: Swap to a 1-to-1 gluten-free baking mix. If your blend lacks xanthan gum, add 1/4 teaspoon xanthan gum to mimic gluten structure.
Vegetable, Sauce, and Seasoning Modifications
These modifications let you play with flavor while keeping the core method of the raspberry thumbprint cookies intact.
- Jam and fillings: Swap raspberry jam for apricot, strawberry, peach, or cranberry jam for variety. For a nutty twist, add a teaspoon of almond butter under the jam.
- Flavorings: Replace vanilla with almond extract or add 1 teaspoon lemon zest to brighten the dough. Cinnamon or cardamom can be added sparingly for a cozy twist.
- Sweeteners: Use a baking-friendly sugar substitute to lower calories, but be aware this can change browning and texture slightly.
Mastering Raspberry Thumbprint Cookies: Advanced Tips and Variations
Once you have the basic raspberry thumbprint cookies method down, try these pro tips and creative twists to make the cookies your own.
Pro cooking techniques
- Chill the dough briefly if your kitchen is warm; slightly firmer dough holds its shape better while baking.
- For even baking, weigh your cookie dough balls or use the same-size scoop so cookies finish at the same time.
- If indents puff up in the oven, press a thumb or the back of a spoon into the center as soon as cookies come out of the oven, then fill with jam while warm.
Flavor variations
- Make lemon-raspberry thumbprints by adding 1 teaspoon lemon zest to the dough and using a mixed raspberry-lemon jam.
- Add 1/2 cup finely chopped toasted nuts to the dough, or roll cookie balls in chopped nuts or sanding sugar before baking for texture.
- Use chocolate ganache in place of jam for a chocolate thumbprint variation; fill with ganache when cookies are cool.
Presentation tips
Serve raspberry thumbprint cookies on a decorative plate or tiered stand. For gifting, layer cookies in a tin with parchment between layers. They pair well with citrus desserts or cream cakes; try serving alongside a lemon tart or a blueberry cream cake for a pretty dessert spread.
Try pairing with this lemon tart or this blueberry cream cake for complementary flavors.
Make-ahead options
- Freeze shaped, indented dough balls on a sheet pan until solid, then store in a freezer bag for up to 3 months. Bake from frozen, adding a few extra minutes.
- Bake fully, cool, then fill centers and store in an airtight container in the refrigerator for up to one week.
How to Store Raspberry Thumbprint Cookies: Best Practices
Proper storage keeps your raspberry thumbprint cookies tasting fresh and looking great. Below are short-term and long-term options with tips for reheating and meal prep.
Refrigeration
- Store cookies in an airtight container in the refrigerator for up to one week. Layer with parchment paper to prevent jam from sticking to the lid or other cookies.
- Bring to room temperature before serving so the butter regains a soft, melt-in-your-mouth texture.
Freezing
- Freeze unbaked dough balls with indents on a sheet pan until solid, then transfer to a freezer bag for up to 3 months. Bake from frozen at 350°F, adding 1 to 2 minutes to bake time.
- For baked cookies, cool completely, fill, then freeze in a single layer. Freeze filled cookies for up to 2 months to prevent jam separation.
Reheating
- To recrisp cookies, warm in a 300°F oven for 3 to 5 minutes after thawing to room temperature.
- A quick 10 to 15 second zap in the microwave can soften jam slightly but may make cookies less crisp.
Meal prep considerations
Make large batches, freeze dough or baked cookies, and pull out what you need for gatherings or snacks. Label bags with dates so you rotate older batches first.
Nutritional Information
Nutrition per cookie based on the provided recipe:
| Nutrient | Amount per cookie |
|---|---|
| Calories | 190 kcal |
| Carbohydrates | 24 g |
| Protein | 2 g |
| Fat | 10 g |
| Saturated Fat | 6 g |
| Cholesterol | 44 mg |
| Sodium | 135 mg |
| Fiber | 0.5 g |
| Sugar | 11 g |
| Vitamin A | 310 IU |
Tips and Tricks
- Store cookies in an airtight container in the refrigerator for up to one week for best freshness.
- Dough can be frozen before baking: scoop dough balls onto a sheet, press thumb indent, cover and freeze until solid, then store in a freezer bag. When ready to bake, place frozen dough balls on a baking sheet, fill with jam, and bake adding a few extra minutes.
- Substitute any jam flavor for variety, including apricot, strawberry, peach, or cranberry. Seedless jam is easiest to work with.
- Use salted butter if you prefer; if using unsalted, add an extra pinch of salt to the dough to balance sweetness.
- Save egg whites for other recipes like meringues or an egg-white omelet.
- These cookies are ideal for gift-giving, cookie exchanges, or simple snacking.
FAQs: Frequently Asked Questions About Raspberry Thumbprint Cookies
How do you make raspberry thumbprint cookies from scratch?
Raspberry thumbprint cookies are simple shortbread-style treats with a jam-filled center. Start with 1 cup softened butter, 1/2 cup powdered sugar, 1 tsp vanilla, 2 cups flour, and 1/4 tsp salt. Cream butter and sugar until fluffy, add vanilla, then mix in dry ingredients to form dough. Chill 30 minutes. Preheat oven to 350°F. Roll into 1-inch balls, place on parchment-lined sheets, and press thumb gently into each center to create an indent (about 1/2-inch deep). Bake 12-15 minutes until edges are lightly golden—don’t overbake. Cool 5 minutes, then fill indents with 1/3 cup raspberry jam using a spoon or piping bag. Makes 24 cookies. For best results, use seedless jam to avoid sogginess and press indents after baking if they puff up. Store in an airtight container. These hold shape well and pair perfectly with tea. (112 words)
Can you freeze raspberry thumbprint cookies or the dough?
Yes, freezing works great for raspberry thumbprint cookies, saving time for holidays. For dough: Scoop into 1-inch balls, press thumb indents, and freeze on a sheet pan until solid (about 2 hours). Transfer to a freezer bag for up to 3 months. Bake straight from frozen at 350°F, adding 1-2 extra minutes—no thawing needed. Fill with raspberry jam right after baking while warm. For baked cookies: Cool completely, fill, then freeze in a single layer before bagging. Thaw at room temp and recrisp in a 300°F oven for 5 minutes. Avoid freezing filled cookies longer than 1 month to prevent jam separation. Label bags with date for easy use. This method keeps texture crisp and flavor fresh. (118 words)
What are other names for thumbprint cookies?
Thumbprint cookies go by several names depending on region and style. Common alternatives include butterballs (for plain versions), jam drops, or linzer cookies (almond-flour variations). In Sweden, raspberry-filled ones are called “hallongrotta,” translating to “raspberry cave,” reflecting the indented jam pocket. Some call them bird’s nests or holiday thumbprints during Christmas. These names highlight their versatile, buttery base and fruit filling. No matter the name, the recipe stays simple: shortbread dough baked with a thumb-pressed center for jam. If baking raspberry hallongrotta, use high-quality preserves for authentic tartness. They’re a staple in Scandinavian fika traditions and American cookie swaps alike. Search for these terms to find cultural twists. (109 words)
How should you store raspberry thumbprint cookies?
Store raspberry thumbprint cookies properly to keep them fresh up to 1 week. After cooling completely, place in a single layer in an airtight container lined with parchment paper to prevent sticking from jam. Keep at room temperature in a cool, dry spot—avoid humid areas to stop sogginess. For longer storage, refrigerate in a sealed container up to 10 days; bring to room temp before serving for best texture. Freeze unfilled baked cookies up to 3 months as noted earlier. Filled ones last 2 months frozen. Tip: Layer wax paper between stacks and check jam for mold weekly. They stay crispest without plastic wrap touching the jam. Perfect for gifting in tins. (102 words)
What jam works best for raspberry thumbprint cookies?
Seedless raspberry jam is ideal for thumbprint cookies—it spreads smoothly, adds bright tartness, and won’t make centers gritty. Use 1/3 to 1/2 cup total for 24 cookies. Brands like Bonne Maman or Smucker’s offer quality options with real fruit. For homemade: Simmer 2 cups raspberries, 1/2 cup sugar, 1 tbsp lemon juice until thick (10 minutes), then strain seeds. Fill warm cookies post-bake to set nicely. Avoid runny preserves that leak during baking. Variations: Mix in lemon zest for zing or swirl strawberry for duo-berry flavor. Pro tip: Pipe jam with a small tip for neat indents. This elevates the classic cookie without overpowering the buttery dough. (108 words)
Raspberry Thumbprint Cookies
🍪 Create delightful homemade cookies with a buttery, melt-in-your-mouth texture and sweet raspberry jam center that everyone will love
🫐 Enjoy this easy-to-follow recipe that delivers bakery-quality thumbprint cookies perfect for holidays, gifts, or everyday treats
- Total Time: 25 minutes
- Yield: 24 cookies
Ingredients
– 1 cup softened butter for the rich, buttery base and tender texture
– 2/3 cup white granulated sugar for sweetening and slight browning
– 2 egg yolks for richness and binding
– 1 teaspoon vanilla extract for aromatic depth
– 1/2 teaspoon kosher salt to balance sweetness and tighten flavor
– 2 1/3 cups all-purpose flour for cookie structure
– 1/2 cup raspberry jam for filling and fruity center
Instructions
1-First Step: Prep and mise en place
Preheat your oven to 350°F and line two baking sheets with parchment paper. Measure all ingredients precisely: spoon and level the 2 1/3 cups of all-purpose flour so the dough has the right texture. Having a small cookie scoop and a teaspoon ready will speed up the process and create evenly sized cookies.
2-Second Step: Cream butter and sugar
In a large mixing bowl, add 1 cup softened butter (2 sticks) and 2/3 cup white granulated sugar. Using a handheld or stand mixer on medium speed, cream until the mixture is pale and slightly fluffy, about 2 to 3 minutes. Properly creamed butter and sugar trap small air pockets for a light cookie crumb.
3-Third Step: Add egg yolks and flavoring
Add the 2 egg yolks one at a time, beating well between additions so each yolk is fully incorporated. Stir in 1 teaspoon vanilla extract. If you prefer, substitute the vanilla with 1 teaspoon almond extract or add a little lemon zest for a brighter finish. Mixing yolks in slowly keeps the dough smooth and avoids breaking the emulsion.
4-Fourth Step: Combine dry ingredients
Gradually add 1/2 teaspoon kosher salt and the 2 1/3 cups all-purpose flour to the bowl. Mix on low speed or fold in by hand until the dough comes together and there are no dry streaks of flour. The dough should be soft but not sticky; if it seems too wet because of warm butter, chill for 10 minutes.
5-Fifth Step: Shape the cookies
* Using a small cookie scoop, form the dough into even-sized balls and place them on the prepared baking sheets about 2 inches apart so the cookies have room to spread.
* Press your thumb or the back of a small spoon into the center of each cookie without pressing all the way through to make an indent. Aim for an indent about 1/2 inch deep so it will hold the jam while baking.
6-Sixth Step: Fill and bake
Spoon about a teaspoon of raspberry jam into each indented center. Using 1/2 cup raspberry jam total should cover the batch; if you prefer more jam, add a little extra but avoid overfilling so the jam does not run. Bake the trays for 12 to 15 minutes, rotating pans halfway through if your oven has hot spots. Cookies are done when the edges are lightly browned underneath.
7-Final Step: Cool and serve
Cool the cookies on the baking sheets for 10 minutes after removing them from the oven, then transfer to a wire rack to cool completely. Cooling on the sheet helps the cookies set so they keep their shape. Once cooled, store or serve as desired. These raspberry thumbprint cookies pair wonderfully with tea or a light dessert spread.
Notes
🍯 Store cookies in an airtight container in the refrigerator for up to one week to maintain freshness
❄️ Dough can be frozen before baking – scoop dough balls, press thumb indent, cover and freeze until solid, then store in freezer bag
🍓 Substitute any jam flavor for variety including apricot, strawberry, peach, or cranberry to customize your cookies
- Prep Time: 10 minutes
- Cook Time: 15 minutes
- Category: Dessert
- Method: Baking
- Cuisine: American
- Diet: Vegetarian
Nutrition
- Serving Size: 1 cookie
- Calories: 190
- Sugar: 11
- Sodium: 135
- Fat: 10
- Saturated Fat: 6
- Unsaturated Fat: 3.5
- Trans Fat: 0.4
- Carbohydrates: 24
- Fiber: 0.5
- Protein: 2
- Cholesterol: 44


