
Why You’ll Love This Banana Pudding Bars
If you’re craving a dessert that tastes like pure nostalgia but takes barely any effort, these Banana Pudding Bars are calling your name! They combine everything you love about classic banana pudding with the convenience of a bar format that’s easy to slice, serve, and share with friends and family.
- Ease of preparation: With just 25 minutes of hands-on prep time, this banana pudding bar recipe is perfect for busy weeknights or last-minute gatherings. The no-bake style assembly means you won’t be stuck in the kitchen for hours. Simply press the crust, layer the ingredients, and let your fridge do the rest of the work while you relax or tackle other things on your to-do list.
- Health benefits: Fresh bananas bring natural sweetness plus essential nutrients like potassium, vitamin C, and vitamin B6 to every bite. Each serving contains 1.9mg of vitamin C and 170mg of potassium, making this treat a bit more wholesome than your average dessert. You can feel good about serving these bars to your family knowing they’re getting real fruit in every slice.
- Versatility: These bars adapt beautifully to different dietary needs and preferences. Need a gluten-free version? Simply swap the vanilla wafers for a certified gluten-free alternative. Want to cut back on sugar? Use sugar-free instant pudding mix. The base recipe welcomes all kinds of tweaks while still delivering that creamy, dreamy banana flavor everyone loves.
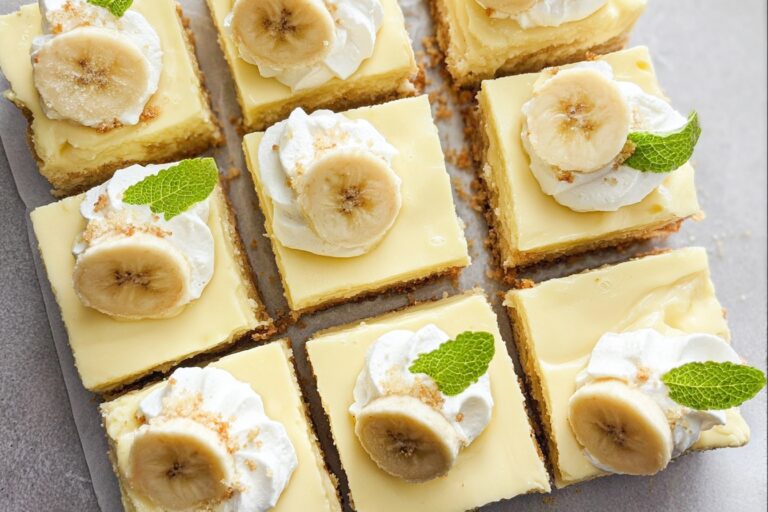
- Distinctive flavor: The combination of crunchy vanilla wafer crust, silky vanilla pudding, sweet ripe bananas, and fluffy whipped topping creates layers of texture and taste that make every bite exciting. It’s like having a banana cream pie but without all the fuss of making pastry from scratch!
Jump To
- 1. Why You’ll Love This Banana Pudding Bars
- 2. Essential Ingredients for Banana Pudding Bars
- 3. Step-by-Step Instructions to Make Banana Pudding Bars
- 4. Tips and Variations for the Best Banana Pudding Bars
- 5. Nutrition Facts for Banana Pudding Bars
- 6. Frequently Asked Questions About Banana Pudding Bars
- 7. Banana Pudding Bars
Essential Ingredients for Banana Pudding Bars
Gathering your ingredients is the first step to creating these irresistible banana pudding bars. Here’s everything you’ll need to make this recipe a success:
Complete Ingredient List
- 60 vanilla wafers, finely crushed (about 1 1/2 cups): These form the sweet, crunchy base that gives your bars that classic banana pudding flavor. Crush them finely for the best crust texture.
- 1/3 cup melted butter: Binds the crust together and adds a rich, buttery flavor. Use unsalted butter for best results.
- 3 bananas, sliced: Choose ripe bananas with some brown spots for maximum sweetness and flavor. Firmer bananas hold their shape better during layering.
- 2 packages (3.4 ounces each) vanilla instant pudding mix: The key to achieving that creamy, dreamy pudding texture without cooking. Stick with instant pudding, not cook-and-serve varieties.
- 3 cups cold milk: Essential for creating the pudding base. Whole milk produces the creamiest results, but you can use any milk you prefer.
- 2 1/2 cups whipped topping, divided: Adds lightness and a beautiful finish to your bars. You’ll use some in the filling and the rest on top.
When selecting bananas for your banana pudding bar recipe, look for ones that are yellow with small brown speckles. These are perfectly ripe and will give you the ideal balance of sweetness and structural integrity. According to health experts, bananas are packed with nutrients that make this dessert slightly more nourishing than typical treats!
Step-by-Step Instructions to Make Banana Pudding Bars
Ready to create the most delicious banana pudding bars you’ve ever tasted? Follow these simple steps for perfect results every time. The whole process takes about 25 minutes of active prep, plus chilling time.
What You’ll Need
Equipment: 13×9-inch baking dish, mixing bowls, whisk, measuring cups and spoons, and a glass or flat object for pressing the crust.
Instructions
- Preheat your oven to 325°F. This brief bake sets the crust and gives it a sturdier texture that holds up beautifully under the creamy layers. While many no-bake desserts skip this step, taking 8 minutes to bake the crust makes a noticeable difference in the final result.
- Prepare the crust. Combine the crushed vanilla wafers and melted butter in your 13×9-inch baking dish. Use the bottom of a glass to press the mixture firmly into the bottom, creating an even layer. Pressing firmly is crucial here because a loose crust won’t hold together when you cut the bars later.
- Bake and cool the crust. Pop the dish in the oven for 8 minutes, then let it cool for 10 minutes. The crust should feel set and smell wonderfully fragrant. Don’t skip the cooling time because a hot crust will wilt your banana slices.
- Layer the bananas. Arrange your sliced bananas evenly over the cooled crust. Take your time with this step to ensure every bite gets a perfect amount of banana. If you’re worried about browning, you can toss the slices in a little lemon juice before arranging them.
- Make the pudding layer. Whisk both packages of vanilla instant pudding mix with the cold milk until thickened, which takes about 2 minutes. The pudding should coat the back of a spoon when it’s ready. Spread 2 cups of the pudding carefully over the banana layer, covering all the fruit.
- Create the creamy middle. Mix the remaining pudding with 1 cup of the whipped topping. This creates a lighter, fluffier layer that adds wonderful texture contrast. Spread this mixture evenly over the first pudding layer.
- Finish with whipped topping. Top everything with the remaining 1 1/2 cups of whipped topping, spreading it to the edges of the dish. For an extra pretty presentation, you can create swirls with the back of a spoon.
- Chill thoroughly. Refrigerate for at least 3 hours until the bars are completely set. This chilling time is essential for clean slicing and the perfect texture.
- Serve and enjoy! Cut into squares and serve cold. Garnish with extra crushed wafers or fresh banana slices if desired.
For more creamy dessert inspiration, check out our Vanilla Custard Cream Squares or explore this classic banana pudding recipe that inspired so many variations!
Tips and Variations for the Best Banana Pudding Bars
Want to take your banana pudding bars to the next level? Here are some tried-and-true tips and creative variations to make this recipe uniquely yours:
- Perfect your crust: If your crust seems crumbly after pressing, try adding a little more melted butter. The bottom of a drinking glass works perfectly for pressing the crust firmly and evenly into the pan.
- Prevent banana browning: Slice bananas just before assembly for the freshest look. You can also toss slices in a small amount of lemon juice to slow down oxidation. Press bananas fully into the pudding layer to minimize air exposure.
- Make ahead: These bars are perfect for entertaining because you can prepare them the night before. The flavors meld beautifully overnight, and the crust softens slightly for a pleasant texture. Just add any fresh garnishes right before serving.
- Chocolate lovers version: Spread a layer of chocolate pudding between the vanilla layers, or drizzle melted chocolate over the top before serving. You could also use chocolate wafers for the crust instead of vanilla.
- Go nutty: Sprinkle chopped pecans or walnuts into the crust for added crunch and flavor. About 1/2 cup mixed into the crushed wafers works wonderfully.
- Gluten-free adaptation: Use certified gluten-free vanilla wafers for the crust. The pudding and whipped topping are naturally gluten-free, making this an easy swap for those with dietary restrictions.
- Lighter version: Substitute low-fat milk and sugar-free pudding mix, plus light whipped topping, for a lower-calorie treat that still satisfies your sweet tooth.
Nutrition Facts for Banana Pudding Bars
Knowing what’s in your dessert helps you make informed choices. Here’s the nutritional breakdown for one serving of these delicious banana pudding bars (recipe makes approximately 16 servings):
| Nutrient | Amount Per Serving |
|---|---|
| Calories | 212 |
| Carbohydrates | 26g |
| Protein | 2g |
| Total Fat | 10g |
| Saturated Fat | 5g |
| Cholesterol | 15mg |
| Sodium | 153mg |
| Potassium | 170mg |
| Sugar | 14g |
| Vitamin A | 215 IU |
| Vitamin C | 1.9mg |
| Calcium | 62mg |
| Iron | 0.1mg |
The fresh bananas in this recipe contribute vitamin C and potassium, making these bars a slightly more nutritious choice than many other desserts. For another bar-style treat with wholesome ingredients, try our Carrot Cake Cheesecake Bars!
Frequently Asked Questions About Banana Pudding Bars
Can I make banana pudding bars ahead of time?
Yes, you can prepare banana pudding bars the night before serving. Assemble them fully, cover tightly with plastic wrap, and refrigerate overnight. The flavors will meld beautifully, but the crust may soften slightly from moisture. To minimize banana browning, slice them thin and press them fully into the pudding layer—avoid exposing them to air. Add fresh banana slices or whipped topping just before serving for the best texture and appearance. They’ll stay fresh for up to 2 days in the fridge. This make-ahead method is perfect for parties, saving you time on the day of. Total prep time is about 20 minutes plus 4 hours chilling. (78 words)
Are banana pudding bars gluten-free?
Traditional banana pudding bars are not gluten-free due to the Nilla wafer or graham cracker crust. To adapt, use gluten-free vanilla wafers or a homemade almond flour crust: crush 2 cups gluten-free wafers with 1/2 cup melted butter and 1/4 cup sugar, then press into an 8×8 pan. The pudding and toppings are naturally gluten-free. Note that full gluten-free, sugar-free, and dairy-free versions alter the taste and texture significantly—sub coconut milk for dairy and sugar-free pudding mix, but test for creaminess. Always check labels for cross-contamination. Yields 16 bars. (92 words)
How long do banana pudding bars last in the fridge?
Banana pudding bars stay fresh in the fridge for 3-4 days when stored properly. Keep them in an airtight container or cover the pan tightly with plastic wrap to prevent drying out and absorbing odors. The bananas may brown slightly after day 2, but flavors remain delicious. For best results, serve within 24-48 hours. If stacking layers, separate with parchment paper to avoid sticking. Discard if they develop off smells or mold. This no-bake dessert is ideal for quick weeknight treats or potlucks—cut into 16 squares for easy portioning. (89 words)
Can you freeze banana pudding bars?
Yes, banana pudding bars freeze well for up to 2 months. Prepare and chill fully first, then cut into squares. Wrap each individually in plastic wrap, then place in a freezer bag to prevent freezer burn. Thaw in the fridge overnight before serving—avoid microwaving to maintain texture. The crust holds up, but whipped topping may weep slightly; refresh with extra cool whip if needed. Bananas soften upon thawing, so freeze extras separately for topping. Great for meal prep or unexpected guests. Label bags with dates for easy tracking. (85 words)
How do you keep bananas from browning in banana pudding bars?
Prevent banana browning by tossing sliced bananas in lemon juice (1 tbsp per 3 bananas) before layering—this neutralizes enzymes without affecting flavor. Use ripe but firm bananas, sliced 1/4-inch thick, and submerge them completely in pudding immediately. Add a thin pudding barrier between crust and bananas. For serving, top with fresh slices right before eating. Store covered in the fridge. This simple step keeps bars visually appealing for 1-2 days. Pro tip: Firmer bananas hold shape better during no-bake assembly. Recipe serves 12-16. (82 words)
Banana Pudding Bars
🍌 Savor the nostalgic layers of creamy vanilla pudding, fresh bananas, and crunchy wafer crust in these easy-to-make bars – a crowd-pleasing dessert for any occasion!
🍮 No-fuss prep with chill time for perfect set, delivering sweet banana bliss without the hassle of traditional baking.
- Total Time: 3 hours 33 minutes
- Yield: 12 servings
Ingredients
– 60 vanilla wafers, finely crushed (about 1 1/2 cups) for crust base
– 1/3 cup melted butter for binding crust
– 3 bananas, sliced for layering
– 2 packages (3.4 ounces each) vanilla instant pudding mix for pudding texture
– 3 cups cold milk for pudding base
– 2 1/2 cups whipped topping, divided for filling and topping
Notes
🧂 Use the bottom of a glass to firmly press the crust into the pan for even texture.
🍌 Slice and layer bananas close to assembly time to minimize browning.
⏰ Prepare the dessert ahead overnight; flavors meld beautifully as the crust softens slightly.
- Prep Time: 25 minutes
- Chill Time: 3 hours
- Cook Time: 8 minutes
- Category: Dessert
- Method: Bake then Chill
- Cuisine: American
- Diet: Vegetarian
Nutrition
- Serving Size: 1 bar
- Calories: 212 kcal
- Sugar: 14g
- Sodium: 153mg
- Fat: 10g
- Saturated Fat: 5g
- Unsaturated Fat: 5g
- Trans Fat: 0g
- Carbohydrates: 26g
- Fiber: 1g
- Protein: 2g
- Cholesterol: 15mg


