
Why You’ll Love This Campfire Nachos
Have you ever imagined sharing a quick meal that brings everyone together under the stars? We all crave recipes that fit right into outdoor adventures, and that’s exactly what campfire nachos deliver. Picture a dish that’s not only fun to make but also packed with flavors that’ll make your camping trip unforgettable. Let’s chat about why this recipe stands out for busy families, travelers, and food lovers alike.
- Ease of preparation: Campfire nachos come together in just 15 minutes total, making it a go-to for quick outdoor meals. This means you can spend less time cooking and more time enjoying nature. For busy parents and working professionals, the simple steps and minimal cleanup add a layer of convenience that enhances any camping experience.
- Health benefits: These nachos feature ingredients like black beans and avocado, which bring in plant-based nutrients that support energy levels and wellness on the trail. Black beans offer fiber and protein to keep you full, while avocado adds healthy fats think of them as nature’s boost for travelers and diet-conscious folks. You can easily tweak it for lighter options without losing that tasty appeal.
- Versatility: Whether you’re adapting for dietary needs or experimenting with add-ins, campfire nachos work for everyone. Students and newlyweds might love how it scales for small groups, and seniors can appreciate the soft textures. This flexibility keeps it fresh for food enthusiasts and baking fans looking for a savory twist.
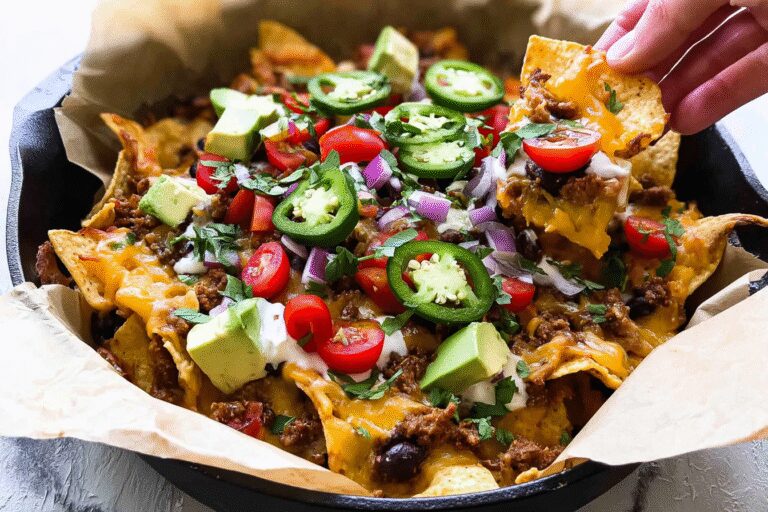
- Distinctive flavor: The mix of melted cheese, fresh herbs, and zesty salsa creates a bold taste that’s all about campfire vibes. It’s that perfect blend of crunchy and gooey that makes these nachos shine, turning simple ingredients into a memorable dish. We think it’ll become your favorite for family gatherings around the fire.
By layering in campfire nachos, you’re not just eating you’re creating stories with every bite. This recipe’s straightforward nature makes it ideal for home cooks and travelers, blending ease with excitement in ways that elevate your outdoor cooking game.
Jump To
- 1. Why You’ll Love This Campfire Nachos
- 2. Essential Ingredients for Campfire Nachos
- 3. How to Prepare the Perfect Campfire Nachos: Step-by-Step Guide
- 4. Dietary Substitutions to Customize Your Campfire Nachos
- 5. Mastering Campfire Nachos: Advanced Tips and Variations
- 6. How to Store Campfire Nachos: Best Practices
- 7. FAQs: Frequently Asked Questions About Campfire Nachos
- 8. Campfire Nachos
Essential Ingredients for Campfire Nachos
Gathering the right ingredients is the first step to nailing those perfect campfire nachos. We love how this recipe uses everyday items that pack a punch in flavor and nutrition. Below, you’ll find a detailed list of everything needed, complete with precise measurements and a quick explanation of why each one matters.
Main Ingredients
- 1 tablespoon neutral flavored oil – This helps prevent sticking and ensures even cooking, making your layers hold together nicely.
- ½ lb tortilla chips – These form the base, providing that essential crunch while absorbing flavors from the toppings.
- 1 (7.75 oz) can hot tomato sauce/salsa – Adds a spicy kick and moisture, turning the nachos into a cohesive, flavorful dish.
- 1 cup shredded Mexican cheese blend – Melts beautifully to bind everything, offering a creamy texture that’s hard to resist.
- 1 (14.5 oz) can black beans, drained – Brings in protein and fiber for a satisfying meal, plus they hold up well over the fire.
- 1 large avocado, cubed – Offers creamy goodness and healthy fats; for more on how avocados boost your meal, check out this avocado nutrition guide.
- 4-5 green onions, sliced – Provide a fresh, sharp contrast that brightens up the flavors and adds a bit of color.
- Handful of fresh cilantro, chopped – Infuses a burst of herbal notes, making the dish feel lively and authentic.
- 1 small lime, cut into wedges – Squeezed over the top, it adds a zesty finish that balances the richness.
Special Dietary Options
Campfire nachos are all about making it work for you. For vegan swaps, use plant-based cheese in place of the shredded Mexican blend and ensure your beans are the star. If you’re going gluten-free, stick with certified gluten-free tortilla chips to keep things safe. For low-calorie versions, swap in more veggies like extra onions and cut back on cheese while leaning on beans for that full feeling options like black beans bring extra benefits, as detailed in this black bean benefits overview. These changes keep the fun alive for all eaters.
How to Prepare the Perfect Campfire Nachos: Step-by-Step Guide
Ready to dive into making campfire nachos that everyone will rave about? We find that following these steps keeps things simple and exciting, especially when you’re out in nature. Let’s walk through the process, adapting it for different needs along the way to suit busy parents or diet-conscious travelers.
First Step: Gather and Prep Your Ingredients
Start by collecting all your ingredients to make assembly smooth. Lightly oil the bottom of a large Dutch oven with 1 tablespoon of neutral flavored oil this prevents sticking and sets the stage for even heating. For dietary tweaks, if you’re vegan, have your plant-based cheese ready; this step takes about 5 minutes of prep time.
Second Step: Build the First Layer
Evenly spread one-third of the ½ lb tortilla chips into the Dutch oven. Top this with one-quarter of the 7.75 oz can of hot tomato sauce, one-quarter of the drained 14.5 oz can of black beans, one-quarter cup of the shredded Mexican cheese blend, and a handful of the cubed avocado, sliced green onions, and chopped cilantro. This layering ensures every bite has a mix of textures; for low-calorie options, add extra veggies here to lighten it up. Aim for balance as you go, which takes just a minute or two.
Third Step: Add the Second Layer
Repeat the process with another one-third of the tortilla chips, using one-quarter of the sauce, one-quarter of the beans, one-quarter cup of cheese, and another handful of avocado, green onions, and cilantro. This builds flavor depth while keeping things adaptable if you’re making it for seniors, ensure the layers aren’t too thick. The key is even distribution, helping the heat melt everything uniformly in about 10 minutes total cook time.
Fourth Step: Complete the Third Layer
Use the remaining one-third of the chips, half of the hot tomato sauce, half of the drained black beans, half a cup of the shredded cheese blend, and all the remaining avocado, green onions, and cilantro. For food enthusiasts, this is where you can sneak in extras like grilled chicken from a recipe like our queso dip companion. Cover the Dutch oven to lock in the heat, preparing for the final cook.
Fifth Step: Cook Over the Campfire
Place the covered Dutch oven on a metal grill over your campfire and cook for about 10 minutes until the cheese melts. Use medium heat from coals or embers for safety, turning the pot if needed to avoid hot spots. This step works on a camp stove too, and for dietary preferences, check that all add-ins are pre-cooked if necessary.
Final Step: Serve and Enjoy
Once done, serve immediately with the lime wedges for a fresh squeeze. Let it cool for a minute so it’s easy to handle, then dig in pair it with sides for a full meal. This quick total time of 15 minutes makes it perfect for students or working professionals on the go.
To keep things engaging, remember that campfire nachos shine with their adaptability. We’ve found that practicing these steps a few times brings out the best results, turning your outdoor cooking into a highlight.

Dietary Substitutions to Customize Your Campfire Nachos
Protein and Main Component Alternatives
Swapping proteins in campfire nachos lets you tailor the dish to what you have on hand. Instead of black beans, try pinto beans for a milder taste, or add lentils if you’re aiming for more fiber. For meat lovers, toss in grilled chicken or ground beef, but for vegetarians, focus on bean-based options to keep it hearty and satisfying.
Vegetable, Sauce, and Seasoning Modifications
Change up the veggies for seasonal variety swap green onions for bell peppers in summer for extra crunch. If the sauce feels too spicy, use a milder salsa or add diced tomatoes for balance. Seasonings can shift too; try cilantro alternatives like parsley for a different herb note, making it easier for those with dietary restrictions to enjoy.
Mastering Campfire Nachos: Advanced Tips and Variations
Pro Cooking Techniques
Taking your campfire nachos to the next level involves smart tricks like placing coals on top of the Dutch oven lid for even heat. We suggest lining the bottom with parchment paper for easy cleanup, and if you’re using a cast-iron skillet, make sure it’s seasoned well. These methods help beginners build confidence while impressing food enthusiasts.
Flavor Variations
Experiment with seasonings by mixing in cumin or chili powder for a deeper kick. For a twist, incorporate ingredients from our chipotle pork beans recipe to add smokiness. This keeps things fresh for travelers and busy parents looking for quick changes.
Presentation Tips and Make-Ahead Options
Garnish with extra lime for a pop of color, and prep toppings ahead to save time. Batch-cooking at home makes it ideal for family trips, ensuring you have everything ready.
How to Store Campfire Nachos: Best Practices
Keeping your campfire nachos fresh is key for leftovers. For refrigeration, cool the dish quickly and store in an airtight container for up to two days to maintain texture. Freezing works for longer storage wrap portions tightly and freeze for a month, thawing in the fridge first.
When reheating, use a microwave or oven to avoid sogginess, heating until warm. For meal prep, assemble layers in advance but add cheese last to keep it from getting mushy.

FAQs: Frequently Asked Questions About Campfire Nachos
What ingredients do I need to make campfire nachos?
To make campfire nachos, you’ll need sturdy tortilla chips, shredded cheese (cheddar or a Mexican blend works well), canned beans (black or pinto), diced tomatoes, sliced jalapeños, and cooked meat such as ground beef or shredded chicken if desired. Additional toppings like chopped onions, olives, and sour cream can be added after cooking. Don’t forget aluminum foil or a cast iron skillet for cooking over the fire.
How do I cook nachos over a campfire safely?
To cook campfire nachos safely, build a medium heat fire with hot coals rather than open flames. Layer your ingredients in a cast iron skillet or wrap them tightly in heavy-duty aluminum foil. Place the skillet on a grill grate over the coals or set the foil packet directly on the coals, turning occasionally to avoid burning. Cook for about 10-15 minutes until the cheese melts and toppings heat through.
Can I prepare campfire nachos ahead of time?
Yes, you can prepare campfire nachos ahead by pre-chopping toppings and cooking any meat at home. Assemble the ingredients in a foil packet or skillet at the campsite. This saves time and makes the cooking process quicker and easier. Keep perishable items chilled until ready to use and add fresh toppings like sour cream or avocado after cooking.
What are some easy side dishes to serve with campfire nachos?
Great side dishes for campfire nachos include grilled corn on the cob, canned beans, fresh salsa, or a simple salad. Roasted vegetables wrapped in foil, like bell peppers or zucchini, also pair well. These sides are easy to cook at the campsite and help balance the richness of the nachos.
How can I make campfire nachos vegetarian or vegan?
To make campfire nachos vegetarian or vegan, use plant-based proteins such as black beans, lentils, or vegan meat substitutes. Replace cheese with vegan shredded cheese or nutritional yeast for a cheesy flavor. Load up on vegetables like avocado, tomatoes, onions, and jalapeños. Make sure to use vegan-friendly tortilla chips, then cook as usual over the campfire.
Campfire Nachos
🔥 Campfire Nachos Easy Recipe for Outdoor Cooking makes a perfect, hearty meal with melty cheese and bold flavors that come together quickly.
🌽 This recipe is ideal for camping or backyard gatherings, bringing comfort food that’s simple to prepare over an open fire.
- Total Time: 15 minutes
- Yield: 2 servings as main course or 4 as appetizer
Ingredients
– 1 tablespoon neutral flavored oil for preventing sticking and ensuring even cooking
– ½ lb tortilla chips for the base crunch and flavor absorption
– 1 (7.75 oz) can hot tomato sauce/salsa for spicy kick and moisture
– 1 cup shredded Mexican cheese blend for binding everything with creamy texture
– 1 (14.5 oz) can black beans for protein and fiber
– 1 large avocado for creamy goodness and healthy fats
– 4-5 green onions for fresh contrast and color
– Handful of fresh cilantro for herbal notes
– 1 small lime for zesty finish
Instructions
1-First Step: Gather and Prep Your Ingredients Start by collecting all your ingredients to make assembly smooth. Lightly oil the bottom of a large Dutch oven with 1 tablespoon of neutral flavored oil this prevents sticking and sets the stage for even heating. For dietary tweaks, if you’re vegan, have your plant-based cheese ready; this step takes about 5 minutes of prep time.
2-Second Step: Build the First Layer Evenly spread one-third of the ½ lb tortilla chips into the Dutch oven. Top this with one-quarter of the 7.75 oz can of hot tomato sauce, one-quarter of the drained 14.5 oz can of black beans, one-quarter cup of the shredded Mexican cheese blend, and a handful of the cubed avocado, sliced green onions, and chopped cilantro. This layering ensures every bite has a mix of textures; for low-calorie options, add extra veggies here to lighten it up. Aim for balance as you go, which takes just a minute or two.
3-Third Step: Add the Second Layer Repeat the process with another one-third of the tortilla chips, using one-quarter of the sauce, one-quarter of the beans, one-quarter cup of cheese, and another handful of avocado, green onions, and cilantro. This builds flavor depth while keeping things adaptable if you’re making it for seniors, ensure the layers aren’t too thick. The key is even distribution, helping the heat melt everything uniformly in about 10 minutes total cook time.
4-Fourth Step: Complete the Third Layer Use the remaining one-third of the chips, half of the hot tomato sauce, half of the drained black beans, half a cup of the shredded cheese blend, and all the remaining avocado, green onions, and cilantro. For food enthusiasts, this is where you can sneak in extras like grilled chicken from a recipe like our queso dip companion. Cover the Dutch oven to lock in the heat, preparing for the final cook.
5-Fifth Step: Cook Over the Campfire Place the covered Dutch oven on a metal grill over your campfire and cook for about 10 minutes until the cheese melts. Use medium heat from coals or embers for safety, turning the pot if needed to avoid hot spots. This step works on a camp stove too, and for dietary preferences, check that all add-ins are pre-cooked if necessary.
6-Final Step: Serve and Enjoy Once done, serve immediately with the lime wedges for a fresh squeeze. Let it cool for a minute so it’s easy to handle, then dig in pair it with sides for a full meal. This quick total time of 15 minutes makes it perfect for students or working professionals on the go.
Notes
🔥 Use a Dutch oven with a lid and place coals both below and on the lid for even cooking.
🧀 Layer chips and cheese like bricks and mortar to ensure every bite is flavorful.
🥑 Customize with cooked meats or fresh ingredients, but cook raw items thoroughly before layering.
- Prep Time: 5 minutes
- Cook Time: 10 minutes
- Category: Main Dish
- Method: Cooking over campfire
- Cuisine: Mexican-inspired


