
Why You’ll Love This Chocolate Snowballs
Chocolate Snowballs are a delightful treat that combines rich chocolate flavors with a simple, no-fuss preparation, making them perfect for home bakers of all levels. These cookies offer a cozy, indulgent experience that’s especially popular during the holiday season, but you can whip them up anytime for a quick sweet fix. With their nut-free recipe, they’re versatile and easy to customize, appealing to busy parents, students, and anyone looking for a comforting dessert that doesn’t require hours in the kitchen.
Beyond their taste, Chocolate Snowballs provide some surprising benefits that make them stand out. For instance, the unsweetened cocoa powder adds antioxidants, supporting your overall wellness while satisfying your cravings. Whether you’re a baking enthusiast or a working professional seeking a simple recipe, these cookies bring joy and flexibility to your table, adapting to various dietary needs like vegan or gluten-free options. You’ll find yourself returning to this recipe again and again for its ease, flavor, and the memorable moments it helps create around family gatherings.
One of the best parts is how quickly they come together, with just about 25 minutes from start to finish including prep and cook time. Imagine pulling warm, powdered-sugar-coated balls from the oven that melt in your mouth these aren’t just cookies; they’re a fun, shareable treat that fits into any lifestyle. If you’re new to baking, don’t worry; this recipe builds confidence and encourages you to experiment in the kitchen.
Key Features That Make Them Special
- Quick preparation with minimal ingredients, ideal for busy schedules.
- Nutritional perks from cocoa, offering healthy fats and antioxidants for a balanced treat.
- Easy adaptations for dietary preferences, like making them vegan or gluten-free.
- A rich, creamy texture that provides a standout indulgence without the fuss.
To learn more about similar desserts, check out our Brown Butter Oatmeal Chocolate Chip Cookies recipe for another easy chocolate option that pairs well with family activities.
Jump To
- 1. Why You’ll Love This Chocolate Snowballs
- 2. Essential Ingredients for Chocolate Snowballs
- 3. How to Prepare the Perfect Chocolate Snowballs: Step-by-Step Guide
- 4. Dietary Substitutions to Customize Your Chocolate Snowballs
- 5. Mastering Chocolate Snowballs: Advanced Tips and Variations
- 6. How to Store Chocolate Snowballs: Best Practices
- 7. FAQs: Frequently Asked Questions About Chocolate Snowballs
- 8. Chocolate Snowballs
Essential Ingredients for Chocolate Snowballs
Gathering the right ingredients is the first step to creating perfect Chocolate Snowballs, and this recipe keeps things straightforward with everyday items you likely have on hand. Each component plays a key role in achieving that signature soft texture and deep chocolate taste. Below is a comprehensive list of all the ingredients needed, based on the precise measurements provided, to ensure your baking goes smoothly.
Main Ingredients List
- 1 cup unsalted butter, softened
- ½ cup powdered sugar (plus 1 to 1½ cups additional for rolling)
- ¼ cup unsweetened cocoa powder (recommended for deep flavor and color)
- 1 teaspoon vanilla extract
- 2 cups all-purpose flour, measured correctly (spoon and level method)
- ½ teaspoon salt
- ¾ cup mini chocolate chips (can substitute with chopped nuts or other chips if preferred)
This structured list ensures you have everything measured out accurately, making it easy to follow along and avoid any mistakes. Remember, using softened butter and the spoon-and-level method for flour helps the dough come together just right, preventing it from becoming too dry or sticky.
How to Prepare the Perfect Chocolate Snowballs: Step-by-Step Guide
Getting started with Chocolate Snowballs is as simple as preheating your oven and gathering your tools, and this step-by-step guide will walk you through the process with ease. Begin by setting your oven to 350°F and lining two cookie sheets with parchment paper to prevent sticking and make cleanup a breeze. This recipe’s straightforward directions mean even beginners can create these tasty treats in no time.
Detailed Steps for Success
- Mix the 1 cup unsalted butter, ½ cup powdered sugar, ¼ cup unsweetened cocoa powder, and 1 teaspoon vanilla extract with an electric mixer until light and fluffy. This step usually takes about 2-3 minutes and ensures a creamy base.
- Add the 2 cups all-purpose flour and ½ teaspoon salt, mixing until the dough forms, then stir in the ¾ cup mini chocolate chips. If the dough feels too soft, pop it in the fridge for a bit to firm up it makes shaping easier.
- Scoop the dough by the tablespoon and roll it into balls, placing them on your prepared cookie sheets. Aim for uniform sizes so they bake evenly and look great on a platter.
- Bake for 7 to 10 minutes, watching for the bottoms to brown slightly and the tops to lose their glossy look. Pull them out while they’re still soft for that perfect melt-in-your-mouth texture.
- Let the cookies cool for 5 to 10 minutes on the sheets, then roll them in the additional powdered sugar. Once fully cooled, you can give them another roll in sugar for an extra snowy coating.
The total time for this recipe is about 25 minutes, including 15 minutes of prep and 10 minutes of cooking, making it ideal for busy parents or students. For a similar chocolatey delight, try our Chocolate Covered Strawberries recipe for a fresh twist on chocolate treats.

Dietary Substitutions to Customize Your Chocolate Snowballs
Making Chocolate Snowballs your own is simple with a few smart swaps, allowing them to fit various dietary needs without losing that delicious flavor. For example, if you’re aiming for a vegan version, replace the unsalted butter with a plant-based alternative to keep the recipe dairy-free. These adjustments not only make the cookies accessible to more people but also let you experiment based on what you have in your pantry.
Protein and fat alternatives can enhance the recipe further. Consider swapping coconut oil for the butter if you want a different texture, or add nut butters for extra protein. Flavor enhancers like spices can also play a role, turning your basic Chocolate Snowballs into something unique for food enthusiasts or newlyweds hosting a dinner.
One helpful tip is to use gluten-free flour in place of all-purpose flour for those with sensitivities, ensuring everyone at the table can enjoy. These customizations keep the cookies versatile, whether you’re baking for seniors or travelers looking for portable snacks.
Mastering Chocolate Snowballs: Advanced Tips and Variations
Once you’re comfortable with the basics, take your Chocolate Snowballs to the next level with some pro techniques and creative twists. For instance, chilling the dough before shaping helps it hold its form, resulting in perfectly round cookies every time. This method is especially useful if your mixture feels a bit soft, as mentioned in the tips from the recipe summary.
Expert Techniques and Ideas
- Try tempered chocolate for a glossy finish if you’re coating the snowballs, adding a professional touch to your presentation.
- Experiment with flavors like orange zest or espresso powder to create unique variations that excite your taste buds.
- For make-ahead options, freeze the unbaked balls on a tray first, then store them for later, as suggested in the preparation notes.
These cookies hold their shape well without baking soda or powder, which is a neat trick for maintaining that soft center. As a blockquote from baking wisdom goes:
If your dough feels a little crumbly at first, don’t worry just keep mixing, and it will come together before you know it!This approach makes them a hit for baking enthusiasts looking to impress.
How to Store Chocolate Snowballs: Best Practices
Proper storage is key to keeping your Chocolate Snowballs fresh and tasty, whether you’re saving them for later or preparing in advance. Store them in an airtight container in the fridge for up to 5 days to maintain their texture and prevent the powdered sugar from dissolving. For longer-term options, freezing is a great choice, as these cookies freeze well uncoated.
Storage Tips for Longevity
- Freeze on a cookie sheet first, then transfer to a freezer-safe container with wax paper between layers to avoid sticking.
- Thaw at room temperature and roll in powdered sugar before serving to keep that classic look.
- Avoid reheating; let them come to room temperature slowly for the best flavor and consistency.
This method works wonders for meal prep, helping working professionals or busy parents have treats ready for any occasion. It’s one of the reasons these cookies are so popular for gifting year-round.

FAQs: Frequently Asked Questions About Chocolate Snowballs
Why is my chocolate snowball dough crumbly and hard to shape?
If your dough feels crumbly and dry, it usually means it needs more moisture or mixing time. Continue mixing for up to 10 minutes with a hand mixer, or less if using a stand mixer. Adding a small amount of liquid such as milk or an extra egg yolk can also help the dough come together more smoothly. Avoid adding too much flour, and make sure your butter is softened to room temperature before mixing.
Can I replace mini chocolate chips with nuts in chocolate snowballs?
Yes, you can substitute mini chocolate chips with an equal amount of chopped nuts like pecans, walnuts, or almonds. These provide a crunchy texture and rich flavor that complements the cookie. You could also try peppermint chips or mini M&Ms for a different twist. Just be sure to chop nuts finely so they distribute evenly in the dough.
How can I tell when chocolate snowball cookies are fully baked?
Chocolate snowballs are done when the tops lose their gloss and look matte, and the bottoms turn slightly golden brown. The cookies should be set but still soft to the touch. Avoid overbaking, as these cookies are best when tender and melt in your mouth. Baking times vary but typically range from 10 to 14 minutes at 350°F (175°C).
What is the best way to store chocolate snowball cookies to keep them fresh?
Store chocolate snowballs in an airtight container at room temperature for up to 5 days. To maintain their delicate texture, separate layers with parchment or wax paper to prevent sticking. Keeping them away from heat and humidity will help preserve their flavor and prevent the coating from dissolving.
Can I freeze chocolate snowball cookies, and how should I thaw them?
Yes, you can freeze chocolate snowballs for up to 3 months. Freeze them before coating with powdered sugar to avoid sogginess. When ready to serve, thaw the cookies at room temperature and then roll them in powdered sugar for that classic snowy look. This method keeps the cookies fresh and maintains their texture after freezing.
Chocolate Snowballs
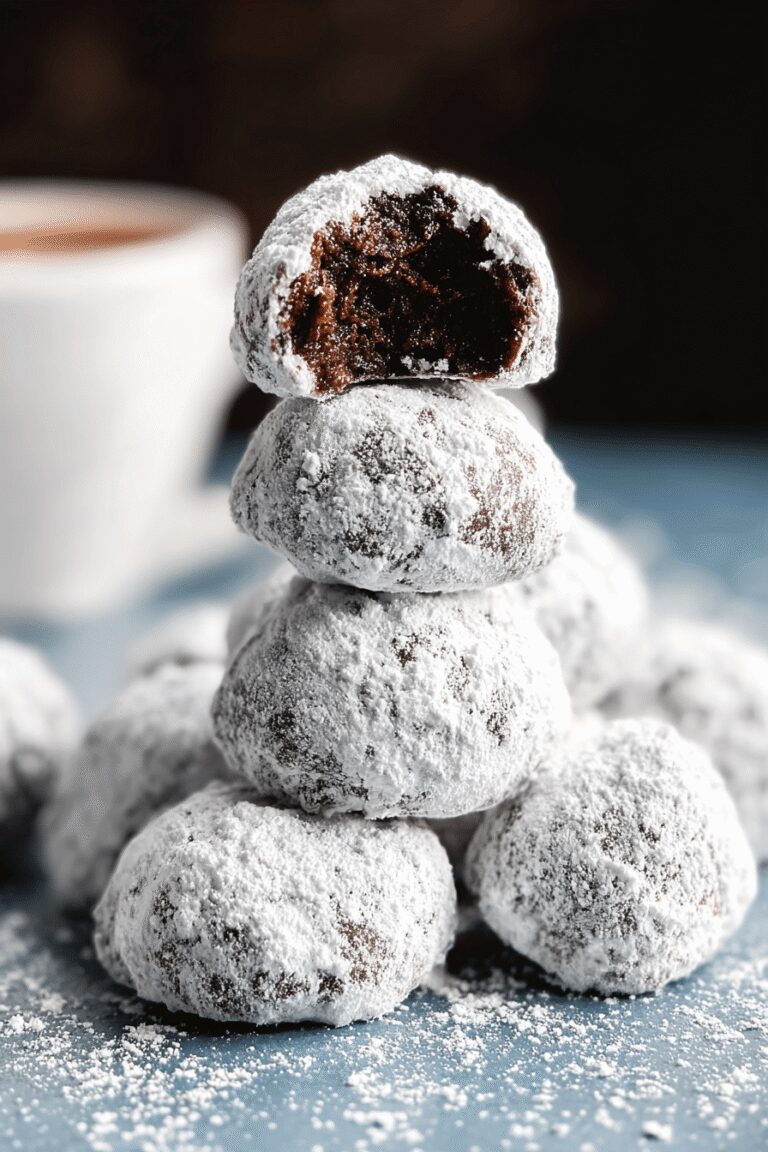
🍫 Chocolate Snowball Cookies offer a delightful chocolate twist on a classic holiday favorite, making them perfect for any season.
❄️ Their rich cocoa flavor combined with a classic powdered sugar coating creates a melt-in-your-mouth texture that’s hard to resist.
- Total Time: 25 minutes
- Yield: About 24 cookies
Ingredients
– 1 cup unsalted butter, softened
– ½ cup powdered sugar (plus 1 to 1½ cups additional for rolling)
– ¼ cup unsweetened cocoa powder (recommended for deep flavor and color)
– 1 teaspoon vanilla extract
– 2 cups all-purpose flour, measured correctly (spoon and level method)
– ½ teaspoon salt
– ¾ cup mini chocolate chips (can substitute with chopped nuts or other chips if preferred)
Instructions
1-Mix the 1 cup unsalted butter, ½ cup powdered sugar, ¼ cup unsweetened cocoa powder, and 1 teaspoon vanilla extract with an electric mixer until light and fluffy. This step usually takes about 2-3 minutes and ensures a creamy base.
2-Add the 2 cups all-purpose flour and ½ teaspoon salt, mixing until the dough forms, then stir in the ¾ cup mini chocolate chips. If the dough feels too soft, pop it in the fridge for a bit to firm up it makes shaping easier.
3-Scoop the dough by the tablespoon and roll it into balls, placing them on your prepared cookie sheets. Aim for uniform sizes so they bake evenly and look great on a platter.
4-Bake for 7 to 10 minutes, watching for the bottoms to brown slightly and the tops to lose their glossy look. Pull them out while they’re still soft for that perfect melt-in-your-mouth texture.
5-Let the cookies cool for 5 to 10 minutes on the sheets, then roll them in the additional powdered sugar. Once fully cooled, you can give them another roll in sugar for an extra snowy coating.
Notes
🍪 Use unsweetened cocoa powder for deeper flavor and rich color.
🍫 Mini chocolate chips ensure even distribution and a perfect bite.
❄️ Chill dough if it’s too soft to handle; this makes shaping easier.
- Prep Time: 15 minutes
- Cook Time: 10 minutes
- Category: Dessert
- Method: Baking
- Cuisine: American
- Diet: Vegetarian
Nutrition
- Serving Size: 2 cookies
- Calories: 179 kcal
- Sugar: 12 g
- Sodium: 828 mg
- Fat: 10 g
- Saturated Fat: 6 g
- Carbohydrates: 22 g
- Fiber: 1 g
- Protein: 1 g
- Cholesterol: 20 mg


