
Why You’ll Love These Chocolate Thumbprint Cookies
These Chocolate Thumbprint Cookies are the kind of treat that feels special, but still fits into a busy day. With a soft chocolate cookie base and a smooth ganache center, they bring together rich flavor, simple steps, and a bakery-style finish that home bakers can feel proud of. If you love gooey chocolate cookies, chocolate jam thumbprints, or easy holiday baking, this recipe will quickly earn a spot in your favorites.
- Easy to make: This recipe uses simple pantry staples and straightforward steps, so even beginner bakers can make chocolate thumbprint cookies with confidence. The dough comes together quickly, and the thumbprint shape adds charm without extra fuss.
- Rich, satisfying flavor: Dutch process cocoa gives the cookies a deep chocolate taste, while the ganache filling adds a creamy, melt-in-your-mouth center. Every bite tastes like a little chocolate celebration.
- Flexible for many occasions: These chocolate thumbprint cookies work for holidays, lunchbox treats, bake sales, gift boxes, or an after-dinner dessert. You can also switch up the filling to match the season or your mood.
- Great for sharing: Because they look pretty and hold up well, these cookies are ideal for parties and cookie trays. If you want a dessert that feels homemade and thoughtful, this one delivers.
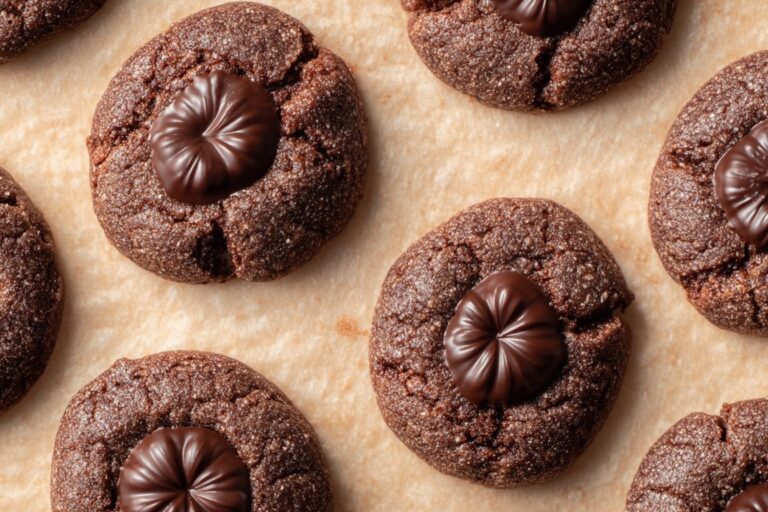
Chocolate thumbprint cookies are proof that a small cookie can bring big joy, especially when the center is filled with glossy ganache and a little sprinkle of color.
If you enjoy chocolate bakes with a soft, chewy texture, you may also love my peanut butter chocolate molten lava cake or these classic chocolate-covered strawberries for another simple chocolate treat.
For readers who enjoy the wellness side of chocolate, this article from the Mayo Clinic on what science says about the health benefits of chocolate offers a helpful look at cocoa’s natural compounds and why chocolate is such a beloved ingredient.
Jump To
- 1. Why You’ll Love These Chocolate Thumbprint Cookies
- 2. Ingredients for Chocolate Thumbprint Cookies
- 3. Step-by-Step Instructions to Make Chocolate Thumbprint Cookies
- 4. Expert Tips for Perfect Chocolate Thumbprint Cookies
- 5. Chocolate Thumbprint Cookies Variations and Substitutions
- 6. Chocolate Thumbprint Cookies Storage, Freezing, and FAQ
- 7. Chocolate Thumbprint Cookies
Ingredients for Chocolate Thumbprint Cookies
The essential ingredients in this chocolate thumbprint cookies recipe are easy to find and work together to create a soft, rich cookie with a shiny chocolate center. The cocoa powder gives the dough a deep flavor, the butter keeps the texture tender, and the egg yolks add richness for that melt-in-your-mouth bite.
For the cookies
- 1 1/2 cups all-purpose flour
- 1/2 cup Dutch process cocoa powder
- 1/2 teaspoon salt
- 1/2 teaspoon baking powder
- 3/4 cup unsalted butter, softened
- 3/4 cup light brown sugar
- 1/4 cup granulated white sugar
- 2 egg yolks
- 1 1/2 teaspoons vanilla
For the ganache
- 1 cup semi-sweet chocolate chips
- 1/2 cup heavy whipping cream
- Nonpareils for sprinkling, optional
If you like cookie recipes with a rich chocolate base, you might also enjoy browsing our brown butter oatmeal choc chip cookies for another cozy baking day option.
Step-by-Step Instructions to Make Chocolate Thumbprint Cookies
Here is how to make chocolate thumbprint cookies from start to finish. These cookies are easy enough for weeknights, but pretty enough for a holiday tray. Prep time: 20 minutes. Chill time: 30 minutes to 2 hours. Cook time: 10 to 12 minutes. Servings: About 24 cookies.
- Mix the dry ingredients. In a medium bowl, whisk together the flour, cocoa powder, salt, and baking powder. This helps the cocoa blend evenly into the dough and keeps the cookies smooth. Photo cue: The mixture should look dark and fluffy.
- Cream the butter and sugars. In a larger bowl, beat the softened butter, light brown sugar, and granulated sugar until the mixture looks light and creamy. This step helps create a tender cookie with good structure.
- Add the egg yolks and vanilla. Mix in the egg yolks and vanilla until fully combined. The dough will look rich and glossy at this stage.
- Bring the dough together. Add the dry ingredients to the wet mixture and stir until a soft dough forms. If it seems a little sticky, that is normal.
- Chill the dough. Wrap the dough tightly and refrigerate for at least 30 minutes. Chilling helps the cookies keep their shape and makes the thumbprints easier to form.
- Shape the cookies. Scoop the dough into balls and place them on a parchment-lined baking sheet. Leave a little space between each one.
- Create the thumbprint. Press your thumb gently into the center of each dough ball, making a deep indent without flattening the edges too much.
- Bake the cookies. Bake at 350°F for 10 to 12 minutes, until the edges are set but the centers still look soft. They will firm up as they cool.
- Make the ganache. Heat the heavy cream until warm, then pour it over the chocolate chips. Let it sit for a minute, then stir until smooth and shiny.
- Fill and finish. Spoon or pipe the ganache into each cooled thumbprint. Add nonpareils if you like a colorful finish, then let the cookies set before serving.
For the best texture, keep an eye on the bake time. Chocolate thumbprint cookies are at their best when the centers stay soft and the edges are just set.
Expert Tips for Perfect Chocolate Thumbprint Cookies
- Chill the dough: This keeps the cookies from spreading too much and helps the indent stay neat.
- Use Dutch process cocoa: It gives a deeper chocolate flavor and darker color.
- Press the centers gently: A light touch prevents cracks around the edges.
- Do not overbake: Pull them out when the centers still look a little soft.
- Fill after cooling: Warm cookies can make the ganache too runny.
- Pipe for a tidy look: A piping bag or zip-top bag with the corner cut off makes filling easy.
- Make ahead when needed: You can chill the dough in advance or bake the cookies a day before serving.
Chocolate Thumbprint Cookies Variations and Substitutions
Once you know the base recipe, it is easy to play with chocolate thumbprint cookies variations that fit different tastes and occasions. These small changes can make the cookies feel brand new without making the process harder.
Fun filling ideas
- Raspberry jam: Swap the ganache for a bright, fruity center if you want a classic chocolate and berry pairing.
- Peanut butter filling: Stir peanut butter with a little powdered sugar for a thick, creamy center.
- Salted caramel: Spoon in caramel for a sweet and salty holiday-style cookie.
Easy swaps
- Nutty version: Add finely chopped pecans to the dough for extra crunch.
- Holiday finish: Use red and green sprinkles instead of nonpareils for a festive look.
- Darker chocolate flavor: Use bittersweet chocolate chips in the ganache for a less sweet finish.
If you like rich desserts with a cozy feel, you may also enjoy our Biscoff millionaires traybake for another sweet treat with plenty of texture and flavor.
Chocolate Thumbprint Cookies Storage, Freezing, and FAQ
Do I need to chill chocolate thumbprint cookie dough?
Yes, chilling the dough for at least 30 minutes (or up to 2 hours) is essential for chocolate thumbprint cookies. It prevents the dough from spreading too much during baking, helping the cookies hold their shape and keep the thumbprint indentation crisp. Without chilling, the chocolate butter can melt quickly in the oven, leading to flat, misshapen cookies. After mixing, wrap the dough tightly in plastic wrap and refrigerate. Scoop into balls straight from the fridge, press your thumb gently into each center (about halfway down), and bake immediately. This simple step ensures bakery-style results every time. Pro tip: If you’re short on time, chill the shaped cookies on the baking sheet for 15 minutes before baking.
How do I store chocolate thumbprint cookies?
Store chocolate thumbprint cookies in an airtight container at room temperature for up to 3 days. Layer them with parchment paper to prevent sticking, especially if filled with ganache or jam. For longer storage, freeze them in a single layer on a baking sheet until solid, then transfer to a freezer bag for up to 2 months. Thaw at room temperature for 30 minutes before serving. Avoid refrigerating, as it can make the cookies dry out or cause fillings to weep. If your kitchen is humid, add a silica packet to the container to maintain crispness. Properly stored, they’ll stay fresh and flavorful, perfect for holiday gifting or make-ahead treats.
What can I fill chocolate thumbprint cookies with?
Chocolate thumbprint cookies pair perfectly with various fillings to suit your taste. Classic options include chocolate ganache (melt 4 oz chocolate with 1/2 cup heavy cream, cool slightly, and pipe in), raspberry jam, or Nutella for a quick swirl. For variety, try salted caramel, peanut butter, or lemon curd. After baking and cooling the cookies for 5 minutes, fill while warm so the indent holds the filling without cracking. Use a piping bag or small spoon for neat application—aim for level with the cookie edge to avoid overflow. Each filling adds about 10-15 calories per cookie, keeping them indulgent yet customizable for dietary needs like dairy-free ganache with coconut cream.
How long do you bake chocolate thumbprint cookies?
Bake chocolate thumbprint cookies at 350°F (175°C) for 10-12 minutes. Preheat your oven fully, place dough balls 2 inches apart on parchment-lined sheets, and press thumbprints after chilling. They’re done when edges are set and centers are still soft—don’t overbake, or they’ll harden. Cool on the sheet for 5 minutes, then transfer to a rack. This timing yields chewy centers with crisp edges, ideal for chocolate dough. Test one batch first; ovens vary, so rotate sheets halfway if needed. Yields about 24 cookies from standard recipes. For high altitude, reduce temp to 340°F and add 1-2 minutes.
Can I make chocolate thumbprint cookies ahead of time?
Yes, chocolate thumbprint cookies are great for prep-ahead baking. Make and chill the dough up to 2 days in advance, or freeze scooped balls for 1 month—bake straight from frozen, adding 1-2 minutes. Bake unfilled cookies up to 3 days ahead, then fill just before serving to keep fillings fresh. Full cookies freeze well up to 2 months as noted earlier. This flexibility is perfect for holidays or parties. Label freezer bags with dates for easy tracking. When ready, refresh baked cookies in a 300°F oven for 3 minutes. Planning ahead saves time without sacrificing taste or texture.
Chocolate Thumbprint Cookies
🍪 Indulge in rich, fudgy chocolate cookies with a luscious ganache center that melts in your mouth.
🎁 Perfect for holidays or any occasion, these easy-to-make treats will delight chocolate lovers everywhere!
- Total Time: 1 hour
- Yield: 24 cookies
Ingredients
Notes
❄️ Chill the dough for at least 30 minutes to prevent cookies from spreading too much.
👆 Press thumbprints firmly but not too deep to avoid cracking during baking.
🍫 Use high-quality chocolate chips for the ganache to achieve the best flavor and texture.
- Prep Time: 20 minutes
- Chill: 30 minutes
- Cook Time: 12 minutes
- Category: Dessert
- Method: Baking
- Cuisine: American
- Diet: Vegetarian
Nutrition
- Serving Size: 1 cookie
- Calories: 170
- Sugar: 11g
- Sodium: 85mg
- Fat: 11g
- Saturated Fat: 6g
- Unsaturated Fat: 4g
- Trans Fat: 0g
- Carbohydrates: 17g
- Fiber: 1g
- Protein: 2g
- Cholesterol: 30mg


