
Why You’ll Love This Creamy Chocolate Popsicles
Imagine whipping up a batch of these creamy chocolate popsicles on a hot summer day it’s that simple and fun! This recipe is a hit for busy parents and home cooks alike because it takes barely any time and uses ingredients you probably have on hand. Plus, the rich chocolate flavor will make everyone smile from kids to food enthusiasts looking for a sweet treat.
One reason you’ll adore this creamy chocolate popsicles recipe is its ease of preparation. It’s straightforward and quick, needing just a few steps and minimal ingredients, so even if you’re a busy parent or a student, you can make it without stress. What’s more, it’s packed with health benefits like antioxidants from the cocoa, turning it into a smart snack that satisfies cravings while supporting your wellness goals. You’ll love how versatile it is too, letting you tweak it for different diets without losing that amazing taste!
The distinctive flavor really sets these apart. That smooth, chocolaty goodness combined with a creamy texture makes every bite feel special. Whether you’re hosting a family gathering or just treating yourself, these popsicles bring joy to the table. If you’re into frozen desserts, check out more ideas like our homemade mango ice cream for more refreshing options.
Health and Fun Benefits
These popsicles aren’t just tasty they’re good for you! Rich in antioxidants from cocoa, they provide a nutritious way to enjoy sweets. For diet-conscious folks, swapping in plant-based milks keeps things healthy and delicious. Imagine serving these at your next gathering; they’ll be a hit and keep everyone coming back for more!
With options for customization, you can make these fit any lifestyle. That’s why baking enthusiasts and working professionals love them. Let’s dive into what makes these popsicles so special and how to get started.
Jump To
- 1. Why You’ll Love This Creamy Chocolate Popsicles
- 2. Essential Ingredients for Creamy Chocolate Popsicles
- 3. How to Prepare the Perfect Creamy Chocolate Popsicles: Step-by-Step Guide
- 4. Dietary Substitutions to Customize Your Creamy Chocolate Popsicles
- 5. Mastering Creamy Chocolate Popsicles: Advanced Tips and Variations
- 6. How to Store Creamy Chocolate Popsicles: Best Practices
- 7. FAQs: Frequently Asked Questions About Creamy Chocolate Popsicles
- 8. Creamy Chocolate Popsicles
Essential Ingredients for Creamy Chocolate Popsicles
Gathering the right ingredients is the first step to creating these amazing creamy chocolate popsicles! Each one plays a key role in making sure your treats turn out smooth and full of flavor. Below, you’ll find a structured list of all the ingredients needed, based on the exact recipe we’re using today. This makes it super easy to measure out everything precisely.
- 100 grams granulated sugar, sifted
- 35 grams cocoa powder (Dutch-processed or natural)
- 2 tablespoons cornflour (corn starch) (can substitute flour)
- 1/4 teaspoon fine salt
- 420 ml double cream (heavy cream, full-fat preferred)
- 360 ml whole milk (can use low-fat, skim, or plant-based milks)
- 55 grams milk chocolate chips (can substitute dark chocolate or omit)
- Optional for decoration: 70% dark chocolate melted for drizzling
This list covers everything you need for a perfect batch! For special dietary options, you can easily adapt. For instance, use plant-based milk to make it vegan, and everything here is naturally gluten-free. According to experts on dark chocolate benefits, ingredients like cocoa powder add a nutritional boost, making your treats even better for you.
Why These Ingredients Work
Each ingredient contributes to that creamy texture we all love. The cocoa powder gives the intense chocolate flavor, while the cream and milk ensure smoothness. Don’t forget, you can tweak sweeteners for a low-calorie version if needed. This setup is perfect for home cooks experimenting in the kitchen!
How to Prepare the Perfect Creamy Chocolate Popsicles: Step-by-Step Guide
Ready to make these creamy chocolate popsicles? It’s easier than you think, and the results are worth it! Start by gathering your ingredients and following these simple steps for a foolproof treat. This guide uses the exact directions from our recipe to ensure you get that smooth, fudgy texture every time.
- In a medium saucepan, mix the sifted granulated sugar, cocoa powder, cornflour, and salt thoroughly to remove any lumps.
- Gradually pour in the double cream and whole milk while whisking continuously. Add the milk chocolate chips. Heat the mixture gently over medium heat, stirring frequently, until it simmers around the edges, the chocolate melts completely, and the mixture thickens slightly (about 1 minute).
- Remove the saucepan from the heat. If any lumps remain, pour the mixture through a fine mesh sieve. Allow the mixture to cool.
- Pour the cooled mixture evenly into popsicle molds and insert sticks.
- Freeze the popsicles for 4-6 hours, or until completely solid.
- To release the popsicles, briefly run the molds under warm water and gently pull the popsicles out.
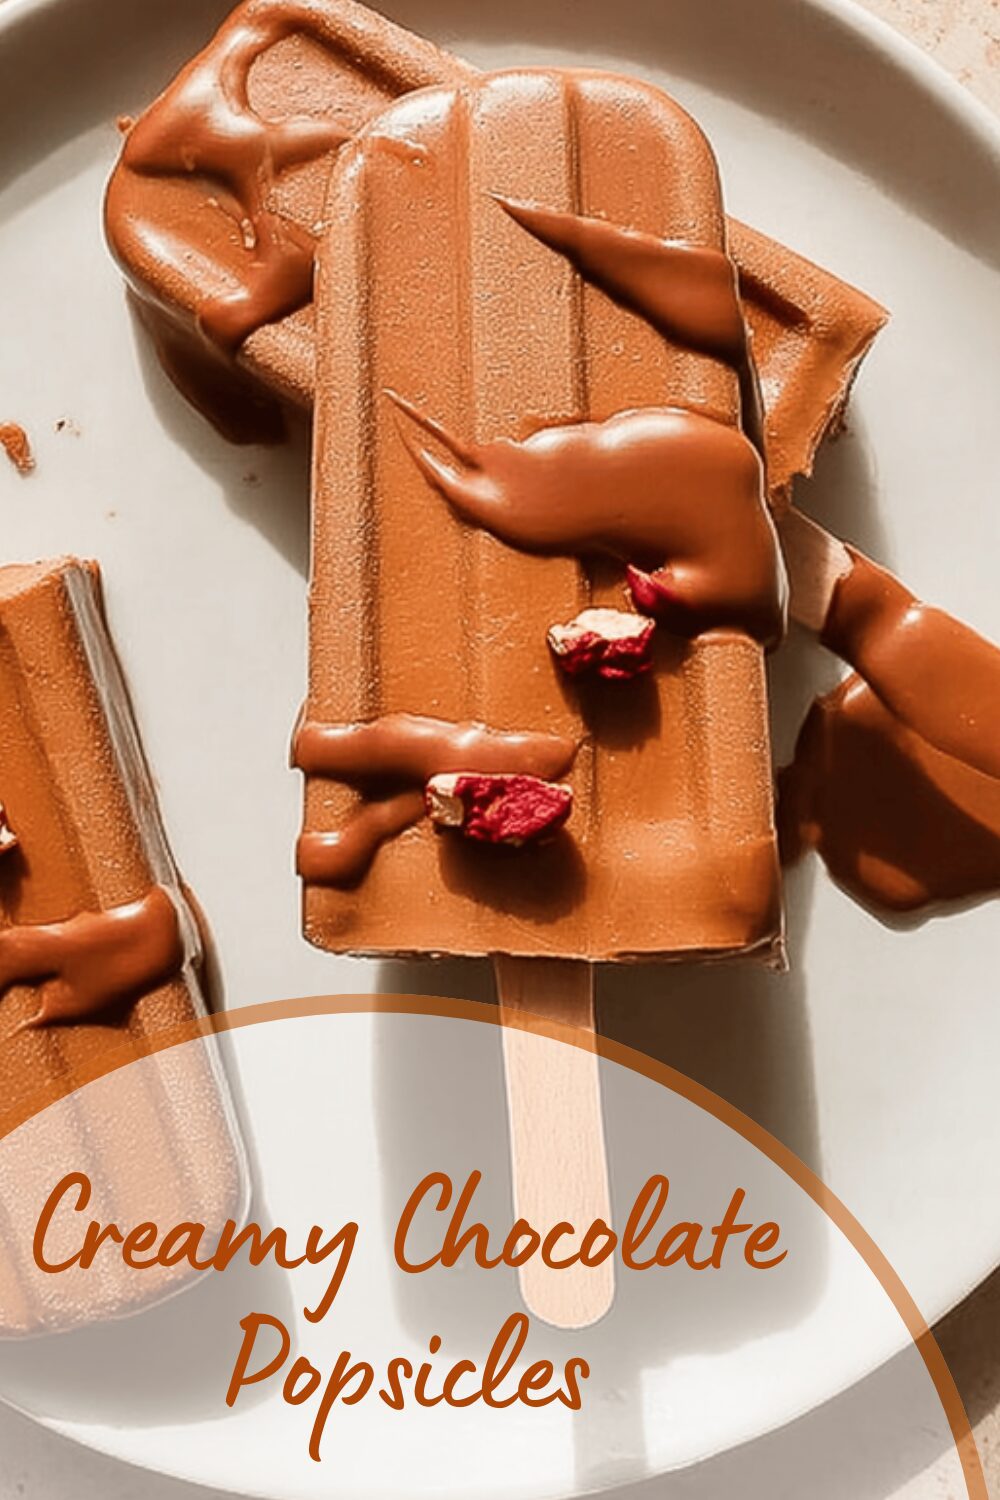
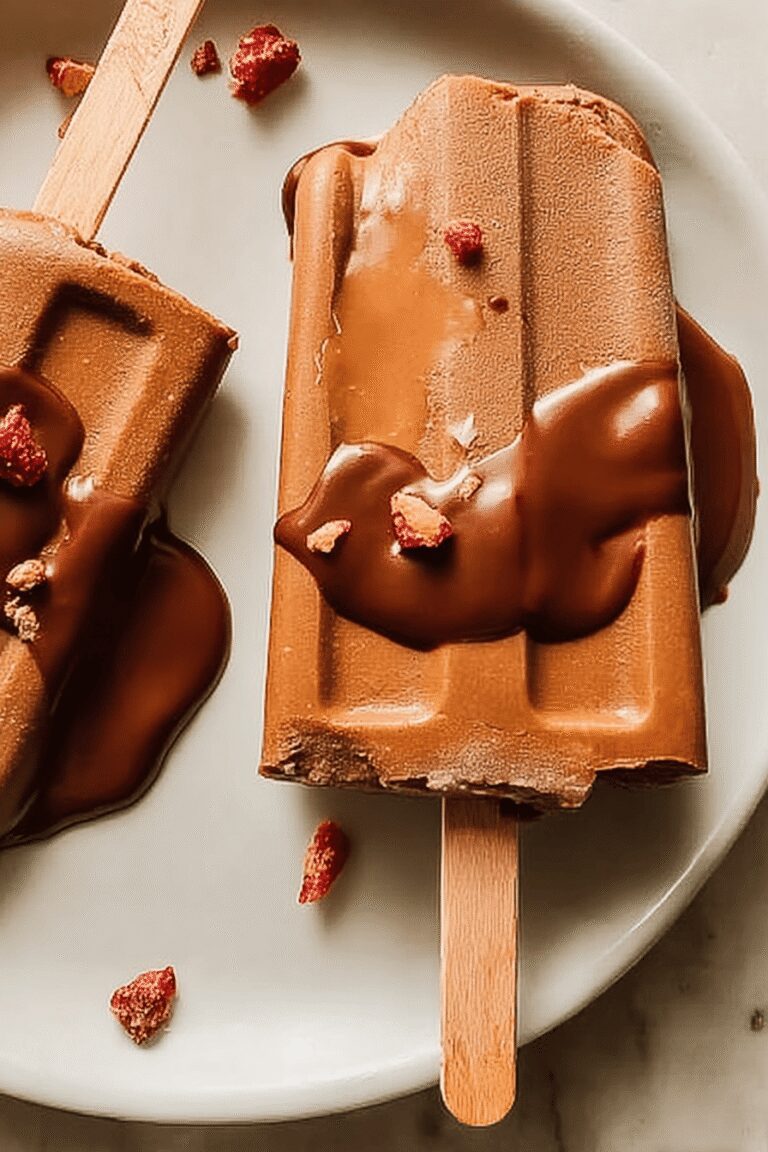
- Optional: Drizzle melted dark chocolate over the frozen popsicles and sprinkle with freeze-dried raspberries or flaked sea salt.
Preparation time is a breeze with just 10 minutes of active prep and 4-6 hours of freeze time, totaling about 6 hours and 10 minutes! For more frozen fun, try our chocolate covered strawberries recipe next. Remember, whisking well prevents lumps and keeps things creamy, as per dairy nutrition insights.
Tips for Smooth Results
If you’re new to this, always use a sieve for extra smoothness it’s a game-changer! This step ensures your popsicles have that professional feel. Once frozen, they’re ready to enjoy, and kids will love helping out. Let’s talk about making these fit your needs next.

Dietary Substitutions to Customize Your Creamy Chocolate Popsicles
Making these creamy chocolate popsicles your own is so exciting! Whether you’re vegan or watching your sugar, simple swaps keep the flavor top-notch. Let’s go over some easy changes to fit different diets and preferences.
For protein and main component alternatives, replace dairy milk with almond, soy, or oat milk for vegan and lactose-intolerant folks. Use coconut cream instead of heavy cream for that plant-based creamy texture. Swap sugar with natural sweeteners like agave or stevia to suit low-sugar diets it’s all about keeping it delicious!
When it comes to vegetable, sauce, and seasoning modifications, add a pinch of cinnamon or chili powder for a unique twist. Incorporate mashed avocado for extra creaminess and nutrition, or use extracts like peppermint for fun flavors. These tweaks make the recipe versatile for everyone from newlyweds to seniors.
Why Customizations Matter
Adapting recipes like this one helps everyone enjoy treats without worry. For example, going gluten-free is straightforward since the base is naturally safe. Plus, these changes keep the popsicles creamy and not icy, which is key for a great texture. It’s all about creating memorable moments!
Mastering Creamy Chocolate Popsicles: Advanced Tips and Variations
Once you’re comfortable with the basics, let’s level up your creamy chocolate popsicles game! Pro cooking techniques like using a blender for an ultra-smooth base can make your treats feel gourmet. Strain the mixture to remove lumps, and you’ll get that perfect texture every time.
Flavor variations are where the fun begins try adding espresso powder for a mocha vibe or swirling in peanut butter for a nutty kick. Presentation tips include garnishing with shaved dark chocolate or crushed nuts before freezing for an elegant look. For make-ahead options, prepare the mixture in bulk and use silicone molds for quick desserts.
| Tip Type | Description |
|---|---|
| Texture Enhancement | Use cornflour to prevent ice crystals and keep popsicles creamy. |
| Flavor Boost | Add vanilla or spices for depth it’s surprising how much it improves! |
The melted milk chocolate chips create that soft, fudgy feel, and a dark chocolate drizzle adds crunch. Pouring through a sieve ensures smoothness, while sprinkling sea salt enhances the taste. These popsicles melt fast, so eat them right away, and if you lack molds, mini paper cups work great!
More Ideas for Variations
Wrap them individually for up to 3 months of storage to avoid freezer burn. This way, you can pull them out for spontaneous treats. Whether you’re a baking enthusiast or a traveler, these tips make it easy to impress.
How to Store Creamy Chocolate Popsicles: Best Practices
Keeping your creamy chocolate popsicles fresh is key to enjoying them later! Store them in airtight containers in the freezer for short-term use. For long-term, wrap each one in parchment paper and pop them into a sealed bag to fight off freezer burn.
Avoid reheating; just let them thaw a bit at room temperature for the best taste and texture. Meal prep pros will love making batches ahead for quick snacks. The melted milk chocolate helps with that fudgy feel, so proper storage keeps it intact.
Long-Term Tips
These can last up to 3 months if stored right, making them perfect for busy professionals. Remember, adding a dark chocolate drizzle provides crunch, but store carefully to maintain it. It’s all about easy, joyful cooking!
FAQs: Frequently Asked Questions About Creamy Chocolate Popsicles
Can I make creamy chocolate popsicles without using milk chocolate?
Yes, you can skip the milk chocolate entirely. The popsicles will still be delicious, but milk chocolate adds extra richness and helps create a softer, fudgy texture. If you prefer, use dark or white chocolate, or omit chocolate pieces altogether and rely on cocoa powder and cream for flavor and creaminess.
What should I do if I don’t have popsicle molds?
If you don’t have popsicle molds, mini paper cups make a great alternative. Pour the creamy chocolate mixture into the cups, cover each with aluminum foil, and push a popsicle stick through the foil into the center of the mixture. Freeze until firm. To serve, peel away the paper cup for easy enjoyment.
What ingredients make chocolate popsicles creamy instead of icy?
The creamy texture comes from using heavy cream and whole milk, both of which have higher fat content than skim milk. Adding a small amount of cornstarch also helps by preventing ice crystal formation, resulting in a smooth, velvety consistency rather than an icy one.
How long do creamy chocolate popsicles take to freeze completely?
Typically, creamy chocolate popsicles need at least 4 to 6 hours in the freezer for best results. For firmer popsicles, freezing them overnight is ideal. Check after 4 hours by gently pressing the surface—if still soft, continue freezing until fully solid.
Can I add extras like nuts or chocolate chips to my popsicles?
Yes, adding mix-ins such as chopped nuts, mini chocolate chips, or even a swirl of caramel sauce can add texture and flavor. Add these just before pouring the mixture into molds to ensure even distribution and prevent settling during freezing.
Creamy Chocolate Popsicles
🍫 These Chocolate Popsicles are creamy, rich, and easy to make at home, perfect for a refreshing frozen treat.
❄️ The smooth texture combined with a hint of chocolate makes them a delightful dessert that kids and adults will love.
- Total Time: 6 hours 10 minutes
- Yield: 6-8 popsicles
Ingredients
– 100 grams granulated sugar, sifted
– 35 grams cocoa powder (Dutch-processed or natural)
– 2 tablespoons cornflour (corn starch) (can substitute flour)
– 1/4 teaspoon fine salt
– 420 ml double cream (heavy cream, full-fat preferred)
– 360 ml whole milk (can use low-fat, skim, or plant-based milks)
– 55 grams milk chocolate chips (can substitute dark chocolate or omit)
– 70% dark chocolate melted for drizzling
Instructions
1- In a medium saucepan, mix the sifted granulated sugar, cocoa powder, cornflour, and salt thoroughly to remove any lumps.
2- Gradually pour in the double cream and whole milk while whisking continuously. Add the milk chocolate chips. Heat the mixture gently over medium heat, stirring frequently, until it simmers around the edges, the chocolate melts completely, and the mixture thickens slightly (about 1 minute).
3- Remove the saucepan from the heat. If any lumps remain, pour the mixture through a fine mesh sieve. Allow the mixture to cool.
4- Pour the cooled mixture evenly into popsicle molds and insert sticks.
5- Freeze the popsicles for 4-6 hours, or until completely solid.
6- To release the popsicles, briefly run the molds under warm water and gently pull the popsicles out.
7- Optional: Drizzle melted dark chocolate over the frozen popsicles and sprinkle with freeze-dried raspberries or flaked sea salt.
Notes
🍫 The melted milk chocolate chips help create a soft, fudgy texture in the popsicles.
🧹 Pouring the mixture through a sieve ensures a smoother final texture.
🍫 Adding a dark chocolate drizzle provides a pleasant crunchy contrast.
- Prep Time: 10 minutes
- Freeze time: 4-6 hours
- Category: Dessert
- Method: Freezing
- Diet: Contains Dairy
Nutrition
- Serving Size: 1 popsicle
- Calories: 240
- Sugar: 16 g
- Sodium: 85 mg
- Fat: 19 g
- Saturated Fat: 12 g
- Unsaturated Fat: 5 g
- Carbohydrates: 18 g
- Fiber: 1 g
- Protein: 3 g
- Cholesterol: 52 mg


