
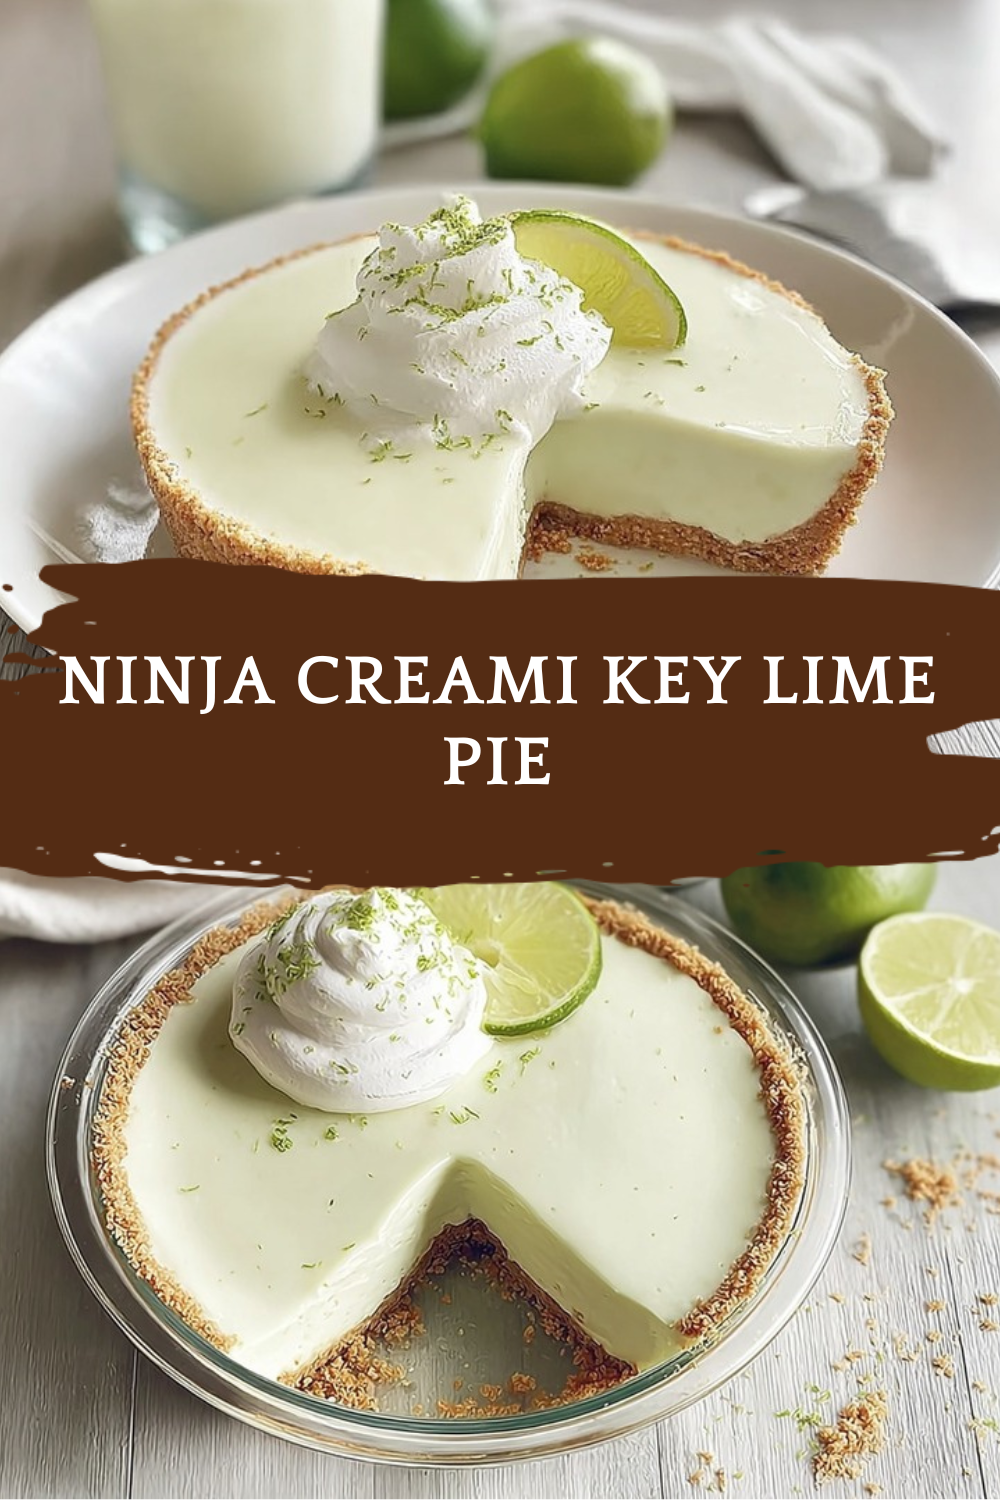
Why You\’ll Love This Ninja Creami Key Lime Pie
Simple, tangy, and packed with protein, this Ninja Creami Key Lime Pie recipe is the kind of freezer-to-table treat the whole family will ask for again and again. It uses common pantry ingredients and a bit of kitchen tech to turn Greek yogurt and a scoop of protein into a dreamy, scoopable dessert. Whether you\’re feeding kids after sports practice or craving a light, citrusy finish after dinner, this Ninja Creami Key Lime Pie option hits the spot.
- Ease of preparation: The Ninja Creami Key Lime Pie base comes together in minutes. Add ingredients to a blender, pour into a pint container, freeze 24 hours, then process in your Ninja Creami. No complex custards, no long baking time, and very little active effort perfect for busy parents and students who want a fast homemade treat.
- Health benefits: Using Greek yogurt and a scoop of vanilla protein powder gives this Ninja Creami Key Lime Pie a protein boost that helps keep you full longer. Whole milk (or full-fat oat milk) adds creaminess and healthy fats that make the texture lush while still keeping portions reasonable for diet-conscious eaters.
- Versatility: This Ninja Creami Key Lime Pie recipe adapts well to dairy-free, gluten-free, and lower-calorie swaps. You can swap yogurts, milks, or toppings to match food sensitivities without losing that classic tangy-lime experience.
- Distinctive flavor: The bright key lime notes backed by a bit of vanilla protein and optional graham-cracker crunch deliver a dessert that tastes like a slice of seaside pie but in ice cream form. It\’s tart, creamy, and a little playful, which makes it a winner with kids and adults alike.
Tip: If you love citrus desserts, pairing this with a light cookie crumb or a dollop of whipped cream turns a simple pint into a party-ready dessert.
Read more about citrus benefits at + $(‘AI Agent’).item.json.output.Anchor1 +.
Jump To
- 1. Why You\’ll Love This Ninja Creami Key Lime Pie
- 2. Essential Ingredients for Ninja Creami Key Lime Pie
- 3. How to Prepare the Perfect Ninja Creami Key Lime Pie: Step-by-Step Guide
- 4. Dietary Substitutions to Customize Your Ninja Creami Key Lime Pie
- 5. Mastering Ninja Creami Key Lime Pie: Advanced Tips and Variations
- 6. How to Store Ninja Creami Key Lime Pie: Best Practices
- 7. FAQs: Frequently Asked Questions About Ninja Creami Key Lime Pie
- 8. Ninja Creami Key Lime Pie
Essential Ingredients for Ninja Creami Key Lime Pie
Below are the exact ingredients you\’ll need for this Ninja Creami Key Lime Pie, followed by quick notes on what each item does in the recipe.
- 2 cartons (5.3 ounce each) key lime pie Greek yogurt – Provides the tart, creamy base and classic key-lime flavor that makes this pint taste like pie.
- 1/2 cup whole milk (full-fat oat milk may work) – Adds extra creaminess and helps the pint spin smoothly in the Ninja Creami.
- 1 scoop vanilla protein powder (about 35 grams; gluten-free with simple ingredients recommended) – Boosts protein and adds body and subtle vanilla notes to balance the lime.
- 2 teaspoons lime juice (fresh key lime juice, bottled key lime juice, or regular lime juice) – Adds fresh acidity to brighten the flavor.
- Optional toppings: whipped cream (fresh) – For a classic pie-like finish and extra creaminess.
- Optional toppings: gluten-free graham cracker crumbs – For crunchy pie-crust texture stirred in after the first spin.
- Optional toppings: white chocolate chips – For a sweet contrast to the tart lime.
- Optional toppings: frozen cream cheese chunks for cheesecake flavor – Adds a tangy, creamy surprise that mimics cheesecake filling.
Special Dietary Options
- Vegan: Use coconut or almond-based key-lime flavored yogurt alternative and swap whole milk for full-fat oat milk. Choose a plant-based vanilla protein powder and dairy-free toppings.
- Gluten-free: The main recipe is gluten-free if the protein powder is certified gluten-free. Use gluten-free graham crumbs for any crust or topping.
- Low-calorie: Choose low-fat Greek yogurt or a lower-calorie dairy-free yogurt and use a lower-calorie protein powder, though texture may be slightly less rich.
How to Prepare the Perfect Ninja Creami Key Lime Pie: Step-by-Step Guide
This step-by-step guide walks you through making the Ninja Creami Key Lime Pie from mise en place to the final spin. Follow the timing closely for the best texture and make small adjustments for dietary swaps where noted.
First Step: Gather and measure
Measure out the ingredients so everything is ready: two 5.3-ounce cartons of key lime pie Greek yogurt, 1/2 cup whole milk (or full-fat oat milk), one scoop (about 35 g) vanilla protein powder, and 2 teaspoons lime juice. If you\’re using optional toppings like graham crumbs or frozen cream cheese chunks, have them measured and chilled.
Second Step: Blend the base
Place the key lime pie Greek yogurt, whole milk, vanilla protein powder, and lime juice into a blender or food processor. Blend on medium speed until smooth and uniform. Scrape down the sides so the protein powder is fully incorporated.
Notes on texture: The mixture should be pourable but slightly thick. If you\’re using dairy-free yogurt, blend until very smooth since some plant yogurts separate more easily.
Third Step: Pack the pint
Pour the blended mixture into a Ninja Creami pint container. Level the surface and wipe the rim clean. Leave about 1/2 inch of headspace if your pint container recommends it. Seal the pint with its lid.
Fourth Step: Freeze solid
Place the pint upright in the freezer and freeze for a full 24 hours. A full 24-hour freeze gives the best results for texture and prevents graininess. Avoid stirring or partially freezing to speed this up; a rushed freeze gives icy, uneven results.
Fifth Step: Spin in the Ninja Creami
After 24 hours, install the pint into your Ninja Creami bowl per the machine\’s instructions. Process on the “Lite Ice Cream” setting. When the cycle finishes, check the texture.
If the mixture is powdery or crumbly, add 1 to 2 tablespoons of cold whole milk (or plant milk) and select the “Re-spin” option. For very dense bases, you may need a second re-spin to reach a scoopable, smooth consistency.
Sixth Step: Add mix-ins and toppings
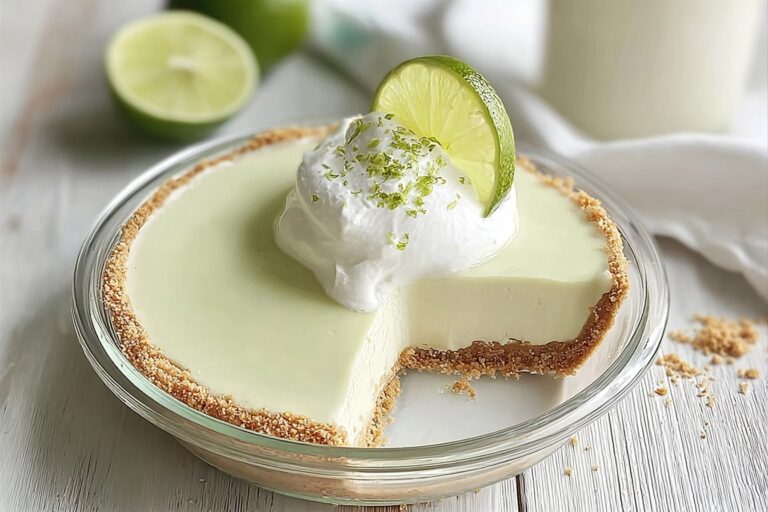
For a pie-crust vibe, mix in 2 tablespoons of gluten-free graham cracker crumbs after the first spin and then use “Re-spin” once to distribute them without crushing the texture. To add cheesecake pockets, fold in frozen cream cheese chunks briefly after spinning; their cold temperature keeps them intact and gives creamy bites. Top with fresh whipped cream and a sprinkle of lime zest if you like.
Final Step: Serve and enjoy
Scoop immediately for a soft-serve style treat, or return to the freezer for 10 to 20 minutes to firm up slightly. If you store leftovers, smooth the surface, press plastic wrap directly on top, and secure the lid before freezing. When you want a scoop later, let sit 5 to 10 minutes at room temperature, then use the “Re-spin” function if needed to regain creaminess.
Quick timing summary:
- Prep and blend: 5 to 10 minutes.
- Freeze: 24 hours (do not shorten).
- Spin and finish: 3 to 6 minutes plus any re-spins.
Adaptations within the steps
If you\’re making a dairy-free or lower-fat version, follow the same freeze-and-spin schedule. Full 24-hour freezing is especially important for plant-based bases because they can otherwise develop icy textures. Add a tablespoon of plant milk during re-spins if the texture becomes a bit dry.
| Swap | Why | Effect on Texture |
|---|---|---|
| Whole milk to full-fat oat milk | Non-dairy option with creaminess | Slightly less dairy richness, still creamy if full-fat |
| Greek yogurt to coconut yogurt | Vegan substitute | May be softer; extra freeze time and re-spins help |
| Protein powder brand swap | Flavor and ingredient preferences | Some powders can thicken more; watch blend time |

Dietary Substitutions to Customize Your Ninja Creami Key Lime Pie
Protein and Main Component Alternatives
If you need swaps for protein or the main creamy base, you\’ve got several reliable choices. Swap the vanilla protein powder for a plant-based vanilla protein of similar weight if you\’re vegan or have dairy sensitivities. If you want fewer calories, use a lower-calorie whey or plant protein, but know the texture may be less rich.
For a dairy-free base, select a full-fat coconut or almond yogurt that\’s labeled for creaminess. Some oat-based yogurts are thicker and work well, but coconut-based yogurts give the creamiest, most indulgent result. For lactose-sensitive eaters, lactose-free whole milk or a lactose-free milk alternative keeps the mouthfeel very similar.
Vegetable, Sauce, and Seasoning Modifications
While this recipe is citrus-forward, you can swap or add flavor layers with simple seasoning changes. A small pinch of salt helps balance sweet and tart notes, while a drop of natural lime or lemon extract intensifies citrus without adding more liquid. If you want herbal contrast, a tiny amount of finely chopped fresh mint folded in after spinning gives a bright, garden-fresh lift.
For a saucier topping, warm a few tablespoons of key-lime curd and spoon it over scoops just before serving. If you prefer less tang, reduce the lime juice to 1 teaspoon and add a bit more vanilla protein to round the taste.
Mastering Ninja Creami Key Lime Pie: Advanced Tips and Variations
Once you\’ve made the basic Ninja Creami Key Lime Pie a few times, these expert tips and variations help get bakery-quality texture and presentation.
Pro cooking techniques
- Chill all ingredients before blending to reduce air incorporation and tiny ice crystals.
- Use cold utensils when testing texture; warm hands or spoons can soften the surface prematurely.
- When adding mix-ins (graham crumbs or white chocolate chips), fold them in after the first spin to preserve texture and avoid sogginess.
Flavor variations
- White chocolate-lime: Stir in 1/4 cup white chocolate chips after spinning for pockets of sweet contrast.
- Cheesecake-style: Add 1 to 2 tablespoons of frozen cream cheese chunks for creamy bites that mimic cheesecake.
- Double-citrus: Add 1 teaspoon lemon zest with the lime juice for extra citrus complexity.
Presentation tips
- Serve in chilled bowls or cones to slow melting.
- Garnish with a lime wheel, a sprinkle of graham crumbs, and a small dollop of fresh whipped cream for a classic visual cue.
- Use clear dessert glasses to showcase layers: a little graham crumb, a scoop of the Ninja Creami Key Lime Pie, and a drizzle of white chocolate or curd.
Make-ahead options
Make multiple pints at once for quick desserts during the week. Store finished pints with a piece of plastic pressed to the surface and a tight lid for up to two weeks. Label with the date so the family knows when you made them. If you plan to serve to guests, spin the pint right before people arrive so it is at perfect scoopable consistency.
Pro tip: For small gatherings, pre-spin and store; then do a short re-spin before serving so the texture is fresh and airy.
How to Store Ninja Creami Key Lime Pie: Best Practices
Refrigeration
This dessert is meant to be frozen. If you have leftovers that softened after spinning, store them in the freezer. Short-term refrigeration (less than 2 hours) is fine for serving, but do not refrigerate for longer-than-needed because the texture will soften and may weep.
Freezing
For best long-term storage, place the processed pint upright in the freezer. Smooth the top with a spoon, press plastic wrap directly on the surface, then secure the lid. Store for up to 2 weeks for best flavor and texture.
Reheating
There is no reheating needed. When you want to serve frozen pints, let them sit at room temperature for 5 to 10 minutes, then use the Ninja Creami\’s “Re-spin” function if the texture needs refreshing. Add 1 tablespoon of milk if the mix is crumbly when you re-spin.
Meal prep considerations
Make several pints for weekly meal prep. Keep a few plain and a few with mix-ins so everyone can choose a favorite. Label containers with the make date and mix-in notes.
| Storage | Duration | Notes |
|---|---|---|
| Freezer | Up to 2 weeks | Press plastic on top to prevent ice crystals |
| Fridge (short-term) | Up to 2 hours | Good for serving; do not store long-term |
FAQs: Frequently Asked Questions About Ninja Creami Key Lime Pie
How do you make Key Lime Pie in a Ninja Creami?
To make Key Lime Pie in your Ninja Creami, blend 1 cup plain Greek yogurt, 1/4 cup key lime juice, 1/4 cup sweetened condensed milk, 1 tablespoon lime zest, and 1/2 teaspoon vanilla extract until smooth. Pour into a Ninja Creami pint container, add 1-2 tablespoons of cream cheese for tang if desired, and freeze for 24 hours. Once frozen solid, install the pint in the Creami and process on the “Lite Ice Cream” setting. If it’s powdery, add 1-2 tablespoons of milk and re-spin on “Re-spin.” For a pie crust vibe, mix in 2 tablespoons crushed graham crackers after the first spin. This yields 1 pint of creamy, tart treat ready in minutes after freezing. Total prep time is 5 minutes plus freezing. Serve topped with whipped cream and extra zest. (98 words)
Can you make Ninja Creami Key Lime Pie dairy-free?
Yes, you can easily adapt Ninja Creami Key Lime Pie to be dairy-free. Swap Greek yogurt for coconut or almond milk yogurt (full-fat versions work best for creaminess). Use dairy-free sweetened condensed milk alternative, like coconut condensed milk, and replace any cream cheese with dairy-free cream cheese or skip it. Blend 1 cup dairy-free yogurt, 1/4 cup key lime juice, 1/4 cup dairy-free condensed milk, 1 tablespoon lime zest, and 1/2 teaspoon vanilla. Freeze in the pint for 24 hours, then process on “Lite Ice Cream.” Add 1 tablespoon plant-based milk for re-spin if needed. It freezes solid and spins into a smooth, tangy pie-like texture. Test brands like So Delicious yogurt for best results. (112 words)
Can I use different yogurt flavors in Ninja Creami Key Lime Pie?
Absolutely, you can swap yogurt flavors in Ninja Creami Key Lime Pie for variety. Plain or vanilla Greek yogurt is ideal for balance, but try lemon Greek yogurt and replace key lime juice with lemon juice for a citrus twist. For strawberry key lime, use strawberry yogurt and add a few fresh berries. Use full-fat yogurt for richer texture—blend 1 cup yogurt with 1/4 cup juice, 1/4 cup sweetened condensed milk, zest, and vanilla. Freeze 24 hours, then spin on “Lite Ice Cream.” Avoid low-fat yogurt as it may result in icier texture; re-spin with milk if powdery. Experiment with key lime yogurt if available for authentic flavor. This keeps the recipe flexible and fun. (114 words)
How do you store leftover Ninja Creami Key Lime Pie?
Store leftover Ninja Creami Key Lime Pie easily for up to 2 weeks. After processing, smooth the top evenly with a spoon to prevent ice crystals. Press plastic wrap directly on the surface, secure the lid tightly, and freeze upright. When ready to eat, let it sit at room temperature for 5-10 minutes if needed, then re-install in the Creami and process on “Re-spin” (add 1 tablespoon milk if crumbly). Key lime pie freezes and re-spins well since it’s yogurt-based, unlike banana recipes that harden more. Avoid refreezing after scooping soft-serve to maintain creaminess. Label with date for freshness. This method keeps it tasting fresh from the machine. (108 words)
What tips make Ninja Creami Key Lime Pie extra creamy?
For the creamiest Ninja Creami Key Lime Pie, use full-fat Greek yogurt and chill all ingredients before blending to minimize air bubbles. Add 1 tablespoon instant pudding mix (cheesecake or vanilla flavor) to the base for better stability and thickness. Freeze the pint level and undisturbed for a full 24 hours—rushing leads to poor texture. Start with “Lite Ice Cream” cycle; if powdery, mix in 1-2 tablespoons cold milk or cream by hand first, then re-spin twice. Stir in graham cracker crumbs post-spin for crunch without sogginess. Avoid overfilling the pint (leave 1-inch headspace). These steps ensure a scoopable, pie-like consistency rivaling soft-serve shops. (106 words)
Ninja Creami Key Lime Pie
🥧 Enjoy a refreshing, high-protein frozen treat that satisfies your sweet tooth while supporting your fitness goals
🍋 This creamy key lime pie ice cream delivers tangy citrus flavor with the protein boost you need for muscle recovery
- Total Time: 4-6 hours 10 minutes
- Yield: 4-6 servings
Ingredients
– 2 cartons key lime pie Greek yogurt for base
– 1/2 cup whole milk for creaminess
– 1 scoop vanilla protein powder for protein
– 2 teaspoons lime juice for acidity
– whipped cream for finish
– gluten-free graham cracker crumbs for texture
– white chocolate chips for contrast
– frozen cream cheese chunks for flavor
Instructions
First Step: Gather and measure Measure out the ingredients so everything is ready: two 5.3-ounce cartons of key lime pie Greek yogurt, 1/2 cup whole milk (or full-fat oat milk), one scoop (about 35 g) vanilla protein powder, and 2 teaspoons lime juice. If you’re using optional toppings like graham crumbs or frozen cream cheese chunks, have them measured and chilled.
Second Step: Blend the base Place the key lime pie Greek yogurt, whole milk, vanilla protein powder, and lime juice into a blender or food processor. Blend on medium speed until smooth and uniform. Scrape down the sides so the protein powder is fully incorporated. Notes on texture: The mixture should be pourable but slightly thick. If you’re using dairy-free yogurt, blend until very smooth since some plant yogurts separate more easily.
Third Step: Pack the pint Pour the blended mixture into a Ninja Creami pint container. Level the surface and wipe the rim clean. Leave about 1/2 inch of headspace if your pint container recommends it. Seal the pint with its lid.
Fourth Step: Freeze solid Place the pint upright in the freezer and freeze for a full 24 hours. A full 24-hour freeze gives the best results for texture and prevents graininess. Avoid stirring or partially freezing to speed this up; a rushed freeze gives icy, uneven results.
Fifth Step: Spin in the Ninja Creami After 24 hours, install the pint into your Ninja Creami bowl per the machine’s instructions. Process on the “Lite Ice Cream” setting. When the cycle finishes, check the texture. If the mixture is powdery or crumbly, add 1 to 2 tablespoons of cold whole milk (or plant milk) and select the “Re-spin” option. For very dense bases, you may need a second re-spin to reach a scoopable, smooth consistency.
Sixth Step: Add mix-ins and toppings For a pie-crust vibe, mix in 2 tablespoons of gluten-free graham cracker crumbs after the first spin and then use “Re-spin” once to distribute them without crushing the texture. To add cheesecake pockets, fold in frozen cream cheese chunks briefly after spinning; their cold temperature keeps them intact and gives creamy bites. Top with fresh whipped cream and a sprinkle of lime zest if you like.
Final Step: Serve and enjoy Scoop immediately for a soft-serve style treat, or return to the freezer for 10 to 20 minutes to firm up slightly. If you store leftovers, smooth the surface, press plastic wrap directly on top, and secure the lid before freezing. When you want a scoop later, let sit 5 to 10 minutes at room temperature, then use the “Re-spin” function if needed to regain creaminess.
Notes
🧊 For best results, use a shallow container to freeze the ice cream faster and more evenly
🥄 If the ice cream becomes too hard, let it sit at room temperature for 10-15 minutes before scooping
🍋 Adjust the lime juice amount based on your preference – add more for a tangier flavor or less for a milder taste
- Prep Time: 10 minutes
- Freezing Time: 4-6 hours
- Cook Time: 0 minutes
- Category: Dessert
- Method: No-Churn
- Cuisine: American
- Diet: High-Protein
Nutrition
- Serving Size: 1 serving
- Calories: 220
- Sugar: 18g
- Sodium: 85mg
- Fat: 4g
- Saturated Fat: 2.5g
- Unsaturated Fat: 1g
- Trans Fat: 0g
- Carbohydrates: 22g
- Fiber: 0g
- Protein: 25g
- Cholesterol: 15mg


