
Why You’ll Love These Raw Chocolate Brownies
Raw Chocolate Brownies are one of those sweet treats that feel rich and indulgent, yet they come together with simple ingredients and almost no fuss. If you are looking for no bake brownies that fit a busy schedule, this recipe is such a win. The texture is fudgy, the chocolate flavor is deep, and the chilled ganache adds that dreamy finish everyone loves.
These raw brownies are a great little dessert for hot days, last-minute guests, or any time you want a chocolate fix without turning on the oven.
- Easy to make: You only need a food processor, a bowl, and an 8×8 pan. The prep is quick, and the fridge does the rest.
- Better-for-you ingredients: Medjool dates bring natural sweetness, while almond flour and cacao powder help create a satisfying, wholesome bite.
- Fits many diets: These are vegan brownies, gluten-free, and refined sugar-free, which makes them handy for sharing.
- Bold chocolate taste: The combo of cacao in the base and ganache gives these healthy brownies a rich, layered chocolate flavor.
If you love easy sweets, you might also enjoy pairing these with a chilled treat like homemade mango ice cream for a fun dessert spread.
For more about one of the star ingredients, you can read this helpful overview from WebMD on cacao powder benefits.
Jump To
- 1. Why You’ll Love These Raw Chocolate Brownies
- 2. Essential Ingredients for Raw Chocolate Brownies
- 3. How to Prepare the Perfect Raw Chocolate Brownies: Step-by-Step Guide
- 4. Protein and Main Component Alternatives
- 5. Vegetable, Sauce, and Seasoning Modifications
- 6. Mastering Raw Chocolate Brownies: Advanced Tips and Variations
- 7. How to Store Raw Chocolate Brownies: Best Practices
- 8. FAQs: Frequently Asked Questions About Raw Chocolate Brownies
- 9. Raw Chocolate Brownies
Essential Ingredients for Raw Chocolate Brownies
What You’ll Need
This raw chocolate brownies recipe keeps the ingredient list short and friendly. Every item plays an important role, so it is worth using the exact measurements below for the best texture and flavor.
- 20 plump Medjool dates, pitted – These give the brownies sweetness, stickiness, and that classic fudgy base.
- 1 cup almond flour – Adds structure and a soft, tender bite without any gluten.
- 1/2 cup cacao or cocoa powder – Brings deep chocolate flavor to the brownie layer.
- 1/3 cup cacao or cocoa powder – Forms the rich chocolate ganache topping.
- 1/4 cup maple syrup – Sweetens the ganache and helps it pour smoothly.
- 3 tablespoons coconut oil, melted – Gives the ganache its silky finish; keep it below 118 degrees to maintain raw status.
- Pinch of salt – Balances the sweetness and sharpens the chocolate taste.
Special Dietary Notes
| Dietary Need | How This Recipe Fits |
|---|---|
| Vegan | Uses plant-based ingredients only, including dates, almond flour, cacao, maple syrup, and coconut oil. |
| Gluten-free | Made without wheat or other gluten-containing ingredients. |
| Refined sugar-free | Sweetened with dates and maple syrup instead of white sugar. |
| Low-calorie option | For a lighter feel, cut smaller squares and chill well for a firmer bite. |
How to Prepare the Perfect Raw Chocolate Brownies: Step-by-Step Guide
First Step: Gather and prep everything
Start by measuring all of your ingredients so the process feels smooth from the beginning. Pit the 20 Medjool dates if you have not done so already, and make sure your coconut oil is melted but still kept below 118 degrees if you want to keep the recipe raw. Line an 8×8 pan with parchment paper so the brownies lift out easily later.
If you like easy desserts with a similar feel, you may also want to save this rich traybake recipe for another day when you want a sweet treat without much stress.
Second Step: Make the brownie base
Add the pitted dates, almond flour, and 1/2 cup cacao or cocoa powder to a food processor. Process until the mixture becomes smooth and starts forming a large ball. This usually takes a few minutes, depending on your machine. If the mix looks crumbly at first, keep going and scrape down the sides as needed.
The goal is a sticky, unified dough that presses together easily. The dates are doing a lot of the heavy lifting here, so use plump, soft Medjool dates for the best result. If your dates feel dry, soaking them briefly in warm water and patting them dry can help, but usually fresh Medjool dates work beautifully on their own.
Third Step: Press the batter into the pan
Scoop the brownie batter into the parchment-lined 8×8 pan. Press it down firmly and evenly with your hands or the back of a spoon. Make sure the layer reaches the corners so each square has a nice shape after chilling.
This step matters because a compact base gives you cleaner slices later. If the layer is uneven, some pieces may crumble when cut. A gentle but firm press is perfect.
Fourth Step: Mix the chocolate ganache
In a small bowl, combine the 1/4 cup maple syrup and 3 tablespoons melted coconut oil. Stir until they blend smoothly, then mix in the 1/3 cup cacao or cocoa powder and the pinch of salt. Keep stirring until the ganache looks glossy and smooth.
Because coconut oil can firm up fast, work fairly quickly once it is mixed in. If the mixture thickens before you pour it, place the bowl briefly over warm water and stir again. Just avoid getting it too hot if you want to keep the recipe raw.
Fifth Step: Spread the ganache and chill
Pour the ganache over the brownie base and spread it into an even layer. Make sure the top is covered all the way to the edges. This is where the brownies really start to look like a fancy dessert, even though they are still incredibly simple to make.
Place the pan in the fridge for at least 30 minutes. This helps the ganache set and makes slicing much easier. If you are in a warm kitchen or a humid climate, chill them a little longer if needed.
Final Step: Slice and serve
Once the brownies are firm, lift them out of the pan using the parchment paper. Set them on a cutting board and cut into 12 squares. A sharp knife works best here, especially if you wipe it clean between cuts.
Serve them right away, or keep them chilled until you are ready. The total time is about 1 hour, including 30 minutes of prep and 30 minutes of chill time. This recipe makes 12 brownies, which is just right for sharing with family, friends, or a few lucky snackers at home.
Protein and Main Component Alternatives
Simple swaps for different needs
Even though these raw brownies are built around dates, almond flour, and cacao, there are a few smart ways to adjust the recipe if you need a substitute or want a different texture. Since the ingredients are so minimal, each swap will affect the final taste and structure a bit.
- Almond flour alternatives: If you need a nut-free option, sunflower seed flour can work, though the flavor will be slightly different. Oat flour is another option, but it may make the base softer and less rich.
- Date alternatives: Medjool dates give the best sticky texture, but if you only have smaller dates, use enough to match the weight and soften them if they feel dry.
- Cacao or cocoa powder: Both work well. Cacao has a slightly deeper, more intense flavor, while cocoa is a little milder and more familiar.
- Maple syrup swap: Honey is not vegan, so it is not ideal here, but agave syrup can work if you want another plant-based sweetener.
For readers who love chocolate desserts, chocolate-covered strawberries are another easy no-fuss treat that fits a similar dessert mood.
When changing ingredients, keep in mind that the texture may shift. The recipe is forgiving, but the dates and almond flour are what make these raw vegan chocolate brownies hold together so nicely.
Vegetable, Sauce, and Seasoning Modifications
Flavor twists and finishing ideas
There are no vegetables in this recipe, but you can still play around with sauces and seasonings to match the season or your mood. These small changes are a fun way to turn one base recipe into something that feels new every time.
- Sea salt finish: Sprinkle a tiny pinch of flaky salt on top of the ganache before chilling for a sweet-salty finish.
- Espresso boost: Add a little espresso powder to the brownie base if you want a deeper chocolate flavor.
- Vanilla note: A small splash of vanilla can soften the flavor and make the brownies taste a bit warmer.
- Nutty topping: Crushed almonds, chopped pecans, or shredded coconut can be sprinkled on top for extra texture.
If you enjoy dessert recipes with bright flavor balance, you may also like this silky lemon cream treat for a lighter follow-up dessert.
You can also serve these healthy brownies with fresh berries or a spoonful of coconut yogurt. That makes them feel a little more special without adding much extra work. For a party tray, cut them into small bites and top each square with a raspberry or strawberry slice.
Mastering Raw Chocolate Brownies: Advanced Tips and Variations
Pro cooking techniques
To get the best texture, use soft, plump dates and process long enough for the mixture to turn into a smooth dough. If your food processor struggles, stop and scrape the sides a few times. The smoother the base, the more brownie-like the final result will be.
When making the ganache, keep the coconut oil warm enough to mix but not so hot that it loses the raw quality. A gentle hand matters here. Also, press the base firmly into the pan so the squares slice cleanly once chilled.
Flavor variations
You can make these no bake brownies feel different with tiny additions. Try a pinch of cinnamon for warmth, orange zest for a chocolate-orange combo, or crushed freeze-dried raspberries for a fruity pop. A few chopped nuts in the base will also add crunch.
For a richer dessert plate, pair the brownies with berries or a small dollop of whipped coconut cream. If you want a more festive look, drizzle a little melted chocolate on top after the ganache has set.
Presentation tips
Cut the brownies into neat squares and stack them on a simple plate. A sprinkle of cacao powder, a few berries, or a dusting of shredded coconut makes them look beautiful with very little effort. These little details are perfect when you want a dessert that looks thoughtful without taking all afternoon.
Make-ahead options
This recipe is great for planning ahead. You can make the brownies the night before and keep them chilled until serving time. In fact, they often taste even better after a longer chill because the base firms up and the ganache sets nicely.
If you are short on time, make a batch on Sunday and keep them in the fridge or freezer for easy treats during the week.
How to Store Raw Chocolate Brownies: Best Practices
Refrigeration
Store the brownies in an airtight container in the fridge for short-term keeping. This helps the ganache stay firm, especially in hot or humid weather. They will stay chewy and pleasant to eat when chilled.
Freezing
For long-term storage, freeze the brownies in a single layer first if possible, then move them to a container or freezer bag. This makes it easier to grab one square at a time. Frozen brownies keep their chewy texture nicely and taste great straight from the freezer or after a few minutes on the counter.
Reheating
These are best served cold or at cool room temperature, so reheating is usually not needed. If they have been frozen, let them sit out for a few minutes until they soften slightly. Avoid heating them too much, or the ganache may melt.
Meal prep considerations
Because the recipe makes 12 brownies, it is a nice meal prep dessert for busy weeks. Portion them into small containers or wrap individual squares for easy grab-and-go snacks. If your kitchen runs warm, the fridge is usually the safest place to keep them ready to serve.

FAQs: Frequently Asked Questions About Raw Chocolate Brownies
Print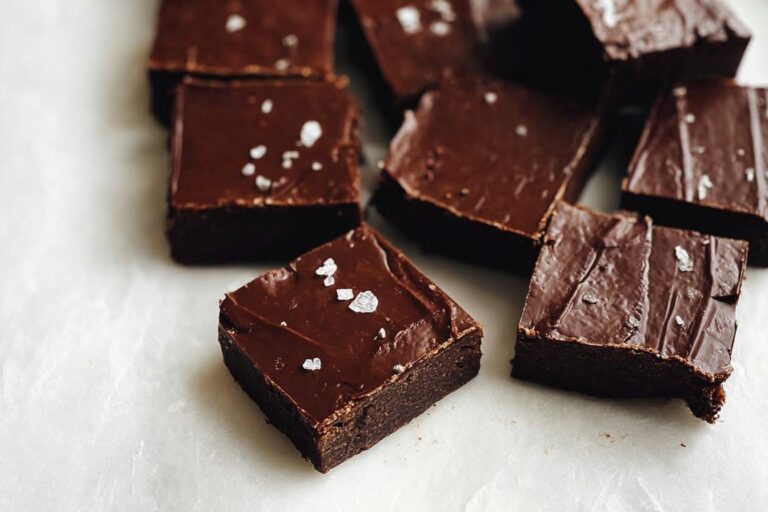
Raw Chocolate Brownies
🍫 Savor fudgy, raw chocolate brownies bursting with natural date sweetness and cacao richness – no oven needed for ultimate indulgence.
🌱 These vegan, gluten-free treats pack antioxidants and healthy fats, perfect for guilt-free snacking anytime.
- Total Time: 1 hour
- Yield: 12 brownies
Ingredients
– 20 plump Medjool dates, pitted for sweetness, stickiness, and fudgy base
– 1 cup almond flour for structure and a soft, tender bite
– 1/2 cup cacao or cocoa powder for deep chocolate flavor to the brownie layer
– 1/3 cup cacao or cocoa powder for the rich chocolate ganache topping
– 1/4 cup maple syrup for sweetening the ganache and smooth pouring
– 3 tablespoons coconut oil, melted for silky ganache finish
– Pinch of salt for balancing sweetness and sharpening chocolate taste
Instructions
1-First Step: Gather and prep everything Start by measuring all of your ingredients so the process feels smooth from the beginning. Pit the 20 Medjool dates if you have not done so already, and make sure your coconut oil is melted but still kept below 118 degrees if you want to keep the recipe raw. Line an 8×8 pan with parchment paper so the brownies lift out easily later.
2-Second Step: Make the brownie base Add the pitted dates, almond flour, and 1/2 cup cacao or cocoa powder to a food processor. Process until the mixture becomes smooth and starts forming a large ball. This usually takes a few minutes, depending on your machine. If the mix looks crumbly at first, keep going and scrape down the sides as needed. The goal is a sticky, unified dough that presses together easily. The dates are doing a lot of the heavy lifting here, so use plump, soft Medjool dates for the best result. If your dates feel dry, soaking them briefly in warm water and patting them dry can help, but usually fresh Medjool dates work beautifully on their own.
3-Third Step: Press the batter into the pan Scoop the brownie batter into the parchment-lined 8×8 pan. Press it down firmly and evenly with your hands or the back of a spoon. Make sure the layer reaches the corners so each square has a nice shape after chilling. This step matters because a compact base gives you cleaner slices later. If the layer is uneven, some pieces may crumble when cut. A gentle but firm press is perfect.
4-Fourth Step: Mix the chocolate ganache In a small bowl, combine the 1/4 cup maple syrup and 3 tablespoons melted coconut oil. Stir until they blend smoothly, then mix in the 1/3 cup cacao or cocoa powder and the pinch of salt. Keep stirring until the ganache looks glossy and smooth. Because coconut oil can firm up fast, work fairly quickly once it is mixed in. If the mixture thickens before you pour it, place the bowl briefly over warm water and stir again. Just avoid getting it too hot if you want to keep the recipe raw.
5-Fifth Step: Spread the ganache and chill Pour the ganache over the brownie base and spread it into an even layer. Make sure the top is covered all the way to the edges. This is where the brownies really start to look like a fancy dessert, even though they are still incredibly simple to make. Place the pan in the fridge for at least 30 minutes. This helps the ganache set and makes slicing much easier. If you are in a warm kitchen or a humid climate, chill them a little longer if needed.
6-Final Step: Slice and serve Once the brownies are firm, lift them out of the pan using the parchment paper. Set them on a cutting board and cut into 12 squares. A sharp knife works best here, especially if you wipe it clean between cuts. Serve them right away, or keep them chilled until you are ready. The total time is about 1 hour, including 30 minutes of prep and 30 minutes of chill time. This recipe makes 12 brownies, which is just right for sharing with family, friends, or a few lucky snackers at home.
Notes
❄️ Store brownies in the freezer for a chewy texture and longer shelf life up to 1 month.
🌡️ Keep in the fridge during hot or humid weather to prevent ganache from melting.
🔧 Process until a dough ball forms; add a splash of water if too dry for smooth consistency.
- Prep Time: 30 minutes
- Chill: 30 minutes
- Category: Dessert
- Method: No-Bake
- Cuisine: American
- Diet: Vegan, Gluten-Free
Nutrition
- Serving Size: 1 brownie
- Calories: 180
- Sugar: 12g
- Sodium: 20mg
- Fat: 10g
- Saturated Fat: 4g
- Unsaturated Fat: 6g
- Trans Fat: 0g
- Carbohydrates: 20g
- Fiber: 3g
- Protein: 3g
- Cholesterol: 0mg


