
Why You’ll Love These Red Velvet Truffles
These Red Velvet Truffles are the kind of sweet bite that disappears fast at any party, holiday tray, or after-dinner treat table. If you love red velvet cake and want a fun, mess-friendly dessert, this red velvet cake truffles recipe is a perfect fit. It brings together soft cake crumbs, creamy filling, and a smooth chocolate shell for a treat that feels special without asking for much time.
- Easy to make: This is one of those easy red velvet truffles recipes that starts with a box mix, so most of the work is already done for you. The prep takes about 15 minutes, and the whole recipe is ready in about 45 minutes.
- Great for sharing: These cake truffles make 42 small bites, which is ideal for parties, bake sales, family gatherings, or lunchbox treats. They are neat, portable, and easy to serve.
- Flexible for different tastes: You can use milk, dark, or white chocolate chips, which makes this truffles recipe easy to adjust for kids, adults, or anyone who likes a specific chocolate flavor. For a richer twist, dark chocolate is a great choice.
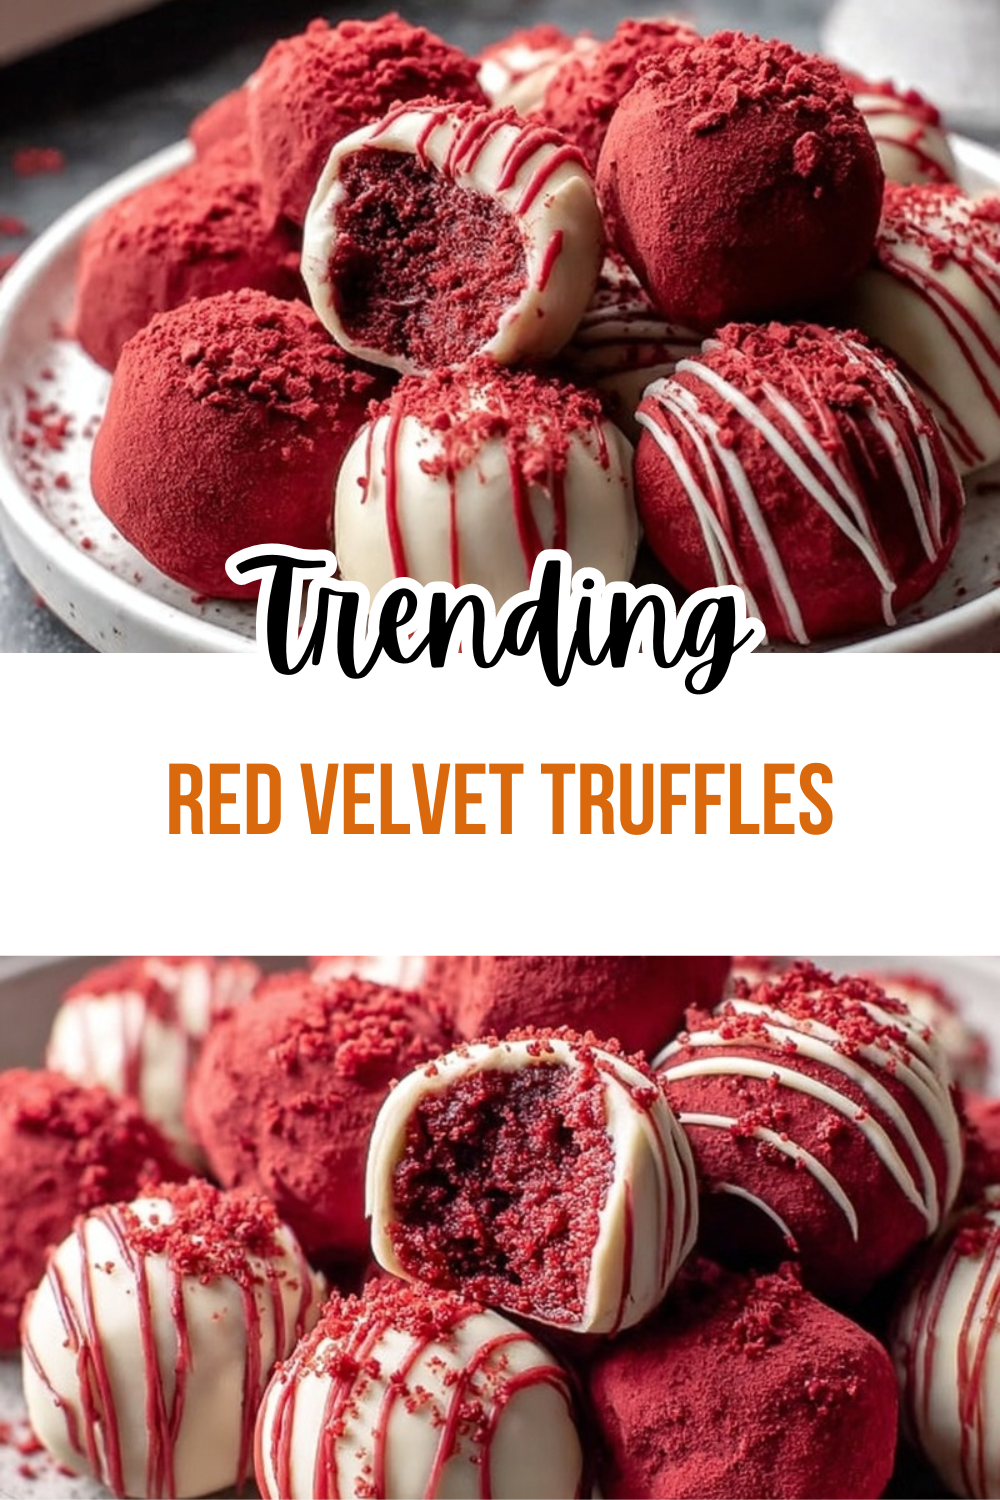
- Classic flavor with creamy texture: The mix of soft red velvet cake, tangy cream cheese, and a chocolate coating gives these red velvet truffles cream cheese treats their signature taste. Every bite is sweet, smooth, and a little indulgent.
These little bites are a quick family favorite that vanish from the plate in no time, making them perfect for sharing a sweet moment with loved ones!
If you enjoy easy dessert recipes, you may also like this chocolate-covered strawberries recipe for another simple treat that looks beautiful on a dessert table.
Jump To
- 1. Why You’ll Love These Red Velvet Truffles
- 2. Essential Ingredients for Red Velvet Truffles
- 3. How to Prepare the Perfect Red Velvet Truffles: Step-by-Step Guide
- 4. Dietary Substitutions to Customize Your Red Velvet Truffles
- 5. Mastering Red Velvet Truffles: Advanced Tips and Variations
- 6. How to Store Red Velvet Truffles: Best Practices
- 7. FAQs: Frequently Asked Questions About Red Velvet Truffles
- 8. Red Velvet Truffles
Essential Ingredients for Red Velvet Truffles
Before you begin, gather everything you need for these homemade red velvet cake truffles. The recipe uses simple ingredients, and the structured list below includes every item from the original directions so nothing gets missed.
Main Ingredients
- 1 box red velvet cake mix plus the ingredients listed on the box to prepare the cake – This forms the base of the truffles and gives them their classic flavor and color.
- 1 (8 oz) package cream cheese, 1/3 less fat, softened – This helps bind the cake crumbs and adds the creamy tang that makes red velvet truffles taste so good.
- 1 (12 oz) package milk, dark, or white chocolate chips – This creates the coating that wraps each truffle in a smooth shell.
- 2 teaspoons vegetable oil, optional – This is helpful if you want a thinner, smoother chocolate coating for dipping.
Ingredient Notes
- Boxed cake mix: The recipe works best with a box mix, which makes the texture easier to handle than many homemade cakes. This is one reason these no bake truffles after baking the cake first come out so well.
- Cream cheese: Use softened cream cheese so it blends smoothly into the crumbs. Cold cream cheese can leave lumps and make the dough harder to mix.
- Chocolate chips: Milk chocolate gives a sweeter finish, dark chocolate gives a deeper flavor, and white chocolate gives a pretty contrast against the red center.
- Vegetable oil: A small amount can help the melted chocolate glide over the cake balls more easily.
Special Dietary Options
- Vegan: Use a vegan red velvet cake mix, plant-based cream cheese, and dairy-free chocolate chips.
- Gluten-free: Choose a certified gluten-free red velvet cake mix and check that all other ingredients are gluten-free.
- Low-calorie: Use reduced-sugar cake mix, lighter cream cheese, and dark chocolate chips in a thinner coating.
How to Prepare the Perfect Red Velvet Truffles: Step-by-Step Guide
Making no bake red velvet truffles is simple once the cake is baked and cooled. The recipe moves fast after that, so it helps to prepare your tools ahead of time. A large mixing bowl, wax paper, a baking sheet, a fork, and a heatproof bowl for melting chocolate are the main items you will need.
First Step: Bake and cool the cake
Prepare the red velvet cake according to the package instructions. Since this recipe starts with a boxed mix, follow the directions on the package for mixing and baking. Once the cake is done, let it cool completely before moving on.
This cooling step matters a lot. If the cake is warm, the cream cheese can melt too quickly and make the mixture sticky. A fully cooled cake will crumble better and help the cake balls hold their shape.
Second Step: Crumble the cake finely
Break the cooled cake into fine crumbs in a large bowl. You want the texture to be soft and even, with no large pieces left behind. The finer the crumbs, the smoother your final red velvet cake truffles recipe will be.
If you are making this for a party, you can crumble the cake by hand or use two forks for a more even texture. Busy parents and students often like this part because it is quick and easy to manage.
Third Step: Add the cream cheese and mix
Add the softened cream cheese to the cake crumbs. Knead the mixture with clean hands until everything is fully incorporated. At first, it may look crumbly, but keep mixing and pressing until the dough comes together.
The mixture should feel soft but firm enough to shape. If it seems too sticky, chill it for a few minutes before rolling. This is where the signature red velvet truffles cream cheese texture really starts to form.
Fourth Step: Shape the truffles
Roll the mixture into 42 balls, using about 1 heaping tablespoon for each one. Place each ball on a wax paper-lined baking sheet. Try to make them as even in size as possible so they set at the same speed and look neat when finished.
For readers who like portion control, this size is handy because each truffle is small and satisfying. If you want to serve them at a potluck or school event, even pieces also make the tray look more polished.
Fifth Step: Chill the cake balls
Place the baking sheet in the fridge and chill the cake balls until they are firm. This makes them much easier to dip in chocolate. Chilling also helps prevent the truffles from falling apart during coating.
Here is a simple tip that makes a big difference:
Cold cake balls are easier to handle, easier to coat, and less likely to smear into the melted chocolate.
Sixth Step: Melt the chocolate
Place the chocolate chips in a heatproof bowl and melt them carefully. You can do this in short bursts if using a microwave, stirring often so the chocolate stays smooth. If you want a thinner coating, stir in the optional vegetable oil.
Using dark chocolate gives a bold flavor and a nice contrast against the red center. White chocolate gives a sweeter look and a pretty finish, especially for holiday desserts or baby showers. Milk chocolate is the classic middle ground.
Seventh Step: Coat each truffle
Take the chilled cake balls out of the fridge. Using a fork, dip each one into the melted chocolate and turn to coat it fully. Lift it out with the fork, tap off the excess chocolate, and place it back on the lined baking sheet.
Work in small batches if needed so the balls stay cold. If they warm up too much, return them to the fridge for a few minutes before continuing. This step is what gives easy red velvet truffles their smooth, bakery-style look.
Eighth Step: Add decorative designs
After coating the truffles, pour any leftover melted chocolate into a small zip-top bag. Cut off one corner and pipe designs over the top of each truffle. A simple drizzle, zigzag, or swirl adds a homemade touch without making the process hard.
If you are serving these for a birthday, holiday, or dinner party, the design step makes the tray look extra inviting. It is a small effort that adds a lot of charm.
Ninth Step: Chill until set
Return the truffles to the fridge for about 15 minutes, or until the chocolate is fully set. Once firm, they are ready to serve. You can arrange them on a platter, box them for gifts, or store them for later.
These cake truffles are a sweet treat that works well for almost any occasion. They are neat enough for guests and simple enough for a weeknight dessert.
Quick recipe details
| Recipe Detail | Amount |
|---|---|
| Prep Time | 15 minutes |
| Cook Time | 30 minutes |
| Total Time | 45 minutes |
| Yield | 42 truffles |
| Calories per serving | 113 kcal |

Dietary Substitutions to Customize Your Red Velvet Truffles
Protein and Main Component Alternatives
If you want to adjust these red velvet truffles for a different eating style, you have a few easy options. For a lighter version, choose reduced-fat cream cheese, which is already included in the original recipe. For a richer bite, use full-fat cream cheese instead, though the texture may be a bit softer.
If dairy is a concern, plant-based cream cheese works well in many cake balls recipes. You can also use dairy-free chocolate chips so the coating stays fully plant-based. These swaps are helpful for vegan guests, students on a budget, or anyone who keeps dairy out of their meals.
Vegetable, Sauce, and Seasoning Modifications
Because this dessert is already sweet and flavorful, it does not need many add-ins. Still, a few changes can make it fit different tastes. Use dark chocolate for a deeper, less sweet coating, or white chocolate for a softer flavor and lighter color. If you want a thinner shell, stir a little more of the optional vegetable oil into the melted chocolate.
You can also add a small pinch of salt to the chocolate for contrast, or sprinkle the finished truffles with red velvet crumbs for a decorative touch. For a gluten-free version, start with a certified gluten-free red velvet cake mix. That keeps the process simple while still giving you homemade red velvet cake truffles that taste just as festive.
Mastering Red Velvet Truffles: Advanced Tips and Variations
Once you have made this truffles recipe once or twice, small details can help your results look even better. Start with a cake mix instead of homemade cake. In this recipe, the boxed version gives a more dependable texture and flavor, while homemade cake can sometimes be too soft or too dry for rolling.
Chilling is another key step. Cold cake balls are much easier to dip, and the coating sets more neatly. If the mixture starts to soften while you work, return it to the fridge for a few minutes. That simple pause can save a lot of mess.
If you want a pretty finishing touch, try these ideas:
- Use contrasting chocolate colors, such as dark chocolate coating with white chocolate drizzle.
- Sprinkle a few cake crumbs on top before the chocolate sets.
- Add a tiny heart, swirl, or zigzag with the piped chocolate.
- Serve on a white platter so the red center and glossy shell stand out.
For busy schedules, these no bake truffles can be made ahead and chilled until needed. They are a smart choice for holidays, classroom parties, and family get-togethers because they travel well and hold their shape nicely. If you enjoy easy make-ahead desserts, you might also like this Biscoff millionaire’s traybake for a sweet tray dessert with a rich finish.
How to Store Red Velvet Truffles: Best Practices
Storing Red Velvet Truffles is simple, and a little care keeps them tasting fresh. Because they contain cream cheese, refrigeration is the best short-term storage method. Place them in an airtight container with parchment paper between layers if needed.
Refrigeration: Keep the truffles in the fridge for up to 5 days. They are best served chilled or slightly softened at room temperature for a few minutes before serving.
Freezing: For longer storage, freeze the truffles in a single layer first, then transfer them to a freezer-safe container or bag. They can keep for about 2 months. Thaw them in the fridge overnight before serving.
Meal prep considerations: These truffles are a nice make-ahead dessert for parties or weekly treats. You can bake the cake one day, roll the balls the next, and dip them later when you have more time. That makes them helpful for working professionals and busy parents who want a sweet finish without last-minute stress.
FAQs: Frequently Asked Questions About Red Velvet Truffles
Print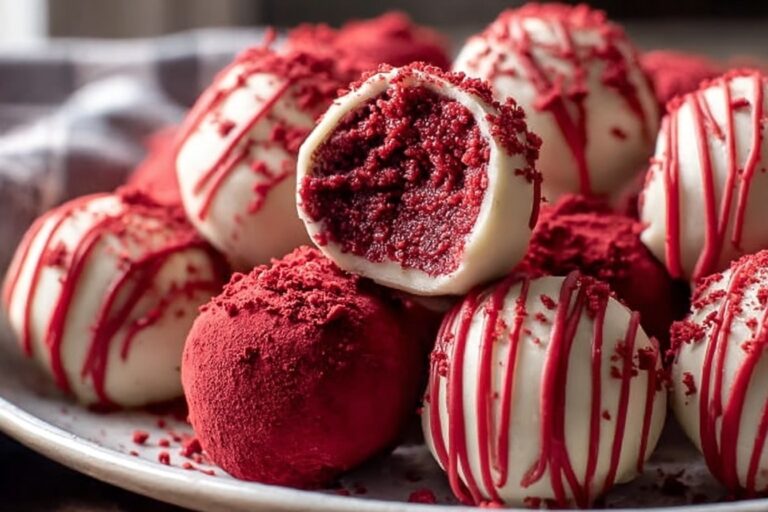
Red Velvet Truffles
🍰 Red velvet cake truffles blend moist crimson cake crumbs with creamy cheese into chocolate-dipped bites – festive, poppable indulgence.
🎂 45-minute easy treat yields 42 no-fuss truffles; perfect holiday gifting or party wow with box mix simplicity.
- Total Time: 1 hour 30 minutes
- Yield: 42 truffles
Ingredients
– 1 box red velvet cake mix plus the ingredients listed on the box to prepare the cake
– 1 (8 oz) package cream cheese, 1/3 less fat, softened
– 1 (12 oz) package milk, dark, or white chocolate chips
– 2 teaspoons vegetable oil, optional
Instructions
1-First Step: Bake and cool the cake
Prepare the red velvet cake according to the package instructions. Since this recipe starts with a boxed mix, follow the directions on the package for mixing and baking. Once the cake is done, let it cool completely before moving on.
This cooling step matters a lot. If the cake is warm, the cream cheese can melt too quickly and make the mixture sticky. A fully cooled cake will crumble better and help the cake balls hold their shape.
2-Second Step: Crumble the cake finely
Break the cooled cake into fine crumbs in a large bowl. You want the texture to be soft and even, with no large pieces left behind. The finer the crumbs, the smoother your final red velvet cake truffles recipe will be.
If you are making this for a party, you can crumble the cake by hand or use two forks for a more even texture. Busy parents and students often like this part because it is quick and easy to manage.
3-Third Step: Add the cream cheese and mix
Add the softened cream cheese to the cake crumbs. Knead the mixture with clean hands until everything is fully incorporated. At first, it may look crumbly, but keep mixing and pressing until the dough comes together.
The mixture should feel soft but firm enough to shape. If it seems too sticky, chill it for a few minutes before rolling. This is where the signature red velvet truffles cream cheese texture really starts to form.
4-Fourth Step: Shape the truffles
Roll the mixture into 42 balls, using about 1 heaping tablespoon for each one. Place each ball on a wax paper-lined baking sheet. Try to make them as even in size as possible so they set at the same speed and look neat when finished.
For readers who like portion control, this size is handy because each truffle is small and satisfying. If you want to serve them at a potluck or school event, even pieces also make the tray look more polished.
5-Fifth Step: Chill the cake balls
Place the baking sheet in the fridge and chill the cake balls until they are firm. This makes them much easier to dip in chocolate. Chilling also helps prevent the truffles from falling apart during coating.
Here is a simple tip that makes a big difference:
Cold cake balls are easier to handle, easier to coat, and less likely to smear into the melted chocolate.
6-Sixth Step: Melt the chocolate
Place the chocolate chips in a heatproof bowl and melt them carefully. You can do this in short bursts if using a microwave, stirring often so the chocolate stays smooth. If you want a thinner coating, stir in the optional vegetable oil.
Using dark chocolate gives a bold flavor and a nice contrast against the red center. White chocolate gives a sweeter look and a pretty finish, especially for holiday desserts or baby showers. Milk chocolate is the classic middle ground.
7-Seventh Step: Coat each truffle
Take the chilled cake balls out of the fridge. Using a fork, dip each one into the melted chocolate and turn to coat it fully. Lift it out with the fork, tap off the excess chocolate, and place it back on the lined baking sheet.
Work in small batches if needed so the balls stay cold. If they warm up too much, return them to the fridge for a few minutes before continuing. This step is what gives easy red velvet truffles their smooth, bakery-style look.
8-Eighth Step: Add decorative designs
After coating the truffles, pour any leftover melted chocolate into a small zip-top bag. Cut off one corner and pipe designs over the top of each truffle. A simple drizzle, zigzag, or swirl adds a homemade touch without making the process hard.
If you are serving these for a birthday, holiday, or dinner party, the design step makes the tray look extra inviting. It is a small effort that adds a lot of charm.
9-Ninth Step: Chill until set
Return the truffles to the fridge for about 15 minutes, or until the chocolate is fully set. Once firm, they are ready to serve. You can arrange them on a platter, box them for gifts, or store them for later.
These cake truffles are a sweet treat that works well for almost any occasion. They are neat enough for guests and simple enough for a weeknight dessert.
Notes
❄️ Chill cake balls 30+ min before dipping for easy handling/no melting.
🛢️ Add veg oil to melted chocolate for smoother, glossy coating.
📦 Box mix preferred over homemade for perfect crumb texture.
- Prep Time: 15 minutes
- Chill: 45 minutes
- Cook Time: 30 minutes
- Category: Dessert
- Method: No-Bake
- Cuisine: American
- Diet: Vegetarian
Nutrition
- Serving Size: 1 truffle
- Calories: 113
- Sugar: 9g
- Sodium: 124mg
- Fat: 5g
- Saturated Fat: 2g
- Unsaturated Fat: 3g
- Trans Fat: 0g
- Carbohydrates: 14g
- Fiber: 0g
- Protein: 1g
- Cholesterol: 7mg


