
Why You’ll Love This Stained Glass Cookies
Imagine pulling warm, colorful cookies from the oven that light up your kitchen like a holiday window this is the magic of stained glass cookies. They mix fun with flavor, making them a hit for anyone who loves baking surprises. Whether you’re a busy parent whipping up a quick treat or a student experimenting in the dorm kitchen, these cookies bring joy without much fuss.
These stained glass cookies come together quickly with simple steps, making them perfect for any skill level. The quick baking time ensures you can enjoy your delicious treats in no time. Made with wholesome ingredients, this stained glass cookies recipe provides nutritional value while satisfying your sweet cravings, supporting wellness and balanced indulgence.
Their versatility shines through as you can tweak them for gluten-free, vegan, or low-calorie needs, keeping the taste exciting. A buttery base paired with vibrant candy centers offers a unique twist on classic sugar cookies, delighting food enthusiasts and baking newcomers alike. Plus, they’re ideal for creating memorable family moments, like decorating together during the holidays.
To add more fun, think about how these cookies can brighten up events like birthday parties or school bake sales. I remember my first time making them with my kids it turned into a laughter-filled afternoon that we still talk about. Working professionals might appreciate the make-ahead options, fitting easily into a packed schedule.
Jump To
- 1. Why You’ll Love This Stained Glass Cookies
- 2. Essential Ingredients for Stained Glass Cookies
- 3. How to Prepare the Perfect Stained Glass Cookies: Step-by-Step Guide
- 4. Dietary Substitutions to Customize Your Stained Glass Cookies
- 5. Mastering Stained Glass Cookies: Advanced Tips and Variations
- 6. How to Store Stained Glass Cookies: Best Practices
- 7. FAQs: Frequently Asked Questions About Stained Glass Cookies
- 8. Stained Glass Cookies
Essential Ingredients for Stained Glass Cookies
Good recipes start with the right ingredients, and for these stained glass cookies, you’ll want fresh, simple items that deliver big on taste and visuals. Let’s break down what you need to create that eye-catching candy center and soft cookie base. This section pulls together everything for a smooth baking experience, perfect for home cooks or baking enthusiasts.
Below is a complete list of ingredients based on the recipe details. I’ve formatted it as a structured list to make it easy to follow, with precise measurements for each item. This ensures you have exactly what’s needed without any guesswork.
- 2 and 1/4 cups (approx. 270g) all-purpose flour, plus extra for rolling and work surface
- 1/2 teaspoon baking powder
- 1/4 teaspoon salt
- 3/4 cup (approx. 170g) unsalted butter, softened
- 3/4 cup (approx. 150g) granulated sugar
- 1 large egg, at room temperature
- 2 teaspoons pure vanilla extract
- 15 to 20 unwrapped hard candies (like fruit-flavored or mint hard candies)
- 1 large egg white, lightly beaten, or 2 tablespoons water (for optional topping)
- 1/3 cup (approx. 65g) coarse sugar or sprinkles (for optional topping)
These ingredients keep things straightforward, focusing on basics that blend into a delightful treat. For special dietary tweaks, you can swap in options like plant-based butter for vegan versions or gluten-free flour to suit different needs.
How to Prepare the Perfect Stained Glass Cookies: Step-by-Step Guide
Getting these stained glass cookies just right is all about following a few easy steps that anyone can master, even if you’re new to baking. You’ll start by mixing up a simple dough and end with colorful, melted candy centers that wow everyone. For inspiration on other cookie adventures, check out our brown butter oatmeal chocolate chip cookies recipe, which adds a nutty twist to your baking lineup.
First, whisk together the dry ingredients: 2 and 1/4 cups of flour, 1/2 teaspoon baking powder, and 1/4 teaspoon salt in a medium bowl. This creates the base for your cookie dough and ensures even texture. Next, beat the softened butter and granulated sugar until smooth and creamy, then add the room temperature egg and vanilla extract and mix well for a flavorful blend.
Gradually add the dry ingredients to the wet mixture, stirring until just combined; the dough will be soft, so add an extra tablespoon of flour if it’s too sticky. Divide the dough into two parts and roll each out on a lightly floured surface to about 1/4 inch thickness, then stack with parchment between and chill in the fridge for 1 to 2 hours. While it chills, prepare the candy by separating hard candies by color and crushing them gently into fine bits to avoid powder.
Preheat your oven to 350°F and line baking sheets with parchment. Cut out large shapes from the chilled dough, then use a smaller cutter to remove centers, re-rolling scraps as needed. Arrange the cookies on sheets, brush edges with egg white or water if using toppings, sprinkle with coarse sugar, and fill centers about 3/4 full with crushed candy. Bake for 12 to 13 minutes, rotating pans halfway, until lightly browned and the candy melts.
Let the cookies cool on the sheets for 15 minutes so the candy hardens, then transfer to a wire rack. The total time is around 3 hours, with active prep under 30 minutes, including chilling and cooling. I love how this process turns baking into a creative outlet, much like trying carrot cake cheesecake bars for a layered treat.

Dietary Substitutions to Customize Your Stained Glass Cookies
Making stained glass cookies work for your lifestyle is simple with a few smart swaps, keeping the fun and flavor intact. Whether you’re aiming for vegan options or lighter versions, these changes help everyone enjoy the recipe. It’s all about adapting without losing that signature colorful center.
For the main components, replace the butter with coconut oil or vegan butter to go dairy-free. Use flaxseed or chia seed as an egg replacer for a plant-based twist. In terms of flavors, add finely grated citrus zest or spices like cinnamon and nutmeg to mix things up, or swap vanilla extract with almond or peppermint for new tastes.
If you’re watching sugar, opt for sugar substitutes and reduce the amount while balancing the candy centers. These adjustments make the cookies versatile for busy parents, diet-conscious folks, or anyone exploring new flavors. Remember, small changes can lead to big smiles around the table.
Mastering Stained Glass Cookies: Advanced Tips and Variations
Once you’ve nailed the basics, dive into tips that take your stained glass cookies to the next level. Chilling the dough before rolling keeps shapes crisp and prevents spreading, while using a silicone mat ensures even baking. For flavor fun, experiment with different colored hard candies to create eye-popping designs.
Here are some key tips to remember:
- Roll dough before chilling to maintain perfect shapes and avoid over-spreading.
- Use light flour on surfaces, rolling pin, and hands to keep everything from sticking.
- Crush candies gently to prevent powder, which might cause stickiness.
- Bake on parchment or silicone mats to stop candy from sticking and breaking cookies.
- Brush edges with egg white or water for toppings to stick and add a nice shine.
The cookies have a soft center with crisp edges, and the candy hardens as it cools clear candies make the best window effect. You can freeze dough ahead or store baked cookies for up to three months. If the centers don’t set, bake a bit longer and let them air-dry. For more ideas, visit this external guide on improving your cookie baking.
How to Store Stained Glass Cookies: Best Practices
Keeping your stained glass cookies fresh means they stay colorful and tasty for as long as possible. Store them in an airtight container at room temperature for up to one week to lock in that just-baked goodness. Freezing is great too layer them with parchment in a sealed container for up to three months.
If you want to enjoy them later, warm in a low oven at 300°F for about 5 minutes to bring back crispness without melting the candy. This approach works well for meal prep, especially during holidays, so you can have treats ready for any occasion.
FAQs: Frequently Asked Questions About Stained Glass Cookies
How do I make stained glass cookies at home?
To make stained glass cookies, start by rolling out sugar cookie dough and cutting shapes with cookie cutters. Use smaller cutters to create window openings in the center of each cookie. Fill these openings with crushed hard candies like Jolly Ranchers or Life Savers. Bake the cookies at around 350°F (175°C) until the dough is set and the candy melts, typically 8-12 minutes. Let the cookies cool completely so the candy hardens into a stained-glass effect.
Can I use other types of cookie dough for stained glass cookies?
Yes, you can use different cookie doughs such as gingerbread, shortbread, or chocolate. Gingerbread is especially popular during holidays and works well for stained glass windows. Be mindful that baking times may vary slightly depending on the dough type, so check for doneness frequently to avoid overbaking.
What types of candies are best for stained glass cookie windows?
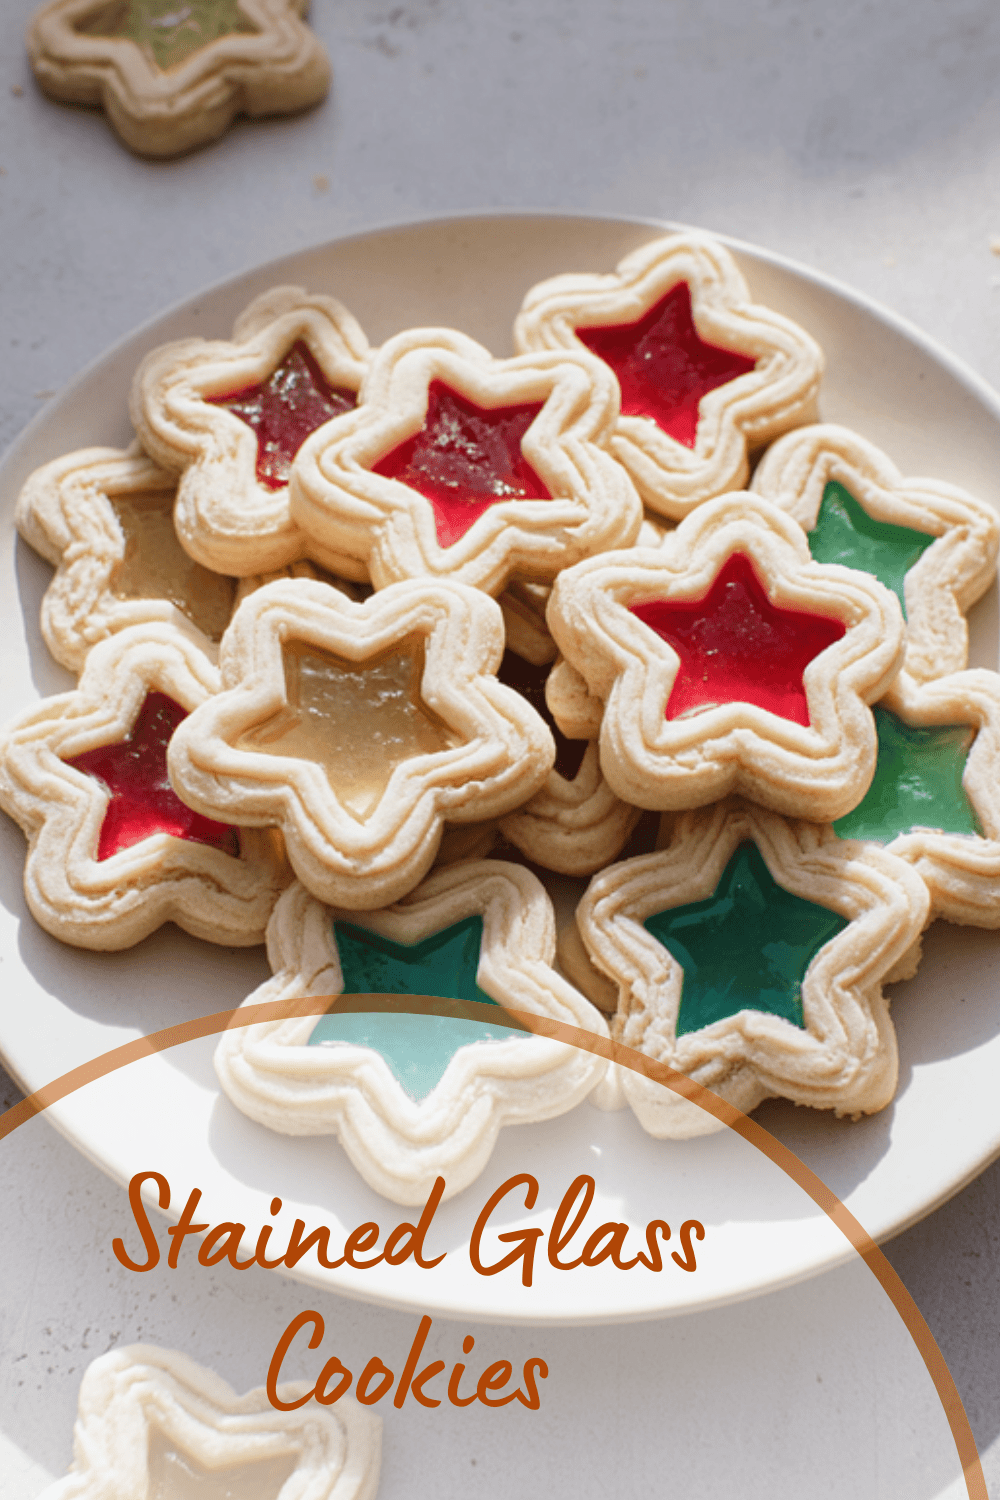
Hard candies that melt smoothly and evenly are best for stained glass cookie windows. Popular choices include crushed Jolly Ranchers, Life Savers, or Werther’s Originals. Avoid candies with fillings or those that burn easily. Crushing the candies into small, even pieces helps them melt uniformly to create clear, colorful window panes.
How do I prevent the stained glass candy from sticking to the baking sheet?
To prevent sticking, line your baking sheet with parchment paper or a silicone baking mat before placing the cookies on it. This creates a non-stick surface for the melted candy and makes cleanup easier. Additionally, make sure the candy is fully melted and cooled on the cookie itself, so it solidifies without sticking.
Can I store stained glass cookies, and how long do they last?
Stained glass cookies can be stored in an airtight container at room temperature for up to one week. Keep them in a single layer or use parchment paper between layers to avoid scratching the candy windows. Avoid refrigeration, as moisture can cause the candy to become sticky or cloudy. For longer storage, freeze cookies in a sealed container, but allow them to return to room temperature before enjoying.

Stained Glass Cookies
🍪 Delight in colorful Stained Glass Window Sugar Cookies that brighten any occasion with their vibrant candy centers.
🌈 These cookies combine classic sugar cookie flavor with a fun, eye-catching twist perfect for gift-giving or festive treats.
- Total Time: Approximately 3 hours
Ingredients
– 2 and 1/4 cups (approx. 270g) all-purpose flour, plus extra for rolling and work surface
– 1/2 teaspoon baking powder
– 1/4 teaspoon salt
– 3/4 cup (approx. 170g) unsalted butter, softened
– 3/4 cup (approx. 150g) granulated sugar
– 1 large egg, at room temperature
– 2 teaspoons pure vanilla extract
– 15 to 20 unwrapped hard candies (like fruit-flavored or mint hard candies)
– 1 large egg white, lightly beaten, or 2 tablespoons water for optional topping
– 1/3 cup (approx. 65g) coarse sugar or sprinkles for optional topping
Instructions
1-First, whisk together the dry ingredients: 2 and 1/4 cups of flour, 1/2 teaspoon baking powder, and 1/4 teaspoon salt in a medium bowl. This creates the base for your cookie dough and ensures even texture.
2-Next, beat the softened butter and granulated sugar until smooth and creamy, then add the room temperature egg and vanilla extract and mix well for a flavorful blend.
3-Gradually add the dry ingredients to the wet mixture, stirring until just combined; the dough will be soft, so add an extra tablespoon of flour if it’s too sticky. Divide the dough into two parts and roll each out on a lightly floured surface to about 1/4 inch thickness, then stack with parchment between and chill in the fridge for 1 to 2 hours. While it chills, prepare the candy by separating hard candies by color and crushing them gently into fine bits to avoid powder.
4-Preheat your oven to 350°F and line baking sheets with parchment. Cut out large shapes from the chilled dough, then use a smaller cutter to remove centers, re-rolling scraps as needed. Arrange the cookies on sheets, brush edges with egg white or water if using toppings, sprinkle with coarse sugar, and fill centers about 3/4 full with crushed candy. Bake for 12 to 13 minutes, rotating pans halfway, until lightly browned and the candy melts.
5-Let the cookies cool on the sheets for 15 minutes so the candy hardens, then transfer to a wire rack. The total time is around 3 hours, with active prep under 30 minutes, including chilling and cooling. I love how this process turns baking into a creative outlet, much like trying carrot cake cheesecake bars for a layered treat.
Notes
🎨 Roll dough before chilling to prevent spreading and keep shape.
🍬 Crush candies gently to avoid powder which can caramelize or cause stickiness.
🧁 Baking on parchment or silicone mats prevents candy from sticking and breaking cookies.
- Prep Time: Under 30 minutes active prep 1 to 2 hours chilling
- Cooling Time: 15 minutes
- Cook Time: 12 to 13 minutes
- Category: Dessert
- Method: Baking
- Cuisine: American


These stained glass cookies looked stunning on our holiday tray! 🎨
I swapped the white chocolate for milk chocolate and the colors still popped.
Would it be okay to use a silicone mat instead of parchment for the shapes?