
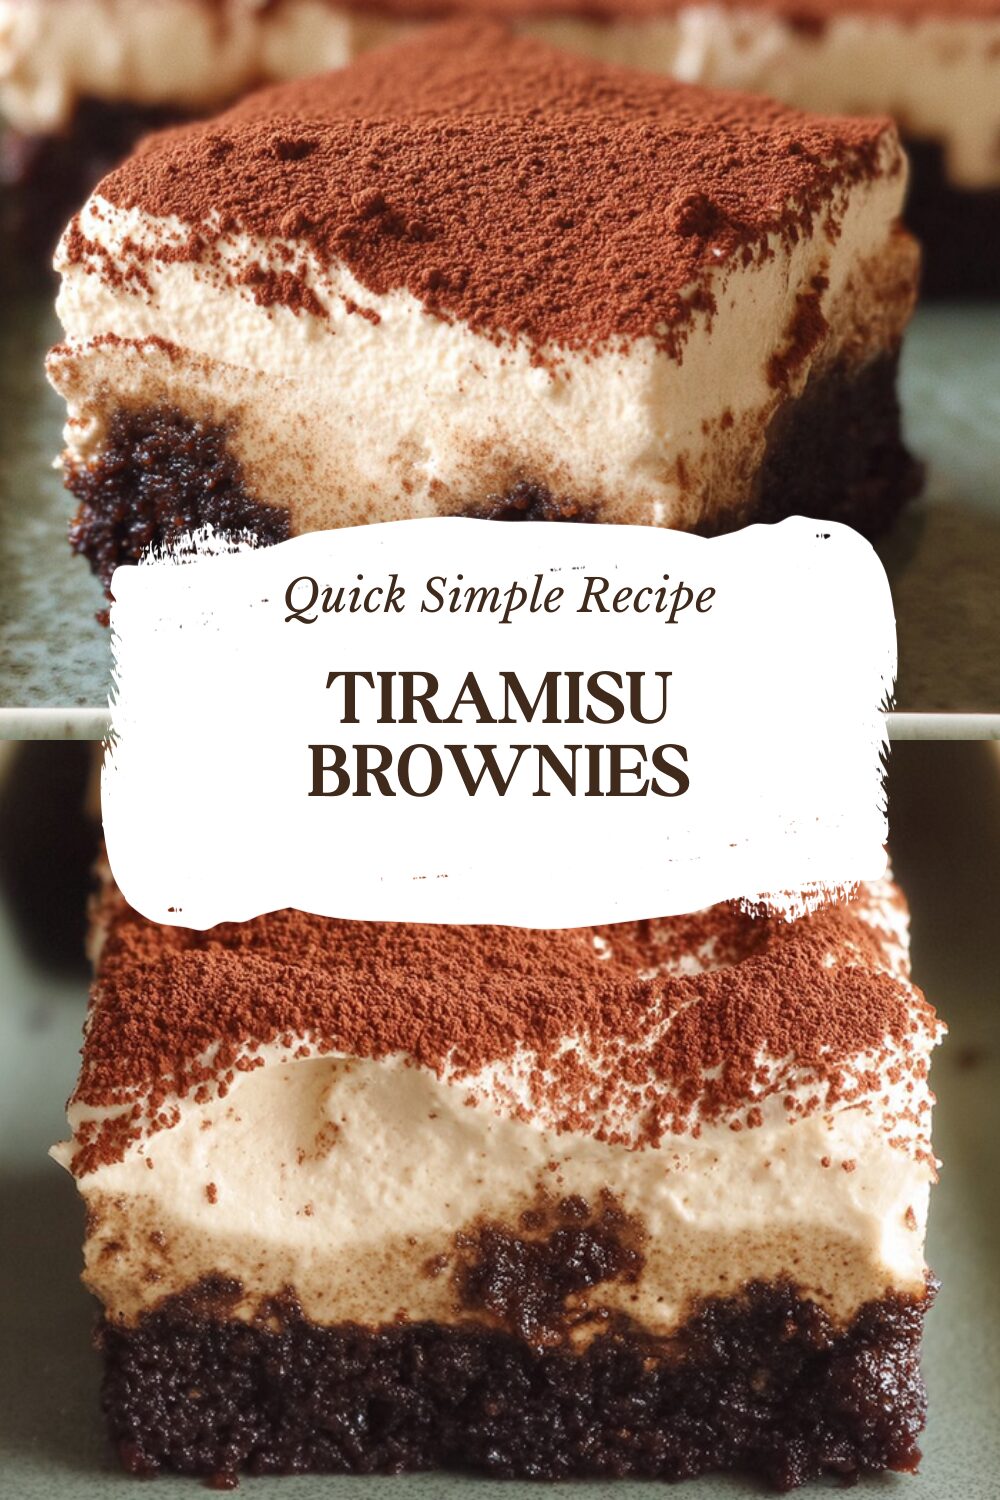
Why You’ll Love This Tiramisu Brownies
Tiramisu Brownies combine the classic coffee-rich taste of tiramisu with the gooey delight of brownies, making them a standout treat for anyone craving something indulgent yet easy to make. One big reason to try this recipe is its straightforward preparation, which takes just about 1 hour and 55 minutes from start to finish, perfect for busy parents or students who want a homemade dessert without spending all day in the kitchen. Another benefit is the nutritional balance it offers, with each serving clocking in at around 800 calories, allowing you to enjoy a rich, satisfying option while being mindful of portion sizes for diet-conscious folks.
Beyond that, these tiramisu brownies shine in their versatility, as you can tweak them for different dietary needs like vegan or gluten-free versions, appealing to a wide audience from newlyweds to seniors. Finally, the distinctive flavor from the espresso-infused base and creamy mascarpone topping sets tiramisu brownies apart, delivering that signature coffee swirl that echoes traditional tiramisu but in brownie form. This makes them a hit for food enthusiasts and baking lovers alike, bringing a touch of elegance to everyday meals.
- Ease of preparation: Tiramisu brownies require simple steps and common ingredients, so even beginners can whip them up quickly, saving time for working professionals who need fast yet tasty options.
- Health benefits: While indulgent, these brownies provide a moderate calorie count per serving that fits into balanced diets, plus the espresso can give a gentle energy boost without overwhelming wellness-focused eaters.
- Versatility: You can adapt tiramisu brownies for various preferences, such as making them dairy-free or using alternative flours, which helps travelers and busy parents customize on the go.
- Distinctive flavor: The blend of rich espresso and smooth mascarpone in tiramisu brownies creates a unique coffee swirl that elevates simple baking, delighting baking enthusiasts with its authentic tiramisu-style taste.
To make these even more appealing, consider how the creamy mascarpone layer adds a luxurious touch that’s hard to resist, turning a basic brownie into something special for family gatherings. Overall, tiramisu brownies are a flexible recipe that fits into many lifestyles while packing in that irresistible coffee flavor everyone loves.
Jump To
- 1. Why You’ll Love This Tiramisu Brownies
- 2. Essential Ingredients for Tiramisu Brownies
- 3. How to Prepare the Perfect Tiramisu Brownies: Step-by-Step Guide
- 4. Dietary Substitutions to Customize Your Tiramisu Brownies
- 5. Mastering Tiramisu Brownies: Advanced Tips and Variations
- 6. How to Store Tiramisu Brownies: Best Practices
- 7. FAQs: Frequently Asked Questions About Tiramisu Brownies
- 8. Tiramisu Brownies
Essential Ingredients for Tiramisu Brownies
Getting the right ingredients is key to making delicious tiramisu brownies, and we’ll break them down here for clear guidance. Each item plays a specific role in creating the perfect balance of flavors and textures, so let’s look at what’s needed for the espresso brownies, the espresso cream, and the finishing touch.
Ingredients for the Espresso Brownies
- Salted butter (quantity not specified) – This forms the base for a rich, moist texture in your tiramisu brownies.
- 70% bittersweet chocolate (quantity not specified) – Adds deep, intense chocolate flavor that pairs wonderfully with the coffee notes.
- Unsweetened Dutch-process cocoa powder (quantity not specified) – Provides a smooth, non-acidic chocolate taste that enhances the overall brownie base.
- All-purpose flour (quantity not specified) – Gives structure to the brownies while keeping them tender and fudgy.
- Large eggs (quantity not specified) – Help bind the ingredients and add richness to the tiramisu brownies batter.
- Dark brown sugar (quantity not specified) – Contributes moisture and a caramel-like sweetness that complements the espresso flavor.
- Granulated sugar (quantity not specified) – Balances the flavors with straightforward sweetness and helps achieve the perfect crisp top.
- Salt (quantity not specified; use less if iodized) – Enhances all the flavors in tiramisu brownies without overpowering them.
- Vanilla extract (quantity not specified) – Adds a warm, aromatic note that ties the chocolate and coffee elements together.
- Instant espresso powder (quantity not specified) – Infuses the brownies with a bold coffee flavor, making them truly tiramisu-style.
Ingredients for the Espresso Cream
- Mascarpone cheese (quantity not specified) – Offers a creamy, tangy topping that defines the tiramisu element in these brownies.
- Heavy cream (quantity not specified) – Whips up to create light and airy peaks for the perfect spreadable layer.
- Granulated sugar (quantity not specified) – Sweetens the cream just enough to balance the coffee bitterness.
- Salt (quantity not specified) – Brings out the flavors in the cream, making it more vibrant.
- Vanilla bean (quantity not specified) – Infuses a natural, floral vanilla taste that elevates the entire dessert.
- Instant espresso powder (quantity not specified) – Adds that essential coffee swirl to mimic traditional tiramisu brownies.
Ingredients for Dusting
- Unsweetened cocoa powder (quantity not specified) – Provides a classic finish that ties back to the cocoa in tiramisu brownies.
For special dietary options, consider these swaps: For vegan tiramisu brownies, use plant-based substitutes like vegan butter and a non-dairy cream alternative for mascarpone. For gluten-free versions, swap all-purpose flour with a gluten-free blend to maintain that fudgy texture. If you’re aiming for low-calorie tiramisu brownie variations, opt for lighter sugars or reduce portions to keep things balanced.
How to Prepare the Perfect Tiramisu Brownies: Step-by-Step Guide
Making tiramisu brownies is a fun and rewarding process that blends simple baking with a touch of Italian flair. Start by gathering all your ingredients and tools to ensure everything goes smoothly, setting the stage for those irresistible coffee swirls and creamy layers.
First Step: Prepare Your Pan and Preheat the Oven
Begin by preheating your oven to 350°F, which is the ideal temperature for baking tiramisu brownies to get that perfect fudgy center. Butter and line a 9-by-13-inch pan with parchment paper for easy removal later, preventing any sticking issues that could ruin your tiramisu brownies. This step helps the batter bake evenly and makes cleanup a breeze, and for dietary adaptations, you can use dairy-free butter if needed.
Second Step: Melt the Butter and Chocolate
Next, melt the salted butter over low heat in a saucepan, stirring until it’s fully liquefied to avoid burning. Once melted, remove it from the heat and stir in the 70% bittersweet chocolate until it’s completely smooth, creating a rich base for your tiramisu brownies. This method ensures a glossy, decadent mixture; if you’re making a vegan version, swap in plant-based chocolate for the same effect.
Third Step: Mix the Dry Ingredients
In a separate bowl, sift together the all-purpose flour, instant espresso powder, and unsweetened Dutch-process cocoa powder to remove any lumps and blend the flavors evenly. This step incorporates the coffee element that defines tiramisu brownies, and for gluten-free adaptations, use a gluten-free flour mix here to keep the texture light and airy.
Fourth Step: Beat the Wet Ingredients
Now, in another bowl, beat the large eggs, dark brown sugar, granulated sugar, salt, and vanilla extract until the mixture is thick and pale, which usually takes about 2-3 minutes with an electric mixer. This creates a fluffy base that holds the chocolate mixture well, and you can adjust the sugar for low-calorie tiramisu brownies if you’re watching your intake.
Fifth Step: Combine and Bake
Fold the cooled chocolate mixture into the egg mixture gently, then incorporate the dry ingredients until just combined, avoiding overmixing to keep your tiramisu brownies fudgy. Pour the batter into your prepared pan, smooth the top, and bake for 25 minutes or until the top is slightly cracked and soft to the touch. Let the brownies cool completely in the pan, which allows the flavors to set; for variations, add nuts at this stage if desired.
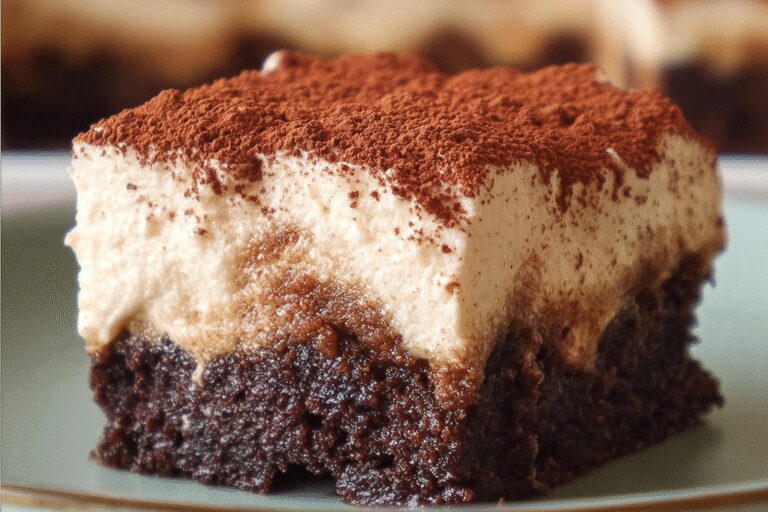
Final Step: Add the Espresso Cream and Serve
For the topping, beat the mascarpone cheese and heavy cream together until combined, then mix in the granulated sugar, salt, vanilla bean, and instant espresso powder until soft peaks form. Spread this espresso cream evenly over the cooled brownies and dust with unsweetened cocoa powder for that classic finish on your tiramisu brownies. Cut into servings and enjoy right away, or refrigerate for later, adapting with non-dairy cream for vegan preferences to maintain the creamy swirl.

Dietary Substitutions to Customize Your Tiramisu Brownies
Protein and Main Component Alternatives
When customizing tiramisu brownies, consider swapping key proteins like eggs for alternatives such as flax eggs or applesauce for an egg-free version, which keeps the batter cohesive but may result in a slightly denser texture. For dairy-free options, replace mascarpone with a cashew-based cream to mimic that creamy richness, though it might alter the traditional flavor slightly in tiramisu brownie variations. These changes help cater to plant-based diets while maintaining the espresso-infused appeal of tiramisu-style bars.
Vegetable, Sauce, and Seasoning Modifications
To tweak the veggies or add-ins, you could incorporate zucchini for moisture in tiramisu brownies, especially in gluten-free versions, but it might introduce a subtle earthiness. For sauces, swap espresso powder with strong brewed coffee for a liquid alternative, and adjust seasonings like salt for a better sweet balance, ensuring your tiramisu-style brownies remain flavorful. These modifications allow for seasonal twists, such as using flavored extracts for garnishes, keeping the coffee swirls intact for different preferences.
Mastering Tiramisu Brownies: Advanced Tips and Variations
Taking your tiramisu brownies to the next level involves some pro techniques that can make a big difference in the final result. One key method is proper tempering of chocolate to ensure a shiny finish, which helps maintain that fudgy texture everyone loves in tiramisu brownies.
Pro Cooking Techniques
Resting the batter for 10 minutes before baking allows flavors to meld, and gentle folding prevents overmixing, keeping your tiramisu brownies moist and chewy.
Flavor Variations
- Add coffee liqueur for a mocha swirl that enhances the traditional tiramisu taste in your brownies.
- Incorporate citrus zest for a fresh twist on tiramisu brownies, balancing the richness with bright notes.
Presentation Tips
Dust with cocoa and layer slices for an elegant presentation that makes your tiramisu brownies perfect for parties. For make-ahead options, par-bake the base and store it, adding the cream layer just before serving to keep everything fresh for busy schedules.
How to Store Tiramisu Brownies: Best Practices
Proper storage keeps your tiramisu brownies tasting fresh and delicious. For short-term needs, cover them in an airtight container and refrigerate at 40°F for up to 4 days to preserve the creamy topping. Freezing works great for longer storage; wrap tightly in plastic and freeze flat for up to 2 months, then thaw in the fridge overnight. When reheating, use a gentle microwave setting or warm in the oven at low heat to maintain the soft texture of tiramisu brownies without making them soggy.
| Storage Method | Duration | Tips |
|---|---|---|
| Refrigeration | Up to 4 days | Use airtight containers to lock in moisture. |
| Freezing | Up to 2 months | Wrap in layers for extra protection against freezer burn. |
For meal prep, batch cook and portion out tiramisu brownies for easy transport, making them ideal for on-the-go snacks. Check out this carrot cake cheesecake bars recipe for more storage ideas.
FAQs: Frequently Asked Questions About Tiramisu Brownies
Can I use regular cocoa powder instead of Dutch-process cocoa in tiramisu brownies?
Yes, regular cocoa powder can be used if Dutch-process cocoa is not available. However, Dutch-process cocoa offers a smoother, less acidic flavor that pairs well with the espresso in tiramisu brownies. Using regular cocoa may result in a slightly sharper chocolate taste, but it will still produce delicious brownies.
What can I use as a substitute for mascarpone cheese in tiramisu brownies?
If mascarpone cheese is hard to find, a combination of cream cheese and heavy cream can work as a substitute. Mix equal parts of softened cream cheese with heavy cream until smooth to mimic mascarpone’s texture. While this substitute will still taste good, mascarpone provides the traditional creamy richness ideal for tiramisu brownies.
How should tiramisu brownies be stored to keep them fresh?
Store tiramisu brownies in an airtight container in the refrigerator to maintain their texture and flavor. They will stay fresh for up to 4 days this way. For longer storage, wrap the brownies tightly in plastic wrap and place them in the freezer for up to 2 months. Thaw them in the fridge before serving.
Can I add alcohol to tiramisu brownies to get a more authentic flavor?
Yes, you can add a splash of coffee liqueur or rum to the mascarpone cream layer for a traditional tiramisu flavor. Adding about 1-2 tablespoons enhances the richness and replicates the classic dessert’s boozy notes, but it’s optional and can be adjusted to taste.
How do I know when tiramisu brownies are perfectly baked?
Tiramisu brownies are done when the top is slightly cracked but still soft when touched. Instead of relying on a toothpick test—which might show crumbs due to their fudgy texture—look for a delicate crust on top without overbaking. This ensures the brownies stay moist and chewy inside.
Tiramisu Brownies
🍫 These Tiramisu Brownies bring together the rich, chocolatey goodness of espresso-infused brownies with a luscious mascarpone cream topping.
☕ Perfect for coffee lovers, this dessert combines the beloved flavors of tiramisu and brownies in a creamy, indulgent treat.
- Total Time: 1 hour 55 minutes
- Yield: 10 servings
Ingredients
– Salted butter
– 70% bittersweet chocolate
– Unsweetened Dutch-process cocoa powder
– All-purpose flour
– Large eggs
– Dark brown sugar
– Granulated sugar
– Salt (use less if iodized)
– Vanilla extract
– Instant espresso powder
– Mascarpone cheese
– Heavy cream
– Granulated sugar
– Salt
– Vanilla bean
– Instant espresso powder
– Unsweetened cocoa powder
Instructions
First Step: Prepare Your Pan and Preheat the Oven Begin by preheating your oven to 350°F, which is the ideal temperature for baking tiramisu brownies to get that perfect fudgy center. Butter and line a 9-by-13-inch pan with parchment paper for easy removal later, preventing any sticking issues that could ruin your tiramisu brownies. This step helps the batter bake evenly and makes cleanup a breeze, and for dietary adaptations, you can use dairy-free butter if needed.
Second Step: Melt the Butter and Chocolate Next, melt the salted butter over low heat in a saucepan, stirring until it’s fully liquefied to avoid burning. Once melted, remove it from the heat and stir in the 70% bittersweet chocolate until it’s completely smooth, creating a rich base for your tiramisu brownies. This method ensures a glossy, decadent mixture; if you’re making a vegan version, swap in plant-based chocolate for the same effect.
Third Step: Mix the Dry Ingredients In a separate bowl, sift together the all-purpose flour, instant espresso powder, and unsweetened Dutch-process cocoa powder to remove any lumps and blend the flavors evenly. This step incorporates the coffee element that defines tiramisu brownies, and for gluten-free adaptations, use a gluten-free flour mix here to keep the texture light and airy.
Fourth Step: Beat the Wet Ingredients Now, in another bowl, beat the large eggs, dark brown sugar, granulated sugar, salt, and vanilla extract until the mixture is thick and pale, which usually takes about 2-3 minutes with an electric mixer. This creates a fluffy base that holds the chocolate mixture well, and you can adjust the sugar for low-calorie tiramisu brownies if you’re watching your intake.
Fifth Step: Combine and Bake Fold the cooled chocolate mixture into the egg mixture gently, then incorporate the dry ingredients until just combined, avoiding overmixing to keep your tiramisu brownies fudgy. Pour the batter into your prepared pan, smooth the top, and bake for 25 minutes or until the top is slightly cracked and soft to the touch. Let the brownies cool completely in the pan, which allows the flavors to set; for variations, add nuts at this stage if desired.
Final Step: Add the Espresso Cream and Serve For the topping, beat the mascarpone cheese and heavy cream together until combined, then mix in the granulated sugar, salt, vanilla bean, and instant espresso powder until soft peaks form. Spread this espresso cream evenly over the cooled brownies and dust with unsweetened cocoa powder for that classic finish on your tiramisu brownies. Cut into servings and enjoy right away, or refrigerate for later, adapting with non-dairy cream for vegan preferences to maintain the creamy swirl.
Notes
🍮 Regular cocoa powder can replace Dutch-process cocoa powder but might affect the smoothness of the chocolate flavor.
🍰 Mascarpone cheese delivers the best texture; substitute with cream cheese and heavy cream only if necessary.
❄️ Store brownies in an airtight container in the refrigerator for up to 4 days or freeze for up to 2 months wrapped tightly.
- Prep Time: 1 hour
- Cooling Time: 30 minutes
- Cook Time: 25 minutes
- Category: Dessert
- Method: Baking and whipping
- Cuisine: Italian-American
- Diet: Vegetarian
Nutrition
- Serving Size: 1 brownie (about 2×2 inches)
- Calories: 800
- Sugar: 30g
- Sodium: 210mg
- Fat: 55g
- Saturated Fat: 30g
- Unsaturated Fat: 20g
- Trans Fat: 0g
- Carbohydrates: 60g
- Fiber: 4g
- Protein: 6g
- Cholesterol: 130mg


