
Why You’ll Love This Witch Hat Cupcakes
Witch Hat Cupcakes bring a sprinkle of magic to your Halloween celebrations, making them perfect for families who enjoy easy, fun baking sessions. This recipe stands out because it’s simple enough for kids to join in, using just a handful of items to create whimsical treats. Whether you’re a busy parent or a baking enthusiast, these cupcakes offer a quick way to make memorable moments in the kitchen.
Here are the main reasons these Witch Hat Cupcakes will become your go-to Halloween recipe:
- They boast ease of preparation with a total time of about 55 minutes, just 30 minutes for prep and 25 for cooking, making it ideal for beginners and families. This simplicity means you can whip up a batch without spending hours, letting you focus on family fun while enjoying spooky Witch Hat Cupcakes.
- Health benefits include balanced nutrition per cupcake, with 204 calories, 31g carbohydrates, and 7g fat, plus vitamins like A and C, which add a wellness aspect. These treats provide a fun way to include some nutrients in festive desserts, making them a smarter choice for diet-conscious individuals who want to indulge without overdoing it.
- Versatility shines through as the recipe adapts to various needs, such as using homemade or store-bought cupcakes, which fits busy schedules. Whether you’re tweaking for dietary preferences or swapping ingredients, these Witch Hat Cupcakes easily fit into different lifestyles, enhancing their appeal for home cooks and students alike.
- A distinctive flavor comes from the mix of chocolate, cream cheese frosting, and colorful decorations, creating a unique Halloween vibe that stands out. The blend of green and orange hues and the crisp cookie element adds a fun twist, making every bite of these Witch Hat Cupcakes a delightful, memorable experience for food enthusiasts.
Overall, with only 5 key ingredients, this recipe proves that creating festive desserts doesn’t have to be complicated. You’ll find Witch Hat Cupcakes not only tasty but also engaging, perfect for sparking joy around the table.
Jump To
- 1. Why You’ll Love This Witch Hat Cupcakes
- 2. Essential Ingredients for Witch Hat Cupcakes
- 3. How to Prepare the Perfect Witch Hat Cupcakes: Step-by-Step Guide
- 4. Dietary Substitutions to Customize Your Witch Hat Cupcakes
- 5. Mastering Witch Hat Cupcakes: Advanced Tips and Variations
- 6. How to Store Witch Hat Cupcakes: Best Practices
- 7. FAQs: Frequently Asked Questions About Witch Hat Cupcakes
- 8. Witch Hat Cupcakes
Essential Ingredients for Witch Hat Cupcakes
Gathering the right ingredients is the first step to crafting delicious Witch Hat Cupcakes. This section lists everything you need in a clear format, including precise measurements and brief explanations for each item. We’ll break it down into main ingredients for the base, frosting, and decorations, followed by options for special dietary needs.
Main Ingredients
- 12 chocolate cupcakes (homemade or from a mix) – Provides the base structure and rich chocolate flavor for the Witch Hat Cupcakes.
- 6 chocolate sandwich cookies – Used for creating the witch hat shapes, offering a crisp texture and chocolatey taste.
- 12 chocolate kisses – Forms the pointed top of the witch hats, adding a sweet, melty element to the decorations.
- Cream cheese frosting (half batch) – Acts as the adhesive and decorative layer, providing creamy richness and helping hold everything together.
- Green and orange food coloring – Tints the frosting for a festive Halloween look, with green for the cupcake tops and orange for the hats.
These items make up the core of Witch Hat Cupcakes, ensuring a simple yet effective recipe. For more inspiration on frosting, check out this cream cheese cupcake idea on our site.
Special Dietary Options
Adapting Witch Hat Cupcakes is easy with these swaps, allowing everyone to enjoy them. Synonyms like spooky treats and Halloween cupcakes help describe the fun without repeating terms.
Vegan Options
- Use plant-based milk and vegan butter in the chocolate cupcakes – Replaces dairy for a creamy texture in these festive cupcakes.
- Opt for a flax egg (1 tablespoon ground flaxseed mixed with 3 tablespoons water per egg) – Serves as a binding agent in place of eggs for vegan Witch Hat Cupcakes.
- Choose dairy-free cream cheese frosting – Made with plant-based cream cheese to maintain the frosting’s smooth consistency.
Gluten-Free Options
- Swap regular flour with 1:1 gluten-free flour in the chocolate cupcakes – Ensures the base holds together without gluten, perfect for gluten-free spooky treats.
- Use gluten-free chocolate sandwich cookies – Replaces standard cookies to keep the witch hats intact and tasty.
- Select low-gluten chocolate kisses or make your own with gluten-free chocolate – Maintains the sweet topping while accommodating dietary needs.
Low-Calorie Options
- Incorporate applesauce (1/2 cup) instead of oil in cupcakes – Reduces calories while keeping the chocolate base moist for lighter Witch Hat Cupcakes.
- Use a sugar alternative like stevia (equal measure to sugar) in frosting – Lowers sugar content without sacrificing the festive flavor.
- Opt for low-fat cream cheese in frosting – Cuts down on fat grams, making the decorations healthier yet still fun.
How to Prepare the Perfect Witch Hat Cupcakes: Step-by-Step Guide
Creating Witch Hat Cupcakes is a straightforward process that brings out the Halloween spirit. We’ll walk through each step with clear instructions, including timing and adaptations for dietary needs. This guide ensures your treats turn out just right, with tips for texture and assembly.
First Step: Gather and Prep Ingredients
Start by collecting all your items to make the process smooth. Measure out 12 chocolate cupcakes, 6 chocolate sandwich cookies, 12 chocolate kisses, a half batch of cream cheese frosting, and green and orange food coloring. Preheat your oven to 350°F if baking cupcakes from scratch, which takes about 10 minutes, and set aside bowls for frosting. For vegan adaptations, use flax eggs here; gluten-free bakers should check flour labels to avoid issues.
Second Step: Prepare the Frosting
Mix the cream cheese frosting as per the recipe, then divide it by separating ½ cup into a small bowl; this should take around 5 minutes. Color the larger portion green and the smaller one orange using a few drops of food coloring for vibrant hues. If your frosting is too runny, add powdered sugar and chill it. Low-calorie versions might use a sugar substitute, which could slightly alter the texture but keeps things light.
Third Step: Assemble the Witch Hats
Carefully split the 6 chocolate sandwich cookies in half, handling them gently to keep them intact; this step is quick, about 2 minutes. Place a small spoonful of orange frosting on the center of each cookie half. Press a chocolate kiss on top and add sprinkles if you like, then set them aside. For gluten-free options, ensure cookies are certified gluten-free, and vegan swaps might mean using plant-based sprinkles to maintain the fun shape.
Fourth Step: Frost the Cupcakes
Pipe green frosting onto the center of each of the 12 chocolate cupcakes, swirling it upwards in layers while avoiding the edges; aim for even coverage, which takes 5-7 minutes. Bake the cupcakes first if making from scratch, for 20-25 minutes at 350°F, then cool for 10 minutes. Check doneness with a toothpick; for low-calorie adaptations, use applesauce to keep them moist without extra fat, adjusting bake time by 2-3 minutes if needed.
Fifth Step: Add the Decorations
Place a cookie witch hat on top of each frosted cupcake, pressing lightly to secure; do this just before serving to keep cookies crisp. The whole assembly might take 5 minutes. If adapting for dietary needs, like vegan frosting, ensure it holds the hat in place; for low-calorie tweaks, use less frosting to balance flavors and texture.
Final Step: Chill and Serve
Refrigerate the cupcakes covered for at least 15 minutes to set, then serve them fresh for the best taste. This final touch helps the frosting firm up and makes the Witch Hat Cupcakes look polished. Remember, for make-ahead options, store unfrosted; reheating in a low oven can refresh them, with variations in time based on your specific ingredients for perfect results.
| Nutrient | Amount per Cupcake |
|---|---|
| Calories | 204 kcal |
| Carbohydrates | 31 g |
| Protein | 2 g |
| Fat | 7 g |
| Sugar | 20 g |

Dietary Substitutions to Customize Your Witch Hat Cupcakes
Customizing Witch Hat Cupcakes lets you tailor them to various preferences, making them accessible for all. This section shows how to adapt for vegan, gluten-free, and low-calorie needs, with two subsections below for details. Using synonyms like festive cupcakes helps keep the content fresh and engaging.
Protein and Main Component Alternatives
Swapping proteins and main elements keeps the recipe flexible. For instance, use flax eggs (1 tablespoon ground flaxseed with 3 tablespoons water) to replace eggs, which works well for vegan options and maintains binding. Dairy-free butter can stand in for regular butter, adjusting quantities to 1:1 for moisture; this might extend baking time by 2-3 minutes. These changes ensure the texture stays light, perfect for dietary tweaks in these spooky treats.
Vegetable, Sauce, and Seasoning Modifications
Altering vegetables and flavors adds variety to Witch Hat Cupcakes. Try pumpkin puree instead of some frosting for added moisture, which could mean reducing liquid by ¼ cup to balance. Spice blends like cinnamon can enhance the seasoning, with adjustments in baking time if using wetter ingredients. For low-calorie versions, opt for sugar-free sauces, keeping flavors bold while cutting calories in these Halloween favorites.
Mastering Witch Hat Cupcakes: Advanced Tips and Variations
Taking your Witch Hat Cupcakes to the next level involves expert techniques and creative ideas. Start with creaming butter and sugar properly for a fluffy base, or try sifting flour for better aeration, which improves the overall texture. For flavor twists, mix in chocolate-orange notes or add salted caramel for a unique spin on these treats.
Presentation matters too; use piping for precise hat designs and edible glitter for sparkle. If you’re short on time, prepare batter in advance and freeze unfrosted cupcakes, assembling on the day. For more baking ideas, check out this carrot cake cupcake recipe for inspiration.
This beginner-friendly recipe is a fun way to make easy Halloween treats, as shared by our author Camille Hayes.
How to Store Witch Hat Cupcakes: Best Practices
Proper storage keeps your Witch Hat Cupcakes fresh and tasty. For short-term, cover them lightly and place in an airtight container in the fridge, ideally at 40°F, for up to 3 days. Freezing works for longer, wrapping unfrosted ones tightly and storing for a month; thaw at room temperature before decorating.
Reheating gently in a low oven restores softness without sogginess. These tips help with meal prep, especially for events, ensuring decorations stay intact.
FAQs: Frequently Asked Questions About Witch Hat Cupcakes
What ingredients do I need to make Witch Hat Cupcakes?
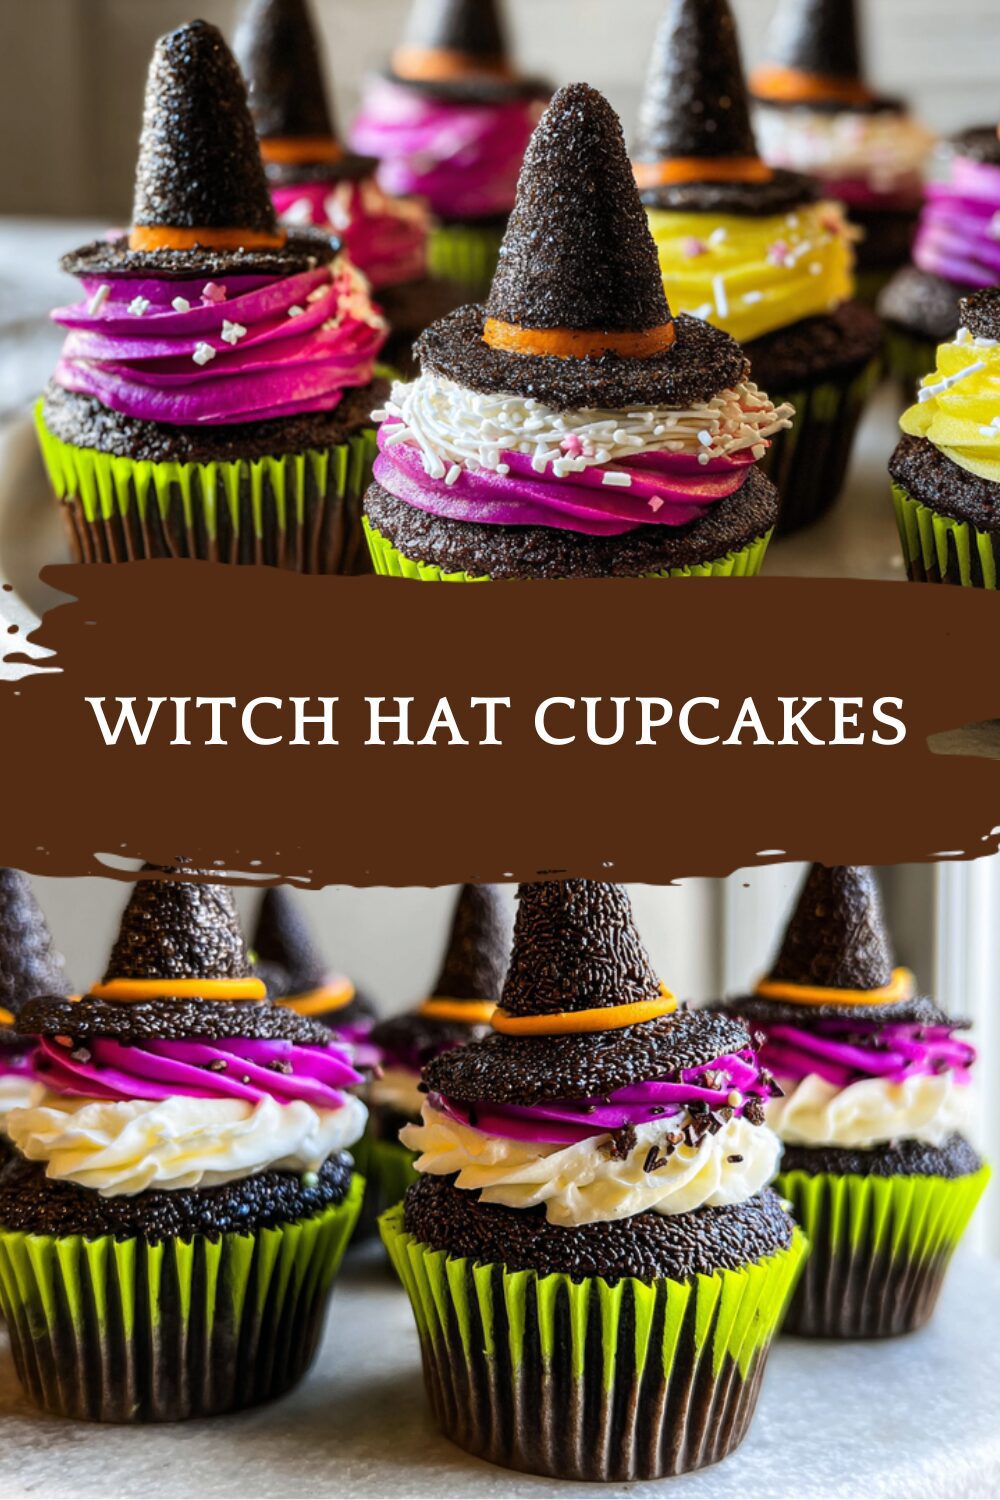
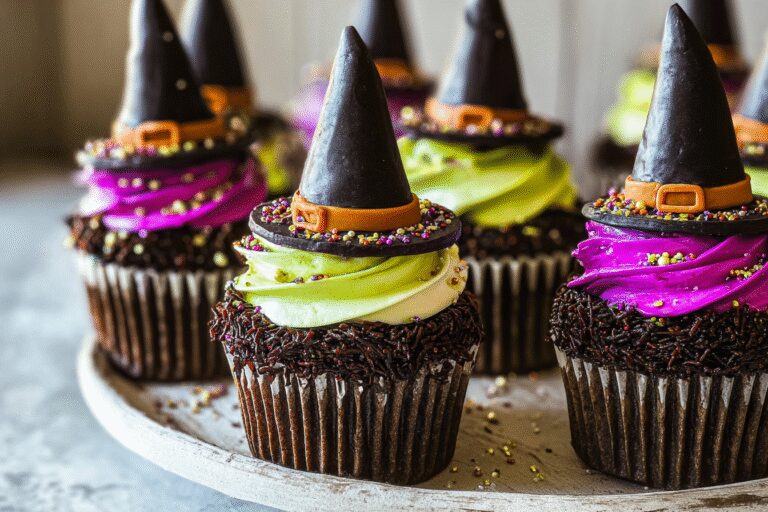
To make Witch Hat Cupcakes, you’ll need 12 chocolate cupcakes (from scratch or boxed mix), 6 Oreo cookies, 12 Hershey’s chocolate kisses, cream cheese frosting colored with green and orange food coloring, and optional sprinkles for decoration. The cream cheese frosting should be mixed and divided to tint half orange and half green for a festive look.
How do I assemble the Oreo witch hats for the cupcakes?
Carefully separate the Oreo cookies in half. On the flat side of each Oreo half, place a small spoonful of orange cream cheese frosting. Then, press a Hershey’s chocolate kiss onto the frosting to form the witch’s hat point. Finally, add sprinkles if desired for extra detail. Attach the assembled hats just before serving to keep cookies crisp.
Can I prepare Witch Hat Cupcakes a day in advance without the Oreo hats getting soggy?
Yes, you can bake the cupcakes and frost them in advance, but it’s best to add the Oreo witch hats just before serving. If you add the Oreo hats earlier, they will absorb moisture from the frosting and soften, losing their crisp texture.
What should I do if my cream cheese frosting is too runny for decorating?
If your cream cheese frosting is runny, gradually add powdered sugar a tablespoon at a time until it thickens to a spreadable consistency. Additionally, chilling the frosting in the refrigerator for 20–30 minutes can help it firm up, making it easier to pipe and hold shape on the cupcakes.
Is it okay to use boxed cake mix for the cupcakes, or should I bake them from scratch?
Using boxed cake mix is perfectly fine and convenient for Witch Hat Cupcakes, producing a moist chocolate base. However, baking from scratch allows you to customize flavors and ingredients more precisely. Both methods work well depending on your preference and time availability.
Witch Hat Cupcakes
🧙♀️ These Witch Hat Cupcakes bring festive Halloween fun with an adorable witch hat design that’s easy to create.
🎃 Perfect for kids and family gatherings, they offer a delicious chocolate treat with colorful cream cheese frosting for spooky delight.
- Total Time: 55 minutes
- Yield: 12 cupcakes 1x
Ingredients
12 chocolate cupcakes provides the base structure and rich chocolate flavor for the Witch Hat Cupcakes
6 chocolate sandwich cookies used for creating the witch hat shapes, offering a crisp texture and chocolatey taste
12 chocolate kisses forms the pointed top of the witch hats, adding a sweet, melty element to the decorations
Cream cheese frosting (half batch) acts as the adhesive and decorative layer, providing creamy richness and helping hold everything together
Green and orange food coloring tints the frosting for a festive Halloween look, with green for the cupcake tops and orange for the hats
plant-based milk and vegan butter in the chocolate cupcakes replaces dairy for a creamy texture in these festive cupcakes
1 tablespoon ground flaxseed mixed with 3 tablespoons water per egg flax egg serves as a binding agent in place of eggs for vegan Witch Hat Cupcakes
dairy-free cream cheese frosting made with plant-based cream cheese to maintain the frosting’s smooth consistency
1:1 gluten-free flour swap regular flour with 1:1 gluten-free flour in the chocolate cupcakes ensures the base holds together without gluten, perfect for gluten-free spooky treats
gluten-free chocolate sandwich cookies replaces standard cookies to keep the witch hats intact and tasty
low-gluten chocolate kisses or make your own with gluten-free chocolate maintains the sweet topping while accommodating dietary needs
1/2 cup applesauce incorporate applesauce instead of oil in cupcakes reduces calories while keeping the chocolate base moist for lighter Witch Hat Cupcakes
sugar alternative like stevia use a sugar alternative like stevia (equal measure to sugar) in frosting lowers sugar content without sacrificing the festive flavor
low-fat cream cheese opt for low-fat cream cheese in frosting cuts down on fat grams, making the decorations healthier yet still fun
Instructions
1-First Step: Gather and Prep Ingredients Start by collecting all your items to make the process smooth. Measure out 12 chocolate cupcakes, 6 chocolate sandwich cookies, 12 chocolate kisses, a half batch of cream cheese frosting, and green and orange food coloring. Preheat your oven to 350°F if baking cupcakes from scratch, which takes about 10 minutes, and set aside bowls for frosting. For vegan adaptations, use flax eggs here; gluten-free bakers should check flour labels to avoid issues.
2-Second Step: Prepare the Frosting Mix the cream cheese frosting as per the recipe, then divide it by separating ½ cup into a small bowl; this should take around 5 minutes. Color the larger portion green and the smaller one orange using a few drops of food coloring for vibrant hues. If your frosting is too runny, add powdered sugar and chill it. Low-calorie versions might use a sugar substitute, which could slightly alter the texture but keeps things light.
3-Third Step: Assemble the Witch Hats Carefully split the 6 chocolate sandwich cookies in half, handling them gently to keep them intact; this step is quick, about 2 minutes. Place a small spoonful of orange frosting on the center of each cookie half. Press a chocolate kiss on top and add sprinkles if you like, then set them aside. For gluten-free options, ensure cookies are certified gluten-free, and vegan swaps might mean using plant-based sprinkles to maintain the fun shape.
4-Fourth Step: Frost the Cupcakes Pipe green frosting onto the center of each of the 12 chocolate cupcakes, swirling it upwards in layers while avoiding the edges; aim for even coverage, which takes 5-7 minutes. Bake the cupcakes first if making from scratch, for 20-25 minutes at 350°F, then cool for 10 minutes. Check doneness with a toothpick; for low-calorie adaptations, use applesauce to keep them moist without extra fat, adjusting bake time by 2-3 minutes if needed.
5-Fifth Step: Add the Decorations Place a cookie witch hat on top of each frosted cupcake, pressing lightly to secure; do this just before serving to keep cookies crisp. The whole assembly might take 5 minutes. If adapting for dietary needs, like vegan frosting, ensure it holds the hat in place; for low-calorie tweaks, use less frosting to balance flavors and texture.
6-Final Step: Chill and Serve Refrigerate the cupcakes covered for at least 15 minutes to set, then serve them fresh for the best taste. This final touch helps the frosting firm up and makes the Witch Hat Cupcakes look polished. Remember, for make-ahead options, store unfrosted; reheating in a low oven can refresh them, with variations in time based on your specific ingredients for perfect results.
Notes
🍪 Add witches hats to cupcakes shortly before serving to prevent cookies from softening.
❄️ If cream cheese frosting is too runny, add more powdered sugar and chill to stiffen before piping.
🎨 Use gel food coloring for vibrant green and orange frosting colors.
- Prep Time: 30 minutes
- Cook time: 25 minutes
- Cook Time: 25 minutes
- Category: Dessert, Halloween, Cupcakes
- Method: Baking, Decorating
- Cuisine: American
Nutrition
- Serving Size: 1 cupcake
- Calories: 204
- Sugar: 20g
- Sodium: 172mg
- Fat: 7g
- Saturated Fat: 2g
- Carbohydrates: 31g
- Protein: 2g
- Cholesterol: 2mg


