
Why You’ll Love This Chocolate Mousse
If you want a dessert that feels fancy but does not act fancy, Chocolate Mousse is a very good place to start. It takes about 20 minutes of active prep, then the fridge does the rest of the work. That means you can make it after dinner, clean up fast, and still serve a dessert that looks like it came from a café.
- Easy to make: This Chocolate Mousse uses simple steps, a few basic tools, and ingredients you may already have at home. You melt, whip, fold, chill, and that is pretty much it. Busy parents, students, and working professionals can all fit this into a packed day without stress.
- Rich but balanced: The dark chocolate gives deep flavor, while the whipped cream and egg whites keep the texture light. Each spoonful tastes indulgent, but the mousse still feels airy instead of heavy. The nutrition facts also show a little protein from the eggs and some calcium from the cream.
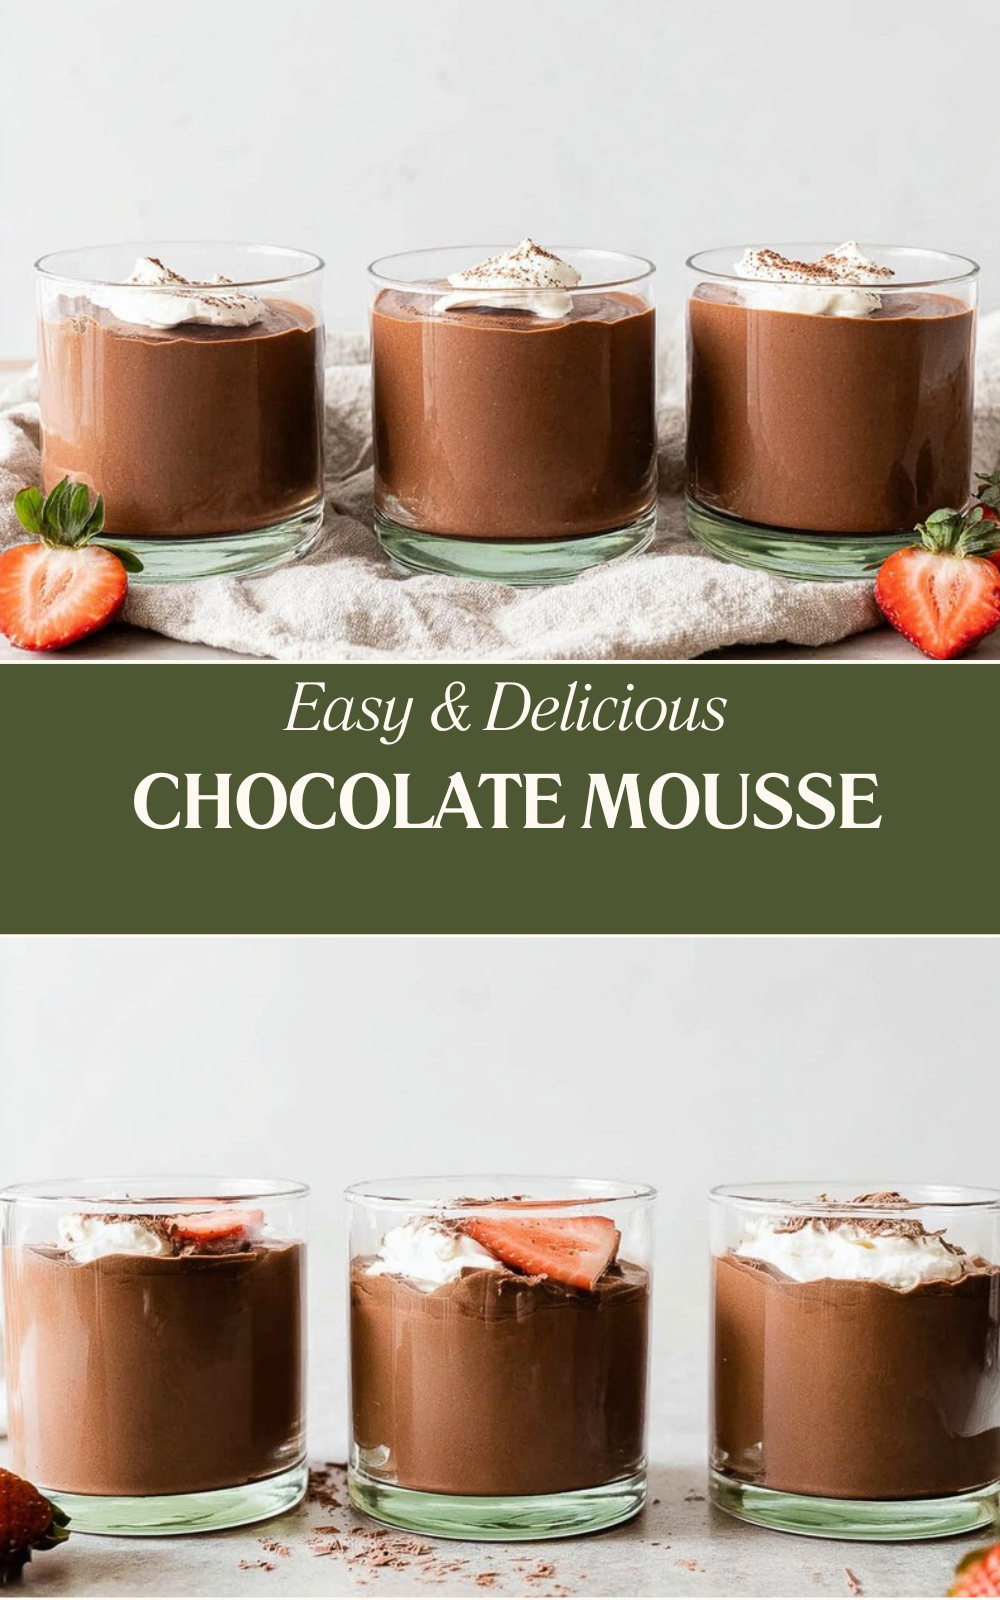
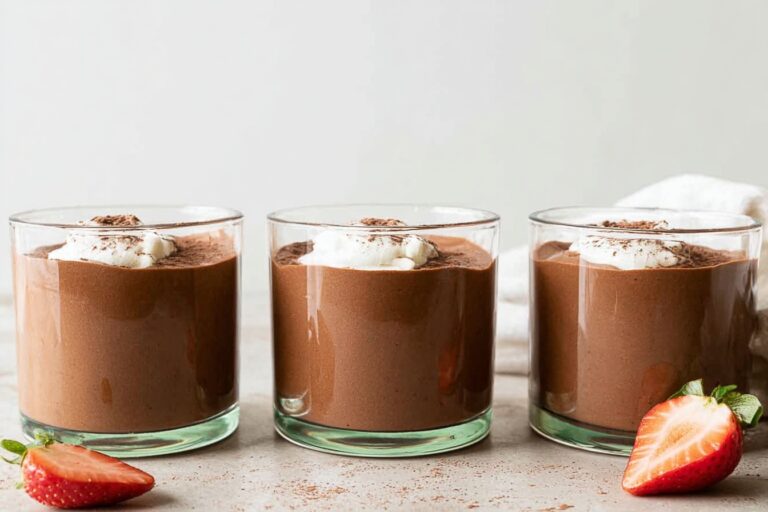
- Flexible for serving: You can spoon the mousse into glasses, little pots, or ramekins. It works for dinner parties, date nights, holiday tables, or a quiet treat after a long day. Add whipped cream, chocolate shavings, berries, or even a cookie on the side.
- Classic flavor and texture: A good Chocolate Mousse has that dreamy mix of silky chocolate and soft, cloud-like lift. Using 70 percent cocoa or bittersweet chocolate gives a bold taste that is not too sweet. If you love desserts like chocolate-covered strawberries, this recipe gives you that same rich chocolate feeling in a smoother, spoonable form.
Chocolate mousse is one of those desserts that looks impressive, tastes luxurious, and still comes together with everyday ingredients.
For readers who like a quick recipe with strong flavor, this is a great one to keep in your back pocket. If you enjoy simple sweet recipes with a creamy finish, you may also like this peanut butter chocolate dessert for another chocolate fix.
Jump To
- 1. Why You’ll Love This Chocolate Mousse
- 2. Essential Ingredients for Chocolate Mousse
- 3. How to Prepare the Perfect Chocolate Mousse: Step-by-Step Guide
- 4. Dietary Substitutions to Customize Your Chocolate Mousse
- 5. Mastering Chocolate Mousse: Advanced Tips and Variations
- 6. How to Store Chocolate Mousse: Best Practices
- 7. FAQs: Frequently Asked Questions About Chocolate Mousse
- 8. Chocolate Mousse
Essential Ingredients for Chocolate Mousse
Here is everything you need for this Chocolate Mousse recipe, listed clearly so you can get started without hunting around the kitchen. The measurements below match the recipe exactly and make about 4 portions, depending on how you divide the mousse.
Main ingredients
- 3 eggs – The yolks add richness and help build the creamy base, while the whites add lift and that classic airy texture.
- 125g 70% cocoa chocolate or bittersweet chocolate, broken into small pieces – This gives the mousse its deep chocolate flavor. Use baking chocolate for smooth melting.
- 10g unsalted butter – Helps the chocolate melt into a glossy, silky mixture.
- 1/2 cup full fat cream – Whips into soft, rich volume and gives the mousse its creamy body.
- 3 tablespoons caster sugar – Sweetens the mousse and helps the egg whites whip to a firm, stable foam.
- More whipped cream for decoration – Adds a pretty finish and a little extra creaminess on top.
- Chocolate shavings for decoration – Gives the mousse a polished look and a little extra chocolate bite.
Ingredient notes and helpful swaps
Use chocolate from the baking aisle if you can, because it usually melts more smoothly than random candy bars. A bittersweet bar with around 70 percent cocoa gives a lovely balance of deep flavor and gentle sweetness. Full fat cream works best here because it whips well and gives the mousse its soft, rich texture.
If you are worried about raw eggs, pasteurized eggs are the safest swap for this classic style of mousse. The recipe still keeps the traditional airy feel, especially if you whip the whites to firm peaks and fold them in gently. For more chocolate dessert ideas with a creamy finish, you might also like this traybake recipe when you want something sweet and easy to slice.
Special dietary options
- Vegan: Swap the eggs for aquafaba, use plant-based whipping cream, and choose dairy-free dark chocolate.
- Gluten-free: This recipe is naturally gluten-free as written, as long as your chocolate is certified gluten-free.
- Low-calorie: Use a lighter whipped topping and a smaller serving size, but keep in mind the texture will be less rich.
| Ingredient | Amount | What it does |
|---|---|---|
| Eggs | 3 | Add structure, richness, and lift |
| 70% cocoa chocolate | 125g | Provides bold chocolate flavor |
| Unsalted butter | 10g | Creates a smooth melt |
| Full fat cream | 1/2 cup | Builds creaminess and volume |
| Caster sugar | 3 tablespoons | Sweetens and stabilizes the whipped whites |
How to Prepare the Perfect Chocolate Mousse: Step-by-Step Guide
Making Chocolate Mousse at home is easier than it looks, and once you do it once, the whole process starts to feel very natural. The trick is to keep things gentle so the mousse stays light. You are not trying to beat it into submission here, just coax it into being airy and smooth.
First step: Get everything ready
Take the eggs out and separate them carefully into yolks and whites. It is usually easiest to separate eggs while they are still cold, because the yolks hold together better. Then let the whites sit for a few minutes so they warm slightly before whipping. Have your glasses or pots ready for the final mousse, because once the mixture is finished, you will want to move quickly.
Second step: Melt the chocolate and butter
Place the 125g of broken 70 percent cocoa chocolate and 10g unsalted butter together in a heat-safe bowl. Melt them slowly until smooth. You can do this over low heat or in short bursts if you are using a microwave. Stir until glossy, then set the bowl aside to cool. This matters because hot chocolate can make the whipped mixture lose its airy texture. The chocolate should be runny, not hot, before you fold it in.
Third step: Whip the cream
In a cold bowl, whip the 1/2 cup full fat cream to stiff peaks. That means when you lift the whisk, the cream should hold its shape without drooping. If you stop too early, the mousse may turn loose. If you go too far, the cream can look grainy, so keep an eye on it. A hand whisk works, but an electric mixer makes the job faster, especially if you are making dessert after a long day.
Fourth step: Whip the egg whites with sugar
In a clean bowl, beat the egg whites with the 3 tablespoons caster sugar until firm peaks form. The bowl and whisk need to be grease-free, or the whites may not whip properly. This step gives Chocolate Mousse its signature lift. You want the whites to look glossy and sturdy, not dry or clumpy. If you are nervous, take it slow and watch the texture closely.
Firm peaks are your friend here. They help the mousse stay fluffy, scoopable, and light.
Fifth step: Fold the yolks into the whipped cream
Once the cream is whipped, fold in the egg yolks. Use a spatula and gentle strokes so you do not knock out too much air. The mixture should look smooth and pale yellow. This is where the mousse starts to get its rich, custard-like base. If you are making a vegan version, this is the point where you would use your plant-based cream mixture instead.
Sixth step: Add the melted chocolate
Pour the cooled melted chocolate into the cream and yolk mixture. Fold it in gently until the color is even. Stop as soon as you no longer see streaks, because overmixing can flatten the mousse. The mixture should look silky, chocolatey, and light. If the chocolate seems a little too thick, give it a few more seconds to cool before folding.
Seventh step: Fold in the egg whites
Add the whipped egg whites and fold them in until just combined. This is the part where patience pays off. Use a large spatula and scrape from the bottom, then lift and turn the mixture over itself. Do not stir hard. You want to keep as much air in the mixture as possible so the finished Chocolate Mousse stays fluffy. A few small white streaks are fine at first, but stop once the mixture looks mostly uniform.
Eighth step: Divide and chill
Spoon the mousse into glasses or pots. Tap them lightly on the counter if needed to remove very large air pockets, but do not flatten the mixture. Cover and refrigerate for at least 6 hours so it can set fully. If you have the time, overnight chilling works beautifully and gives the texture a little more body.
Ninth step: Decorate and serve
Right before serving, add a spoonful of whipped cream and finish with chocolate shavings. You can also add berries if you want a little brightness. The mousse should be cold, soft, and spoonable. Serve it straight from the fridge for the best texture. If you are making dessert for guests, this is a lovely make-ahead option because it looks elegant with very little last-minute work.
For another dessert that is just as creamy and pretty on the table, take a look at these vanilla custard cream squares.

Dietary Substitutions to Customize Your Chocolate Mousse
Protein and main component alternatives
If you need to change the egg portion of Chocolate Mousse, there are a few good paths. For an egg-free version, aquafaba works well because it whips in a similar way to egg whites. You can also use pasteurized eggs if you want to keep the classic texture but feel more comfortable about food safety. For a dairy-free version, choose coconut cream or a plant-based whipping cream, then pair it with a good dairy-free dark chocolate.
If you want a lower dairy option, use a lighter whipped topping, but know that the final texture will be less rich and a bit less stable. For a stronger chocolate flavor, use the darkest chocolate you enjoy, as long as it still melts smoothly.
Vegetable, sauce, and seasoning modifications
Even though this recipe is all about chocolate, you can still play with flavor in small ways. A tiny pinch of salt can sharpen the chocolate taste. A splash of vanilla adds warmth. If you like a fruity note, serve the mousse with fresh raspberries or a spoonful of strawberry sauce. Busy cooks can make one base recipe and then top each portion differently so everyone feels like they got their own custom dessert.
You can also make the mousse feel seasonal with simple toppings. Orange zest works nicely in winter. Fresh mint is great in spring. Crushed cookies add crunch for anyone who wants a little texture on top. The base recipe stays the same, so this is an easy dessert to adjust for different guests and moods.
Mastering Chocolate Mousse: Advanced Tips and Variations
Once you have made Chocolate Mousse once or twice, the small details start to matter more. They are the difference between good and really lovely. The recipe is already simple, but these extra tips can help you get a smoother texture and a prettier finish.
Pro cooking techniques
- Use a clean, dry bowl for the egg whites so they whip properly.
- Let the melted chocolate cool until it is runny, not hot.
- Fold slowly with a large spatula instead of stirring hard.
- Whip the cream to stiff peaks so the mousse holds its shape.
- Beat the whites to firm peaks for the best airy texture.
For the best results, take your time with the folding. That step protects the air you worked so hard to create. If the mousse looks a little softer at first, do not panic. The fridge will take care of most of the setting.
Flavor variations
Dark chocolate is classic, but you can also play with the flavor a little. Add a touch of espresso powder if you want a deeper chocolate taste. A little orange zest gives the mousse a bright note. A pinch of cinnamon can make it feel cozy in colder months. If you like sweet-and-salty desserts, top with a tiny sprinkle of flaky salt just before serving.
Presentation tips
Small glasses or ramekins make the mousse look polished without much effort. Swirl the top with a spoon before chilling if you want a soft decorative finish. After the mousse sets, add whipped cream and chocolate shavings. Fresh berries can add color and balance the richness. If you are serving this for a celebration, a little mint leaf on top makes it look extra neat.
Make-ahead options
This Chocolate Mousse is a very useful make-ahead dessert for busy schedules. You can make it the day before, chill it overnight, and decorate it just before serving. It also works well for dinner parties because the prep is quick and the chill time does all the hard work. If you are planning a larger menu, that gives you more time for the main meal and less time worrying about dessert.
If you enjoy make-ahead sweets, you may also want to try this lemon tart recipe for another chilled dessert that feels special.
How to Store Chocolate Mousse: Best Practices
Chocolate Mousse keeps nicely in the fridge, which makes it a handy dessert for planning ahead. If you store it well, the texture stays pleasant and the flavor remains rich.
Refrigeration
Cover the mousse tightly and keep it in the fridge for up to 2 days for the best texture. It can stay a little longer, but the freshest version is always the lightest and fluffiest. If you already portioned it into glasses, simply cover each glass with wrap or a lid.
Freezing
You can freeze portions of mousse if needed, but the texture may change a bit after thawing. Freeze in airtight containers, then thaw overnight in the fridge. This works best if you do not mind a slightly denser result. For most home cooks, the fridge is the better option.
Reheating
Do not reheat Chocolate Mousse. It is meant to be served cold, and heat will break the texture. If the mousse feels too firm straight from the fridge, let it sit at room temperature for just a few minutes before serving.
Meal prep considerations
If you are making dessert for the week, portion the mousse into individual cups right away. That makes serving much easier later and helps with portion control. It also works well for families, since everyone can grab their own cup when dessert time comes around.
FAQs: Frequently Asked Questions About Chocolate Mousse
What is chocolate mousse?
Chocolate mousse is a classic French dessert known for its light, airy texture and rich chocolate flavor. It combines melted chocolate with whipped cream and egg whites, folded together to trap air for that signature fluffy consistency. Unlike dense cakes or puddings, mousse melts smoothly in your mouth. Traditional versions use high-quality dark chocolate (at least 60% cocoa), heavy cream, sugar, and eggs for structure. It’s often chilled to set and served in individual cups or ramekins, topped with whipped cream, berries, or shaved chocolate. This no-bake treat takes about 20 minutes to prepare, plus chilling time, making it ideal for dinner parties. Variations include vegan options with coconut cream or aquafaba. (78 words)
How do you make chocolate mousse at home?
To make chocolate mousse at home, start with 8 oz dark chocolate (70% cocoa), chopped, melted with 2 tbsp butter over a double boiler. Whisk 3 egg yolks with 1/4 cup sugar until pale, then stir into chocolate. Whip 1 cup heavy cream to soft peaks and fold in half. Beat 3 egg whites with a pinch of salt to stiff peaks, fold in gently. Chill 2-4 hours. Serves 4-6. Key tip: Use room-temperature eggs for smooth folding and avoid overmixing to keep it airy. Total time: 30 minutes active. Perfect for beginners—scale up for crowds. (92 words)
What’s the best chocolate for chocolate mousse?
The best chocolate for mousse is high-quality dark chocolate with 60-70% cocoa content, like Lindt, Ghirardelli, or Valrhona. It provides intense flavor without overpowering sweetness, balancing the whipped cream. Avoid milk chocolate, which can make the mousse too sweet and heavy; bittersweet (60%) is ideal for richness. Use bars, not chips, as chips have stabilizers that prevent smooth melting. For every 8 oz chocolate, pair with 1 cup cream. Pro tip: Taste-test brands—aim for smooth melt and fruity notes. This choice ensures a velvety texture and professional results every time. (89 words)
Can you make chocolate mousse without eggs?
Yes, make egg-free chocolate mousse using whipped heavy cream or coconut cream for vegans. Melt 8 oz dark chocolate with 2 tbsp coconut oil. Whip 2 cups cold heavy cream (or coconut cream) with 2 tbsp sugar and 1 tsp vanilla to medium peaks. Fold melted chocolate into cream in thirds, keeping it light. Chill 2 hours. This no-cook version is safer for kids or pregnant people, avoiding raw eggs. It sets firmly yet stays airy. Add gelatin (1 tsp bloomed in water) for extra hold if needed. Ready in 15 minutes—top with nuts or fruit. (94 words)
How long does chocolate mousse keep in the fridge?
Homemade chocolate mousse lasts 3-5 days in the fridge, covered tightly with plastic wrap or in an airtight container to prevent absorbing odors. It firms up over time but stays delicious. For longer storage, freeze portions up to 1 month—thaw overnight in fridge. Don’t leave at room temperature over 2 hours to avoid spoilage from dairy and eggs. Signs it’s bad: off smell, watery texture, or mold. Portion into glasses before chilling for easy serving. Fresh is best within 24 hours for peak fluffiness. Always use pasteurized eggs for safety. (87 words)
Chocolate Mousse
🍫 Indulge in silky, airy chocolate mousse that’s effortlessly creamy and ready to wow with its rich, melt-in-your-mouth texture.
😋 Simple to prepare yet feels luxurious, perfect for quick elegant desserts that delight chocolate lovers.
- Total Time: 6 hours 20 minutes
- Yield: 4 servings
Ingredients
– 3 eggs for structure, richness, and lift
– 125g 70% cocoa chocolate for bold chocolate flavor
– 10g unsalted butter for a smooth melt
– 1/2 cup full fat cream for creaminess and volume
– 3 tablespoons caster sugar for sweetening and stabilizing the whipped whites
– More whipped cream for decoration
– Chocolate shavings for decoration
Instructions
1-First step: Get everything ready Take the eggs out and separate them carefully into yolks and whites. It is usually easiest to separate eggs while they are still cold, because the yolks hold together better. Then let the whites sit for a few minutes so they warm slightly before whipping. Have your glasses or pots ready for the final mousse, because once the mixture is finished, you will want to move quickly.
2-Second step: Melt the chocolate and butter Place the 125g of broken 70 percent cocoa chocolate and 10g unsalted butter together in a heat-safe bowl. Melt them slowly until smooth. You can do this over low heat or in short bursts if you are using a microwave. Stir until glossy, then set the bowl aside to cool. This matters because hot chocolate can make the whipped mixture lose its airy texture. The chocolate should be runny, not hot, before you fold it in.
3-Third step: Whip the cream In a cold bowl, whip the 1/2 cup full fat cream to stiff peaks. That means when you lift the whisk, the cream should hold its shape without drooping. If you stop too early, the mousse may turn loose. If you go too far, the cream can look grainy, so keep an eye on it. A hand whisk works, but an electric mixer makes the job faster, especially if you are making dessert after a long day.
4-Fourth step: Whip the egg whites with sugar In a clean bowl, beat the egg whites with the 3 tablespoons caster sugar until firm peaks form. The bowl and whisk need to be grease-free, or the whites may not whip properly. This step gives Chocolate Mousse its signature lift. You want the whites to look glossy and sturdy, not dry or clumpy. If you are nervous, take it slow and watch the texture closely.
5-Fifth step: Fold the yolks into the whipped cream Once the cream is whipped, fold in the egg yolks. Use a spatula and gentle strokes so you do not knock out too much air. The mixture should look smooth and pale yellow. This is where the mousse starts to get its rich, custard-like base. If you are making a vegan version, this is the point where you would use your plant-based cream mixture instead.
6-Sixth step: Add the melted chocolate Pour the cooled melted chocolate into the cream and yolk mixture. Fold it in gently until the color is even. Stop as soon as you no longer see streaks, because overmixing can flatten the mousse. The mixture should look silky, chocolatey, and light. If the chocolate seems a little too thick, give it a few more seconds to cool before folding.
7-Seventh step: Fold in the egg whites Add the whipped egg whites and fold them in until just combined. This is the part where patience pays off. Use a large spatula and scrape from the bottom, then lift and turn the mixture over itself. Do not stir hard. You want to keep as much air in the mixture as possible so the finished Chocolate Mousse stays fluffy. A few small white streaks are fine at first, but stop once the mixture looks mostly uniform.
8-Eighth step: Divide and chill Spoon the mousse into glasses or pots. Tap them lightly on the counter if needed to remove very large air pockets, but do not flatten the mixture. Cover and refrigerate for at least 6 hours so it can set fully. If you have the time, overnight chilling works beautifully and gives the texture a little more body.
9-Ninth step: Decorate and serve Right before serving, add a spoonful of whipped cream and finish with chocolate shavings. You can also add berries if you want a little brightness. The mousse should be cold, soft, and spoonable. Serve it straight from the fridge for the best texture. If you are making dessert for guests, this is a lovely make-ahead option because it looks elegant with very little last-minute work.
Notes
🍫 Choose high-quality baking chocolate for the smoothest melt and richest flavor.
🥚 Opt for pasteurized eggs if concerned about using raw eggs for safety.
❄️ Fold gently and chill fully to maintain that light, airy texture.
- Prep Time: 20 minutes
- Chill Time: 6 hours
- Category: Dessert
- Method: Chilling
- Cuisine: French
- Diet: Vegetarian
Nutrition
- Serving Size: 1 portion
- Calories: 375
- Sugar: 19g
- Sodium: 92mg
- Fat: 26g
- Saturated Fat: 18g
- Unsaturated Fat: 8g
- Trans Fat: 0g
- Carbohydrates: 27g
- Fiber: 1g
- Protein: 7g
- Cholesterol: 171mg


