Ingredients
– 3 eggs for structure, richness, and lift
– 125g 70% cocoa chocolate for bold chocolate flavor
– 10g unsalted butter for a smooth melt
– 1/2 cup full fat cream for creaminess and volume
– 3 tablespoons caster sugar for sweetening and stabilizing the whipped whites
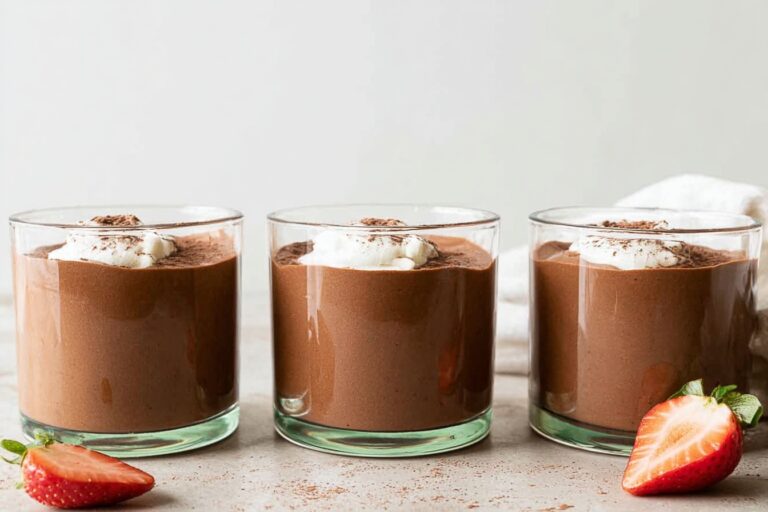
– More whipped cream for decoration
– Chocolate shavings for decoration
Instructions
1-First step: Get everything ready Take the eggs out and separate them carefully into yolks and whites. It is usually easiest to separate eggs while they are still cold, because the yolks hold together better. Then let the whites sit for a few minutes so they warm slightly before whipping. Have your glasses or pots ready for the final mousse, because once the mixture is finished, you will want to move quickly.
2-Second step: Melt the chocolate and butter Place the 125g of broken 70 percent cocoa chocolate and 10g unsalted butter together in a heat-safe bowl. Melt them slowly until smooth. You can do this over low heat or in short bursts if you are using a microwave. Stir until glossy, then set the bowl aside to cool. This matters because hot chocolate can make the whipped mixture lose its airy texture. The chocolate should be runny, not hot, before you fold it in.
3-Third step: Whip the cream In a cold bowl, whip the 1/2 cup full fat cream to stiff peaks. That means when you lift the whisk, the cream should hold its shape without drooping. If you stop too early, the mousse may turn loose. If you go too far, the cream can look grainy, so keep an eye on it. A hand whisk works, but an electric mixer makes the job faster, especially if you are making dessert after a long day.
4-Fourth step: Whip the egg whites with sugar In a clean bowl, beat the egg whites with the 3 tablespoons caster sugar until firm peaks form. The bowl and whisk need to be grease-free, or the whites may not whip properly. This step gives Chocolate Mousse its signature lift. You want the whites to look glossy and sturdy, not dry or clumpy. If you are nervous, take it slow and watch the texture closely.
5-Fifth step: Fold the yolks into the whipped cream Once the cream is whipped, fold in the egg yolks. Use a spatula and gentle strokes so you do not knock out too much air. The mixture should look smooth and pale yellow. This is where the mousse starts to get its rich, custard-like base. If you are making a vegan version, this is the point where you would use your plant-based cream mixture instead.
6-Sixth step: Add the melted chocolate Pour the cooled melted chocolate into the cream and yolk mixture. Fold it in gently until the color is even. Stop as soon as you no longer see streaks, because overmixing can flatten the mousse. The mixture should look silky, chocolatey, and light. If the chocolate seems a little too thick, give it a few more seconds to cool before folding.
7-Seventh step: Fold in the egg whites Add the whipped egg whites and fold them in until just combined. This is the part where patience pays off. Use a large spatula and scrape from the bottom, then lift and turn the mixture over itself. Do not stir hard. You want to keep as much air in the mixture as possible so the finished Chocolate Mousse stays fluffy. A few small white streaks are fine at first, but stop once the mixture looks mostly uniform.
8-Eighth step: Divide and chill Spoon the mousse into glasses or pots. Tap them lightly on the counter if needed to remove very large air pockets, but do not flatten the mixture. Cover and refrigerate for at least 6 hours so it can set fully. If you have the time, overnight chilling works beautifully and gives the texture a little more body.
9-Ninth step: Decorate and serve Right before serving, add a spoonful of whipped cream and finish with chocolate shavings. You can also add berries if you want a little brightness. The mousse should be cold, soft, and spoonable. Serve it straight from the fridge for the best texture. If you are making dessert for guests, this is a lovely make-ahead option because it looks elegant with very little last-minute work.
Notes
🍫 Choose high-quality baking chocolate for the smoothest melt and richest flavor.
🥚 Opt for pasteurized eggs if concerned about using raw eggs for safety.
❄️ Fold gently and chill fully to maintain that light, airy texture.
- Prep Time: 20 minutes
- Chill Time: 6 hours
- Category: Dessert
- Method: Chilling
- Cuisine: French
- Diet: Vegetarian
Nutrition
- Serving Size: 1 portion
- Calories: 375
- Sugar: 19g
- Sodium: 92mg
- Fat: 26g
- Saturated Fat: 18g
- Unsaturated Fat: 8g
- Trans Fat: 0g
- Carbohydrates: 27g
- Fiber: 1g
- Protein: 7g
- Cholesterol: 171mg