
Why You’ll Love This Oreo Cookie Crust
If you’re looking for a simple way to elevate your desserts, this Oreo Cookie Crust offers a tasty base that’s fun and easy to make. It’s perfect for beginners and busy folks alike, taking just about 15 minutes from start to finish. Let me share why so many home bakers rave about it.
- Ease of preparation: This Oreo Cookie Crust comes together quickly with minimal effort, making it ideal for anyone short on time. With a prep time of only 5 minutes and baking time of 10 minutes if needed, you can whip it up without fussing over complicated steps. It’s straightforward, using basic tools like a food processor or even a rolling pin, so even if you’re new to baking, you’ll feel confident trying it out.
- Health benefits: While this crust is a treat, it can fit into a balanced diet when enjoyed in moderation. The recipe uses about 22 regular cookies, totaling around 250g, which means you control the portions. Plus, options for substitutions make it adaptable for dietary needs, like using gluten-free cookies to avoid mushiness, helping you maintain wellness without skipping desserts.
- Versatility: One of the best things about this Oreo Cookie Crust is how it adapts to various recipes and preferences. You can use it for pies, cheesecakes, or no-bake fillings, and it’s easy to tweak for different diets, such as vegan swaps or low-calorie versions. This makes it a go-to for busy parents, students, or anyone exploring new flavors in their kitchen.
- Distinctive flavor: What sets this Oreo Cookie Crust apart is its rich, creamy taste from the whole cookies, including the filling, which adds a unique crunch and sweetness. It’s thicker and more flavorful than store-bought options, binding together with just 5 tablespoons of melted unsalted butter for a perfect texture. This crust stands out in desserts, making every bite memorable for food enthusiasts.
Overall, this crust not only simplifies your baking routine but also brings a fun twist to classic desserts. Whether you’re a baking enthusiast or just starting, it’s a reliable choice that delivers great results every time.
Jump To
- 1. Why You’ll Love This Oreo Cookie Crust
- 2. Essential Ingredients for Oreo Cookie Crust
- 3. How to Prepare the Perfect Oreo Cookie Crust: Step-by-Step Guide
- 4. Protein and Main Component Alternatives
- 5. Vegetable, Sauce, and Seasoning Modifications
- 6. Mastering Oreo Cookie Crust: Advanced Tips and Variations
- 7. How to Store Oreo Cookie Crust: Best Practices
- 8. FAQs: Frequently Asked Questions About Oreo Cookie Crust
- 9. Oreo Cookie Crust
Essential Ingredients for Oreo Cookie Crust
Getting the ingredients right is key to making a solid Oreo Cookie Crust that holds up well. Below, I break down everything you need, including precise measurements and why each one matters. This helps you understand how they work together for the best outcome.
Main Ingredients
- 22 regular cookies (not double-filled) – These provide the base crumbs for the crust, offering about 2 cups packed or 250g, which ensures a sturdy and flavorful structure without making it too soft.
- 5 tablespoons (71g) unsalted butter, melted – This amount binds the crumbs together perfectly, adding richness and helping the crust set without becoming greasy.
Special Dietary Options
For those with specific needs, here are some easy swaps to keep your Oreo Cookie Crust inclusive. These alternatives use related terms like cookie base adjustments to fit naturally.
- Vegan: Swap the unsalted butter with a plant-based alternative like melted coconut oil in the same 71g measurement to maintain binding without dairy, keeping the crust’s texture intact for vegan-friendly desserts.
- Gluten-free: Use gluten-free versions of the regular cookies, ensuring you still measure to 22 pieces or 250g, as prebaking can help avoid mushiness and preserve the cookie base’s stability.
- Low-calorie: Opt for reduced-fat cookies if available, and reduce butter to 4 tablespoons (57g) to cut calories while still achieving a cohesive crust, though you might need to pack crumbs tightly for better hold.
How to Prepare the Perfect Oreo Cookie Crust: Step-by-Step Guide
Making an Oreo Cookie Crust is straightforward and rewarding, with steps that fit into your daily routine. I’ll walk you through each part, including timings and tips for different preferences. This guide uses the provided directions to ensure your crust turns out just right, whether you’re baking for a family pie or a no-bake treat.
First Step: Preparation and Mise en Place
Start by gathering your ingredients and tools to make the process smooth. Measure out 22 whole regular cookies and 5 tablespoons (71g) of unsalted butter, melting the butter in advance. For dietary adaptations, if you’re going vegan, swap the butter for coconut oil now. This step takes about 2 minutes and sets you up for success, reducing any kitchen chaos.
Second Step: Crushing the Cookies
Pulse the 22 whole cookies, including their cream filling, in a food processor or blender until you get about 2 cups (packed) of fine crumbs, roughly 250g. If you don’t have a processor, crush them in a sealed bag using a rolling pin for even results. For gluten-free options, use certified gluten-free cookies here to maintain the same crumb texture, ensuring the base holds together well. This step should take 1-2 minutes and is key for a stable Oreo Cookie Crust.
Third Step: Mixing the Crumbs
Once you have your crumbs, mix in the melted unsalted butter until everything combines evenly, breaking up any large chunks. Aim for a mixture that’s moist but not overly wet; if it feels greasy, add crumbs from 2 more cookies. For low-calorie versions, you could reduce butter slightly, but watch the binding to keep the crust intact. This quick mix, about 1 minute, ensures your Oreo Cookie Crust has the right consistency for pressing.
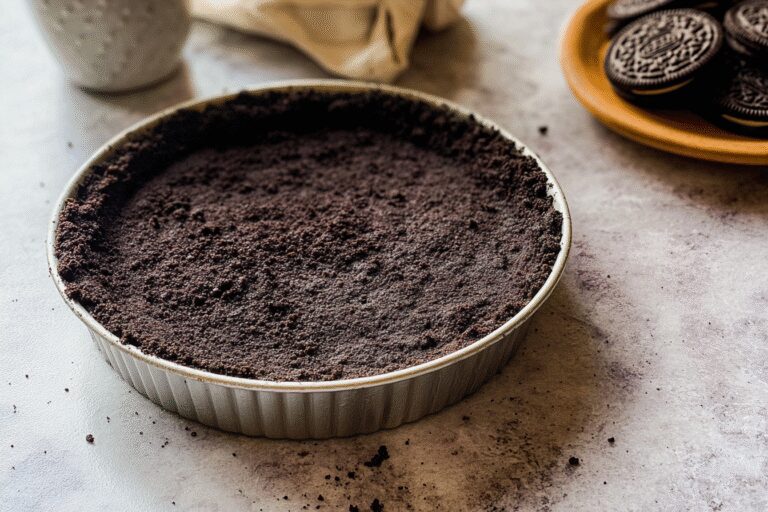
Fourth Step: Pressing the Mixture
Press the crumb mixture firmly and evenly into an ungreased 8-inch, 9-inch, or 10-inch pie dish, cake pan, springform pan, or square pan. Use medium pressure with your hands to smooth the bottom and sides, then shape the edges by flattening the top with your thumb and fingers, and round the inside corners with a spoon to avoid cracks. If adapting for various needs, like vegan swaps, the technique stays the same, but for a low-calorie version, pack lightly to prevent density. This step takes around 2 minutes and is crucial for a neat Oreo Cookie Crust that doesn’t separate when sliced.
Fifth Step: Baking the Crust
Bake the crust at 350°F (177°C) for 8 to 10 minutes if you’re using it for baked fillings, or 10 to 12 minutes for no-bake options. This helps set the crust and prevent sogginess, but if your recipe calls for no baking, you can skip this. For chilling before baking to reduce shrinking, pop it in the fridge for 10 minutes first, especially with gluten-free cookies. Once done, cool it completely before adding filling, which takes about 10-15 minutes. Always check your specific filling recipe for adaptations to keep the Oreo Cookie Crust versatile.
Final Step: Finishing Touches and Serving
After cooling, your Oreo Cookie Crust is ready for your favorite filling, like a creamy cheesecake or pudding. If making ahead, store it as outlined later for freshness. For presentations with dietary tweaks, such as low-calorie fillings, add garnishes that match, like fresh fruits. This final step ensures your crust enhances the dessert, making it easy to serve and enjoy with family or friends, turning a simple base into a delightful treat.
Protein and Main Component Alternatives
When making your Oreo Cookie Crust, the main components like cookies and butter can be swapped for different needs. For instance, if you’re looking for plant-based options, try using nut-based cookies to replace the regular ones, which might alter the texture slightly but still provide good binding. Keep in mind that with these changes, you may need to adjust measurements, like increasing crumbs if the substitute is less dense, to maintain the crust’s stability.
Common Substitutions and Their Effects
Here are some quick alternatives: for dairy-free needs, swap butter with coconut oil, noting it could make the crust a bit firmer. Each option impacts flavor and texture, so test a small batch first to ensure it works for your Oreo Cookie Crust variations.
Vegetable, Sauce, and Seasoning Modifications
To tweak your Oreo Cookie Crust for different tastes, consider adding elements like extracts for flavor boosts. For example, a dash of vanilla could enhance sweetness, or citrus zest for a zesty twist, which pairs well with seasonal fruits. These changes can make the crust more adaptable, such as using low-sugar sweeteners for diet-conscious adjustments, ensuring it fits low-sodium preferences by skipping any added salts.
Adapting for Dietary Restrictions
For allergen-friendly versions, opt for natural spice blends that are vegan and gluten-free, like cinnamon instead of processed flavors. This keeps the Oreo Cookie Crust versatile while maintaining its core appeal, allowing easy modifications without compromising taste or texture.
Mastering Oreo Cookie Crust: Advanced Tips and Variations
Once you’re comfortable with the basics, dive into pro techniques to perfect your Oreo Cookie Crust. For better texture, pack the crumbs tightly before baking to avoid shrinking, and always chill the mixture for a few minutes. Explore pumpkin cheesecake recipes for ideas on using this crust in seasonal desserts.
Flavor Variations and Troubleshooting
Try adding flavors like mint extract for a fresh twist, or mix in nuts for crunch, keeping the focus on a balanced Oreo Cookie Crust. If issues arise, like a greasy mix, add extra crumbs and don’t press too hard to keep it easy to cut.
How to Store Oreo Cookie Crust: Best Practices
Proper storage keeps your Oreo Cookie Crust fresh and ready for use. For short-term, refrigerate it wrapped in plastic for up to 3 days to maintain its texture. Here’s a simple table for reference:
| Storage Method | Duration | Tips |
|---|---|---|
| Refrigeration | Up to 3 days | Wrap tightly to prevent drying out. |
| Freezing | Up to 3 months | Freeze in foil and thaw slowly for best results. |
For long-term, freeze it for up to 3 months, then thaw at room temperature. Always follow food safety when reheating, though it’s often used cold. This makes meal prep simple for busy schedules.

FAQs: Frequently Asked Questions About Oreo Cookie Crust
What pan sizes work best for an Oreo cookie crust?
This Oreo cookie crust recipe is designed to fit 8-inch, 9-inch, or 10-inch pie dishes, round cake pans, springform pans, or square pans. It does not provide enough crust for a 9×13-inch baking pan; for that size, you’ll need to increase the recipe to about 30 Oreos and 8 tablespoons of melted butter to cover the larger surface area evenly.
Should I bake the Oreo crust before adding the filling?
Generally, pre-baking the Oreo crust is recommended unless your filling recipe states otherwise. Baking the crust at 350°F (175°C) for about 8–10 minutes helps it set firmly and prevents sogginess. Some no-bake dessert recipes may suggest freezing the crust instead of baking, so always follow your specific recipe’s instructions.
How can I make an Oreo cookie crust if I don’t have a food processor?
If you don’t have a food processor, crush the Oreo cookies by placing them in a sealed plastic bag and rolling over them with a rolling pin until finely ground. The finer the crumbs, the better the crust holds together when mixed with melted butter. This method works well for making uniform crumbs without additional kitchen tools.
Can I use other chocolate sandwich cookies instead of Oreos for the crust?
Yes, you can substitute other brands of chocolate sandwich cookies. Keep in mind that different brands may vary in size and weight, so you should measure about 2 packed cups or 250 grams of crumbs to match the recipe. Adjust the number of cookies accordingly to ensure the right amount of crumbs for a sturdy crust.
Is it possible to make a gluten-free Oreo cookie crust?
Using gluten-free Oreo-style cookies is a possible option to create a gluten-free crust, but results may differ as it hasn’t been extensively tested. Look for certified gluten-free chocolate sandwich cookies and follow the same crust recipe, but be aware that texture or flavor might vary slightly compared to the traditional Oreo crust.
Oreo Cookie Crust
🍪 This Perfect Oreo Cookie Crust recipe creates a rich, flavorful base that enhances a variety of desserts with its crunchy texture.
🥧 Ideal for pies, cheesecakes, and no-bake treats, it is easy to make and delivers bakery-quality results at home.
- Total Time: 15 minutes
- Yield: Enough for an 8-, 9-, or 10-inch crust
Ingredients
22 regular cookies (not double-filled) – These provide the base crumbs for the crust
5 tablespoons (71g) unsalted butter, melted – binds the crumbs together, adds richness
71g melted coconut oil as plant-based alternative to butter for vegan option
22 pieces or 250g gluten-free cookies for gluten-free option
4 tablespoons (57g) unsalted butter, melted – reduced amount for low-calorie option
Instructions
First Step: Preparation and Mise en Place Start by gathering your ingredients and tools to make the process smooth. Measure out 22 whole regular cookies and 5 tablespoons (71g) of unsalted butter, melting the butter in advance. For dietary adaptations, if you’re going vegan, swap the butter for coconut oil now. This step takes about 2 minutes and sets you up for success, reducing any kitchen chaos.
Second Step: Crushing the Cookies Pulse the 22 whole cookies, including their cream filling, in a food processor or blender until you get about 2 cups (packed) of fine crumbs, roughly 250g. If you don’t have a processor, crush them in a sealed bag using a rolling pin for even results. For gluten-free options, use certified gluten-free cookies here to maintain the same crumb texture, ensuring the base holds together well. This step should take 1-2 minutes and is key for a stable Oreo Cookie Crust.
Third Step: Mixing the Crumbs Once you have your crumbs, mix in the melted unsalted butter until everything combines evenly, breaking up any large chunks. Aim for a mixture that’s moist but not overly wet; if it feels greasy, add crumbs from 2 more cookies. For low-calorie versions, you could reduce butter slightly, but watch the binding to keep the crust intact. This quick mix, about 1 minute, ensures your Oreo Cookie Crust has the right consistency for pressing.
Fourth Step: Pressing the Mixture Press the crumb mixture firmly and evenly into an ungreased 8-inch, 9-inch, or 10-inch pie dish, cake pan, springform pan, or square pan. Use medium pressure with your hands to smooth the bottom and sides, then shape the edges by flattening the top with your thumb and fingers, and round the inside corners with a spoon to avoid cracks. If adapting for various needs, like vegan swaps, the technique stays the same, but for a low-calorie version, pack lightly to prevent density. This step takes around 2 minutes and is crucial for a neat Oreo Cookie Crust that doesn’t separate when sliced.
Fifth Step: Baking the Crust Bake the crust at 350°F (177°C) for 8 to 10 minutes if you’re using it for baked fillings, or 10 to 12 minutes for no-bake options. This helps set the crust and prevent sogginess, but if your recipe calls for no baking, you can skip this. For chilling before baking to reduce shrinking, pop it in the fridge for 10 minutes first, especially with gluten-free cookies. Once done, cool it completely before adding filling, which takes about 10-15 minutes. Always check your specific filling recipe for adaptations to keep the Oreo Cookie Crust versatile.
Final Step: Finishing Touches and Serving After cooling, your Oreo Cookie Crust is ready for your favorite filling, like a creamy cheesecake or pudding. If making ahead, store it as outlined later for freshness. For presentations with dietary tweaks, such as low-calorie fillings, add garnishes that match, like fresh fruits. This final step ensures your crust enhances the dessert, making it easy to serve and enjoy with family or friends, turning a simple base into a delightful treat.
Notes
🍪 Use regular or flavored cookies but avoid double-filled or plain varieties that can make the crust too soft.
📏 Measure crumbs by packing them tightly in the measuring cup for accurate quantity.
❄️ Chill the crust before baking to minimize side shrinking and improve texture.
- Prep Time: 5 minutes
- Cook time: 10 minutes
- Cook Time: 10 minutes
- Category: Dessert, Pie Crust
- Method: Baking, Pressing
- Cuisine: American


