Ingredients
– ½ cup sweetened shredded coconut, toasted for garnish
– 33 golden cream-filled cookies (13.29 ounce package)
– 8 ounce block cream cheese, softened to room temperature
– 8 ounce can crushed pineapple in 100% pineapple juice, drained well (about ⅓ cup after draining)
– 2 tablespoons coconut rum
– 20 ounces white chocolate melting wafers, melted according to package directions
Instructions
1-Step 1: Prepare Your Workspace Start by lining two large rimmed baking sheets with parchment paper. This prevents sticking and makes cleanup a breeze. Having both sheets ready now saves time later when you’re working with the melted chocolate and need to move quickly. Clear your counter space and gather all your ingredients so everything is within reach.
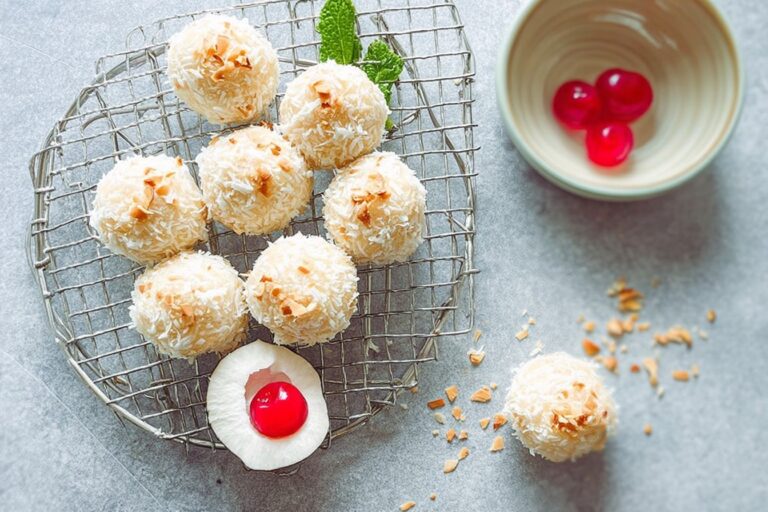
2-Step 2: Toast the Coconut Garnish Place the sweetened shredded coconut in a dry skillet over medium-high heat. Toast for 3-4 minutes, stirring constantly with a wooden spoon or silicone spatula to prevent any burning. The coconut will turn golden brown and release a wonderful nutty aroma when ready. Remove from heat immediately once golden and transfer to a small bowl to cool completely. Set aside for the final garnish step. This toasted coconut can be prepared up to a week in advance and stored in an airtight container.
3-Step 3: Create the Cookie Crumb Base Place all 33 golden cream-filled cookies into your food processor. Process until fine crumbs form, which should take about 30-45 seconds of pulsing. Don’t remove the cream filling from the cookies; it actually helps bind the mixture together beautifully. If you don’t have a food processor, place the cookies in a sturdy Ziploc bag and crush them with a rolling pin until you achieve the same fine crumb consistency. This takes a bit more elbow grease but works just as well.
4-Step 4: Mix the Truffle Filling Add the softened cream cheese to the food processor with the cookie crumbs. Make sure your cream cheese is truly at room temperature, as cold cream cheese will leave lumps in your mixture. Drain the crushed pineapple very thoroughly using a spoon pressed into a wire mesh sieve. You should have about ⅓ cup of pineapple after draining. Add this drained pineapple and the coconut rum to the food processor. Pulse everything together until the mixture is smooth and fully combined, scraping down the sides once or twice to ensure even mixing. The result should be a cohesive, slightly sticky dough that holds together when pressed.
5-Step 5: Scoop and Form the Truffles Using a small cookie scoop (1 ½ tablespoon capacity), portion out the truffle mixture onto one of your prepared baking sheets. Repeat until you’ve formed 28 balls. Work quickly but don’t worry about making them perfectly round yet. At this stage, they’ll be soft and slightly sticky. Place the entire baking sheet in the freezer for 30-45 minutes until the truffles are firm to the touch. This chilling step is essential for successful coating later.
6-Step 6: Roll into Smooth Balls Once the truffles are firm, remove them from the freezer and roll each one between your palms to create smooth, round balls. Work quickly as the heat from your hands can soften them. If the truffles start to lose their shape, return them to the freezer for 5-10 minutes to firm up again before continuing. Place the rolled truffles back on the baking sheet and keep them in the refrigerator while you prepare the chocolate coating.
7-Step 7: Melt the White Chocolate Pour the white chocolate melting wafers into a microwave-safe bowl. Heat for 1 minute, then remove and stir thoroughly. Continue heating in 30-second increments, stirring well after each interval, until the chocolate is completely smooth. Be careful not to overheat, as white chocolate can seize and become grainy if it gets too hot. For a reference on chocolate-dipped techniques, you can check out this Delish piña colada truffles recipe for additional tips.
8-Step 8: Dip the Truffles Working with one truffle at a time, drop it into the melted white chocolate. Use a fork to turn it gently, ensuring complete coverage. Lift the truffle with the fork and tap gently against the side of the bowl to remove excess chocolate. Use a toothpick to slide the truffle off the fork and onto your second prepared baking sheet. This toothpick method prevents those dreaded chocolate drips and keeps your truffles looking neat and professional.
9-Step 9: Add the Toasted Coconut Topping While the white chocolate coating is still wet, immediately sprinkle the toasted coconut on top of each truffle. Work one truffle at a time: dip, place on sheet, sprinkle with coconut, then move to the next. If you wait too long, the chocolate will set and the coconut won’t stick properly. This step gives each truffle its signature tropical look and adds a delightful textural contrast.
10-Step 10: Set and Serve Refrigerate the finished truffles for at least 5 minutes to allow the coating to fully set. Once set, they’re ready to serve! Keep the truffles refrigerated until serving time, as the cream cheese filling should stay chilled. For best flavor, let them sit at room temperature for about 10 minutes before enjoying, which allows the chocolate to soften slightly and the flavors to fully bloom.
Notes
🍍 Drain crushed pineapple thoroughly using a sieve to prevent soggy truffles.
🥥 Toast coconut in advance and store for up to a week at room temperature.
❄️ Avoid freezing finished truffles as they won’t thaw well due to moisture.
- Prep Time: 30 minutes
- Chill/Freeze: 45 minutes
- Category: Dessert
- Method: No-bake
- Cuisine: American
- Diet: Vegetarian
Nutrition
- Serving Size: 1 truffle
- Calories: 134 kcal
- Sugar: 13g
- Sodium: 125mg
- Fat: 6g
- Saturated Fat: 3g
- Unsaturated Fat: 2g
- Trans Fat: 0g
- Carbohydrates: 18g
- Fiber: 0.4g
- Protein: 2g
- Cholesterol: 1mg