
Why You’ll Love This Sponge Candy
There’s something magical about making candy at home, and this sponge candy recipe brings that magic right to your kitchen. Known by many names across different regions Fairy Food in Wisconsin, cinder toffee in Britain, and honeycomb in other parts of the world this delightful treat has won hearts for generations. The crispy, airy texture combined with a rich chocolate coating creates an irresistible combination that store-bought versions simply cannot match.
After testing this recipe dozens of times, I can confidently say it’s become one of my family’s favorite treats to make together. The way the baking soda transforms hot sugar syrup into a bubbling, foaming mixture never fails to amaze my kids (and honestly, me too!). Plus, the satisfaction of biting into that first piece of homemade crunch makes all the effort worthwhile.
What Makes This Recipe Special
- Ease of preparation: Despite its impressive appearance, this recipe requires just three main ingredients for the candy base. The process takes about 35 minutes of active cooking time, and the steps are straightforward enough for intermediate home cooks. With a reliable thermometer and some patience, you’ll achieve consistent results every single time.
- Simplicity of ingredients: White sugar, corn syrup, and baking soda form the foundation of this candy. These pantry staples transform into something extraordinary through the magic of chemistry. No fancy equipment or specialty items needed just basic kitchen tools you likely already own.
- Customizable finish: The chocolate coating offers endless possibilities. Choose milk, dark, or semi-sweet chocolate based on your preference. According to health experts, dark chocolate in moderation can even offer antioxidant benefits, making this treat a bit more guilt-free when you opt for varieties with higher cocoa content.
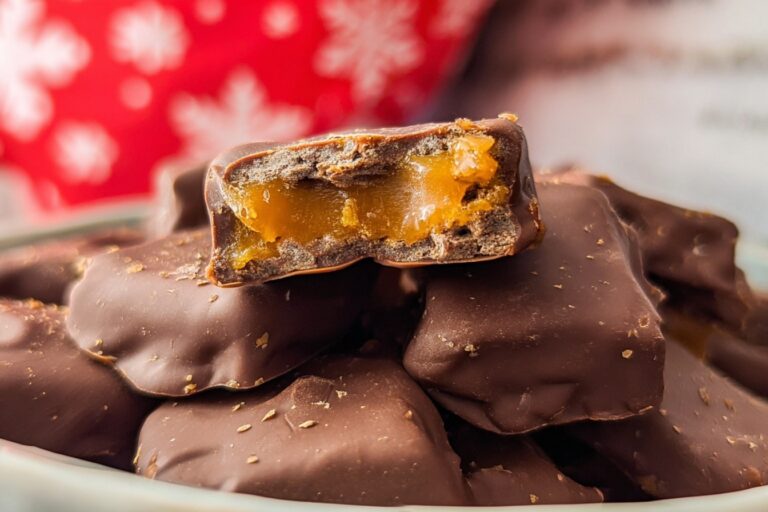
- Impressive presentation: The golden honeycomb interior contrasted with glossy chocolate coating looks stunning on any dessert table. Your friends and family will think you purchased it from a specialty candy shop.
Jump To
- 1. Why You’ll Love This Sponge Candy
- 2. Essential Ingredients for Sponge Candy
- 3. How to Prepare the Perfect Sponge Candy: Step-by-Step Guide
- 4. Protein and Main Component Alternatives
- 5. Vegetable, Sauce, and Seasoning Modifications
- 6. Mastering Sponge Candy: Advanced Tips and Variations
- 7. How to Store Sponge Candy: Best Practices
- 8. FAQs: Frequently Asked Questions About Sponge Candy
- 9. Sponge Candy
Essential Ingredients for Sponge Candy
Creating perfect sponge candy starts with understanding each ingredient’s role. The chemistry between these components creates that signature airy texture we all love. Here’s everything you’ll need:
Sponge Candy Base
- 1 cup white sugar The foundation of the candy. White granulated sugar provides clean caramelization without competing flavors. It creates that perfect golden color and crisp texture when cooked to the right temperature.
- 1 cup light corn syrup or golden syrup This prevents crystallization during cooking and ensures a smooth, even texture. Light corn syrup yields a clearer, lighter candy, while golden syrup adds subtle molasses notes. Either works beautifully.
- 1 tablespoon baking soda The magic ingredient that creates all those wonderful bubbles! When added to the hot syrup, it releases carbon dioxide gas, forming the honeycomb structure. Make sure your baking soda is fresh for maximum bubbling action.
Dipping Chocolate
- 4 tablespoons cocoa butter or coconut oil This helps thin the chocolate for easier dipping and creates a smoother finish. Cocoa butter maintains that authentic chocolate flavor, while coconut oil offers a more accessible alternative.
- 2 cups real chocolate chips or chopped chocolate Choose milk, dark, or semi-sweet based on your taste preferences. Quality matters here look for chocolate that contains actual cocoa butter rather than vegetable fats. This affects both taste and how well the coating sets.
Important Note: Avoid using candy melts or chocolate-flavored coating wafers. These don’t provide the same snap or flavor as real chocolate. The investment in quality chocolate makes a noticeable difference in your finished candy.
Special Dietary Considerations
While traditional sponge candy contains no gluten ingredients, here are adaptations for various needs:
- Gluten-free: This recipe is naturally gluten-free when using pure ingredients. Verify your corn syrup and baking soda are certified gluten-free if you have celiac disease or severe sensitivity.
- Dairy-free option: Use dairy-free chocolate chips and coconut oil instead of cocoa butter. Many dark chocolate varieties are naturally dairy-free just check the label.
- Vegan adaptation: Select vegan chocolate and ensure your sugar was processed without bone char. Organic sugar brands typically use alternative refining methods.
How to Prepare the Perfect Sponge Candy: Step-by-Step Guide
Making sponge candy requires attention to detail and timing. The process moves quickly once you begin, so having everything prepared beforehand makes all the difference. Let me walk you through each step.
Preparation and Setup
Before turning on the stove, complete your mise en place everything in its place. This preparation ensures smooth execution when timing becomes critical.
First, decide on your cooling method. If using the oven technique, preheat your oven to 225°F. Line a 9×13 baking pan with parchment paper, creasing the edges so it fits neatly inside. The parchment prevents sticking and makes removal effortless later.
Measure all ingredients precisely. Candy making requires accuracy, and having everything ready prevents frantic searching mid-recipe. Sift your baking soda into a small bowl to remove any lumps smooth powder distributes evenly and reacts consistently.
Gather your equipment: a large saucepan (the syrup will foam dramatically), instant-read thermometer, wooden spoon or heat-safe spatula, and the prepared pan. Place everything within arm’s reach of your stove.
Cooking the Sugar Syrup
Combine the sugar and corn syrup in your large saucepan. Notice I specified large even experienced candy makers sometimes underestimate the foaming action. A larger pan prevents overflow disasters.
Set the pan over medium heat and begin stirring. You want to dissolve the sugar completely before the mixture comes to a boil. Stir gently but consistently, scraping the sides occasionally to incorporate any sugar crystals.
Once you see the sugar has dissolved and the mixture looks clear with no granules remaining, stop stirring. This moment is crucial. Continuing to stir causes uneven heating and can lead to crystallization. Simply let the syrup cook undisturbed.
Watch as the mixture begins boiling. You’ll notice it turning from clear to a pale yellow this is good! The caramelization process has begun. Insert your instant-read thermometer and monitor closely.
Reaching the Critical Temperature
The target temperature is exactly 295°F. This specific degree matters significantly. Below this point, your candy won’t set properly. Above it, you risk burning the sugar, which creates an unpleasant bitter taste.
| Temperature Range | Result |
|---|---|
| Below 290°F | Candy remains soft and sticky |
| 290-295°F | Perfect crisp texture |
| Above 300°F | Burnt flavor, dark color |
According to nutrition information, sugar undergoes chemical changes at different temperatures, affecting both texture and flavor development in candy making.
If you notice uneven heating perhaps some areas browning faster than others gently swirl the pan. Never stir directly. Just lift and rotate the pan to distribute heat evenly. Lower the heat slightly if caramelization progresses too quickly.
During my early attempts, I rushed this step and ended up with candy that never fully hardened. Patience truly pays off here. Those extra minutes watching the thermometer ensure perfect results.
The Baking Soda Moment
When your thermometer reads 295°F, everything moves fast. Have your sifted baking soda ready beside the stove. Pour it into the bubbling syrup and stir quickly just a few seconds to incorporate.
The reaction is immediate and dramatic. The mixture will foam up dramatically, expanding to two or three times its original volume. This foaming creates those characteristic bubbles that give sponge candy its airy texture.
Work quickly now! Immediately pour the foaming mixture into your prepared pan. Do not level or spread it this would deflate those precious bubbles you just created. Simply pour and let it settle naturally.
Cooling Methods Explained
You have two options for cooling, each with advantages:
Room Temperature Method: Leave the pan completely undisturbed on a flat surface. This takes longer but requires no oven. The candy sets as it cools naturally, typically requiring several hours or overnight for complete hardness.
Oven Method: Place the pan in your preheated 225°F oven, then immediately turn the oven off. Let it sit for 15 minutes before removing. The residual heat helps stabilize the foam structure. After removing, let cool completely at room temperature usually a few hours or overnight.
I prefer the oven method because it creates a more consistent texture throughout. However, both techniques work well when executed properly.
Preparing the Chocolate Coating
While the candy cools, prepare your chocolate. Finely chop your chocolate if using bar form smaller pieces melt more evenly than large chunks.
Place cocoa butter or coconut oil in a microwave-safe bowl. Heat in 30-second bursts, stirring between each interval. This gradual approach prevents overheating, which can cause grainy texture.
Once your cocoa butter or oil has melted, gradually add chocolate, stirring constantly. The residual heat melts the chocolate smoothly. Monitor the temperature carefully dark chocolate should stay under 92°F, milk chocolate under 86°F. A food thermometer helps ensure you don’t overheat the mixture.
If you make our chocolate covered strawberries or other confections, you’ll recognize this tempering technique. Proper tempering creates that satisfying snap when you bite into the finished candy.
Breaking and Dipping the Candy
Once completely cool and firm, remove the candy from the pan using the parchment paper edges. The candy should feel hard and sound hollow when tapped.
Score the surface with a knife in a grid pattern this guides where it breaks. Then gently snap the candy into pieces using your hands. Some irregular shapes add character; don’t worry about perfect squares.
Now comes the fun part dipping! Using a fork, lower each piece into the melted chocolate, turning to coat all sides. Lift and tap gently against the bowl edge to remove excess chocolate. Place on a cooling rack or parchment-lined surface.
Let the chocolate set completely at room temperature. If your kitchen runs warm, pop the rack in the refrigerator for 10-15 minutes to help the chocolate harden.
Protein and Main Component Alternatives
While traditional sponge candy follows a strict formula for success, some variations and substitutions work well depending on your ingredients and preferences.
Syrup Substitutions
The corn syrup in this recipe serves specific purposes: preventing crystallization, controlling texture, and providing consistent results. However, alternatives exist for those seeking different options.
Golden syrup works excellently as a direct substitute. Popular in British baking, it adds subtle caramel notes that complement the candy beautifully. The texture remains virtually identical, though the finished candy may have slightly more color.
Light corn syrup alternatives include rice syrup or glucose syrup. These provide similar anti-crystallization properties. Avoid dark corn syrup, which has a stronger flavor and risks burning more easily at high temperatures.
Honey and maple syrup might seem like natural alternatives, but I don’t recommend them for this recipe. Their distinct flavors overpower the delicate toffee taste, and they contain water that creates soggy, chewy texture rather than crisp crunch. Stick with the recommended syrups for best results.
Sugar Options
White granulated sugar produces the cleanest flavor and clearest color. However, some bakers prefer alternatives:
Organic cane sugar works identically to standard white sugar. If you prefer avoiding GMOs or want less-processed ingredients, organic options perform equally well.
Brown sugar adds molasses notes similar to using golden syrup. However, it contains more moisture and clumps more readily. The finished candy tastes delicious but looks darker.
Most candy recipes require precision, so I suggest mastering the basic version before experimenting. Once comfortable with the technique, substitutions become easier to navigate.
Vegetable, Sauce, and Seasoning Modifications
Though this candy doesn’t include vegetables, the concept of modifications applies to flavorings and additions you might consider.
Flavor Variations
The basic recipe provides a neutral canvas for creativity. Consider these additions:
Vinegar variation: Adding 1 tablespoon of white vinegar to the syrup creates larger bubbles and a crisper finish. The vinegar completely evaporates during cooking, leaving no taste. However, this modification makes the candy more crumbly and prone to breaking. Try it if you prefer a lighter texture over durability.
Extract additions: A teaspoon of vanilla extract stirred in with the baking soda adds warm flavor notes. Peppermint extract creates a refreshing twist perfect for holidays. Add extracts sparingly they’re potent!
Spice incorporations: A pinch of cinnamon or cardamom in the sugar before cooking creates unexpected warmth. These pair beautifully with dark chocolate coating.
Chocolate Coating Variations
The chocolate coating offers abundant customization possibilities:
Chocolate types: Milk chocolate creates classic, sweet-coated candy. Dark chocolate adds sophistication and slight bitterness that balances the sweet interior. Semi-sweet lands somewhere between choose based on your preference.
White chocolate coating creates stunning contrast against the golden candy interior. Though technically not true chocolate, quality white chocolate coatings work beautifully for this purpose.
Flavored chocolates from specialty brands offer interesting variations. Salted caramel chocolate, orange-infused dark chocolate, or espresso-flavored varieties create unique finished products.
Similar to our popular salted caramel popcorn, this candy benefits from quality ingredients. The chocolate coating significantly impacts overall flavor invest in good chocolate for best results.
Mastering Sponge Candy: Advanced Tips and Variations
After making this recipe countless times, I’ve gathered insights that help ensure success every time. These tips address common challenges and open possibilities for creative variations.
Professional Techniques for Perfect Results
Thermometer calibration: Inaccurate thermometers cause more failures than any other factor. Test yours by measuring boiling water it should read 212°F at sea level. If off, adjust your target temperature accordingly. Altitude affects readings too; decrease target by 2°F for every 1,000 feet elevation.
Pan selection: Heavy-bottomed pans distribute heat evenly, preventing hot spots that cause burning. Thin pans create uneven cooking that ruins texture. Invest in quality cookware for candy making.
Weather awareness: Candy making on humid days often produces sticky results. Moisture in the air absorbs into the cooling sugar, preventing proper setting. Save candy making for dry weather or run your air conditioner to reduce humidity indoors.
Pan preparation: Always use parchment paper, never wax paper. Wax paper melts and sticks to the candy, creating a mess. Parchment releases cleanly. Silicone pans work as alternatives just ensure they’re stable and won’t flex during the critical setting period.
Creative Variations to Try
Once comfortable with the basic recipe, experiment with these ideas:
Double chocolate: Drizzle contrasting chocolate over set pieces. White chocolate drizzle on dark-coated candy looks elegant for gift-giving.
Nut additions: Press chopped nuts into the candy surface before it fully cools. Pecans, almonds, or hazelnuts add crunch and flavor complexity.
Seasonal flavors: Add pumpkin spice in autumn, peppermint during winter holidays, or lavender for spring. These additions make the candy perfect for holiday gifting.
Size variations: Pour into different pan sizes for varying thicknesses. Thin candy breaks into delicate shards; thick pieces make substantial bars.
Presentation Ideas
The golden honeycomb interior against glossy chocolate makes stunning gifts:
- Package in clear cellophane bags tied with ribbon visibility showcases the beautiful interior
- Layer in decorative tins with wax paper between layers
- Arrange on dessert platters alongside other confections for impressive spreads
- Create gift boxes with flavor variations for variety
How to Store Sponge Candy: Best Practices
Proper storage maintains that perfect crunch. Sponge candy’s porous structure absorbs moisture readily, leading to softening if not protected.
Short-Term Storage
Store completely cooled candy in airtight containers at room temperature. Layer pieces between parchment or wax paper to prevent sticking. Keep containers in cool, dry locations away from direct sunlight and heat sources.
Properly stored candy stays fresh for 2-3 weeks. The chocolate coating protects somewhat, but humidity still penetrates over time. Avoid the refrigerator for daily storage temperature fluctuations cause condensation that softens the candy.
Long-Term Options
For longer storage, freeze the candy. Wrap pieces individually or separate layers with parchment, place in freezer-safe containers, and freeze for up to 3 months. Thaw at room temperature in the sealed container to prevent condensation from forming on the candy.
Add silica gel packets (food-safe versions) to storage containers for extra moisture protection. These absorb humidity that might seep in during humid weather.
Make-Ahead Considerations
Sponge candy keeps well, making it perfect for batch preparation:
- Make the candy base up to a week before dipping store in airtight containers
- Dip in chocolate closer to serving for freshest taste
- Prepare during dry weather for best results
- Plan gift-making sessions during low-humidity seasons

FAQs: Frequently Asked Questions About Sponge Candy
What is sponge candy?
Sponge candy is a crunchy, airy toffee made by cooking sugar, corn syrup, and water to 295°F, then quickly stirring in baking soda to create bubbles that form its light, sponge-like texture. The result is a delicate, honeycomb-style candy with a toasted molasses flavor, often dipped in chocolate for extra snap and richness. Unlike dense brittles, it shatters easily but melts in your mouth. Originating from Canada and popular in the U.S. Midwest as “fairy food” or “angel food candy,” it’s simple to make at home with basic pantry items. Store-bought versions can be stale, but fresh batches stay crisp for weeks in an airtight container. (78 words)
Why does homemade sponge candy turn out sticky or chewy?
Sticky or chewy sponge candy usually results from high humidity absorbing moisture, syrup not reaching exactly 295°F, or uneven cooking. Test your thermometer with boiling water (it should read 212°F at sea level). Use a heavy-bottomed pan, swirl gently to avoid hot spots, and cook over medium heat. After pouring, let it cool undisturbed in a dry room. Store immediately in an airtight container with silica packets if humid. If still soft, next time add 1 tsp vinegar for crisper bubbles. Avoid refrigeration, as it causes sweating. These fixes yield perfect crunch. (92 words)
How do you keep sponge candy from collapsing?
Sponge candy collapses if disturbed before fully set, as the fragile bubbles deflate. Pour into a parchment-lined 8×8 pan and leave completely still at room temperature for 2-3 hours, or use the oven method: turn off a preheated 200°F oven, place the pan inside, and let cool with the door closed. Never tap, move, or level the surface post-pour. Parchment prevents sticking better than wax paper, which melts. Once cool, break gently with your hands. This preserves the airy structure for that signature shatter. (85 words)
How do you melt chocolate for dipping sponge candy?
For smooth, snappy chocolate coating, melt 1 tbsp cocoa butter or coconut oil first in the microwave (30-second bursts, stirring until liquid). Add 8 oz chopped chocolate off heat, stirring until melted—keep dark under 92°F, milk under 86°F using a thermometer. Dip cooled sponge pieces, tap off excess, and place on parchment. If it won’t harden in warm rooms, chill 10-15 minutes in the fridge. This tempering method avoids bloom (white streaks) and ensures a glossy finish at room temp. Double-boiler works too for precision. (94 words)
Can you substitute ingredients in sponge candy recipe?
Light corn syrup is ideal for clear caramelization, but golden syrup works as a substitute; avoid honey or maple for overpowering taste and soggy texture. White sugar gives clean flavor—brown adds molasses notes but clumps easier. Dark corn syrup risks burning. Vinegar (1 tbsp) creates bigger bubbles for lighter candy but makes it crumblier; skip for denser crunch. Use only baking soda (fresh), not powder. Organic corn syrup dodges GMOs. Stick close to the recipe first, then tweak. Yields consistent results over store-bought. (88 words)
Sponge Candy
🍬 Experience explosive crunch from airy sponge candy bubbles, coated in silky chocolate for irresistible homemade bliss.
💥 Perfectly light treat with pro-level texture – candy-making magic without fancy equipment!
- Total Time: 2 hours 35 minutes
- Yield: 20-24 pieces
Ingredients
– 1 cup white sugar
– 1 cup light corn syrup or golden syrup
– 1 tablespoon baking soda
– 4 tablespoons cocoa butter or coconut oil
– 2 cups real chocolate chips or chopped chocolate
Instructions
1-Preparation and Setup: Before turning on the stove, complete your mise en place everything in its place. This preparation ensures smooth execution when timing becomes critical. First, decide on your cooling method. If using the oven technique, preheat your oven to 225°F. Line a 9×13 baking pan with parchment paper, creasing the edges so it fits neatly inside. The parchment prevents sticking and makes removal effortless later. Measure all ingredients precisely. Candy making requires accuracy, and having everything ready prevents frantic searching mid-recipe. Sift your baking soda into a small bowl to remove any lumps smooth powder distributes evenly and reacts consistently. Gather your equipment: a large saucepan (the syrup will foam dramatically), instant-read thermometer, wooden spoon or heat-safe spatula, and the prepared pan. Place everything within arm’s reach of your stove.
2-Cooking the Sugar Syrup: Combine the sugar and corn syrup in your large saucepan. Notice I specified large even experienced candy makers sometimes underestimate the foaming action. A larger pan prevents overflow disasters. Set the pan over medium heat and begin stirring. You want to dissolve the sugar completely before the mixture comes to a boil. Stir gently but consistently, scraping the sides occasionally to incorporate any sugar crystals. Once you see the sugar has dissolved and the mixture looks clear with no granules remaining, stop stirring. This moment is crucial. Continuing to stir causes uneven heating and can lead to crystallization. Simply let the syrup cook undisturbed. Watch as the mixture begins boiling. You’ll notice it turning from clear to a pale yellow this is good! The caramelization process has begun. Insert your instant-read thermometer and monitor closely.
3-Reaching the Critical Temperature: The target temperature is exactly 295°F. This specific degree matters significantly. Below this point, your candy won’t set properly. Above it, you risk burning the sugar, which creates an unpleasant bitter taste. If you notice uneven heating perhaps some areas browning faster than others gently swirl the pan. Never stir directly. Just lift and rotate the pan to distribute heat evenly. Lower the heat slightly if caramelization progresses too quickly.
4-The Baking Soda Moment: When your thermometer reads 295°F, everything moves fast. Have your sifted baking soda ready beside the stove. Pour it into the bubbling syrup and stir quickly just a few seconds to incorporate. The reaction is immediate and dramatic. The mixture will foam up dramatically, expanding to two or three times its original volume. This foaming creates those characteristic bubbles that give sponge candy its airy texture. Work quickly now! Immediately pour the foaming mixture into your prepared pan. Do not level or spread it this would deflate those precious bubbles you just created. Simply pour and let it settle naturally.
5-Cooling Methods Explained: You have two options for cooling, each with advantages: Room Temperature Method: Leave the pan completely undisturbed on a flat surface. This takes longer but requires no oven. The candy sets as it cools naturally, typically requiring several hours or overnight for complete hardness. Oven Method: Place the pan in your preheated 225°F oven, then immediately turn the oven off. Let it sit for 15 minutes before removing. The residual heat helps stabilize the foam structure. After removing, let cool completely at room temperature usually a few hours or overnight.
6-Preparing the Chocolate Coating: While the candy cools, prepare your chocolate. Finely chop your chocolate if using bar form smaller pieces melt more evenly than large chunks. Place cocoa butter or coconut oil in a microwave-safe bowl. Heat in 30-second bursts, stirring between each interval. This gradual approach prevents overheating, which can cause grainy texture. Once your cocoa butter or oil has melted, gradually add chocolate, stirring constantly. The residual heat melts the chocolate smoothly. Monitor the temperature carefully dark chocolate should stay under 92°F, milk chocolate under 86°F. A food thermometer helps ensure you don’t overheat the mixture.
7-Breaking and Dipping the Candy: Once completely cool and firm, remove the candy from the pan using the parchment paper edges. The candy should feel hard and sound hollow when tapped. Score the surface with a knife in a grid pattern this guides where it breaks. Then gently snap the candy into pieces using your hands. Some irregular shapes add character; don’t worry about perfect squares. Now comes the fun part dipping! Using a fork, lower each piece into the melted chocolate, turning to coat all sides. Lift and tap gently against the bowl edge to remove excess chocolate. Place on a cooling rack or parchment-lined surface. Let the chocolate set completely at room temperature. If your kitchen runs warm, pop the rack in the refrigerator for 10-15 minutes to help the chocolate harden.
Notes
📄 Always use parchment, never wax paper, to prevent sticking.
🥄 Use a large pan – mixture foams up 6x volume with baking soda.
🌡️ Don’t stir after sugar dissolves to avoid grainy candy.
- Prep Time: 15 minutes
- Cooling: 2 hours
- Cook Time: 20 minutes
- Category: Dessert
- Method: Boiling
- Cuisine: American
- Diet: Vegetarian
Nutrition
- Serving Size: 1 piece
- Calories: 150
- Sugar: 18g
- Sodium: 100mg
- Fat: 6g
- Saturated Fat: 4g
- Unsaturated Fat: 2g
- Trans Fat: 0g
- Carbohydrates: 25g
- Fiber: 1g
- Protein: 1g
- Cholesterol: 0mg


