Ingredients
– 1 cup white sugar
– 1 cup light corn syrup or golden syrup
– 1 tablespoon baking soda
– 4 tablespoons cocoa butter or coconut oil
– 2 cups real chocolate chips or chopped chocolate
Instructions
1-Preparation and Setup: Before turning on the stove, complete your mise en place everything in its place. This preparation ensures smooth execution when timing becomes critical. First, decide on your cooling method. If using the oven technique, preheat your oven to 225°F. Line a 9×13 baking pan with parchment paper, creasing the edges so it fits neatly inside. The parchment prevents sticking and makes removal effortless later. Measure all ingredients precisely. Candy making requires accuracy, and having everything ready prevents frantic searching mid-recipe. Sift your baking soda into a small bowl to remove any lumps smooth powder distributes evenly and reacts consistently. Gather your equipment: a large saucepan (the syrup will foam dramatically), instant-read thermometer, wooden spoon or heat-safe spatula, and the prepared pan. Place everything within arm’s reach of your stove.
2-Cooking the Sugar Syrup: Combine the sugar and corn syrup in your large saucepan. Notice I specified large even experienced candy makers sometimes underestimate the foaming action. A larger pan prevents overflow disasters. Set the pan over medium heat and begin stirring. You want to dissolve the sugar completely before the mixture comes to a boil. Stir gently but consistently, scraping the sides occasionally to incorporate any sugar crystals. Once you see the sugar has dissolved and the mixture looks clear with no granules remaining, stop stirring. This moment is crucial. Continuing to stir causes uneven heating and can lead to crystallization. Simply let the syrup cook undisturbed. Watch as the mixture begins boiling. You’ll notice it turning from clear to a pale yellow this is good! The caramelization process has begun. Insert your instant-read thermometer and monitor closely.
3-Reaching the Critical Temperature: The target temperature is exactly 295°F. This specific degree matters significantly. Below this point, your candy won’t set properly. Above it, you risk burning the sugar, which creates an unpleasant bitter taste. If you notice uneven heating perhaps some areas browning faster than others gently swirl the pan. Never stir directly. Just lift and rotate the pan to distribute heat evenly. Lower the heat slightly if caramelization progresses too quickly.
4-The Baking Soda Moment: When your thermometer reads 295°F, everything moves fast. Have your sifted baking soda ready beside the stove. Pour it into the bubbling syrup and stir quickly just a few seconds to incorporate. The reaction is immediate and dramatic. The mixture will foam up dramatically, expanding to two or three times its original volume. This foaming creates those characteristic bubbles that give sponge candy its airy texture. Work quickly now! Immediately pour the foaming mixture into your prepared pan. Do not level or spread it this would deflate those precious bubbles you just created. Simply pour and let it settle naturally.
5-Cooling Methods Explained: You have two options for cooling, each with advantages: Room Temperature Method: Leave the pan completely undisturbed on a flat surface. This takes longer but requires no oven. The candy sets as it cools naturally, typically requiring several hours or overnight for complete hardness. Oven Method: Place the pan in your preheated 225°F oven, then immediately turn the oven off. Let it sit for 15 minutes before removing. The residual heat helps stabilize the foam structure. After removing, let cool completely at room temperature usually a few hours or overnight.
6-Preparing the Chocolate Coating: While the candy cools, prepare your chocolate. Finely chop your chocolate if using bar form smaller pieces melt more evenly than large chunks. Place cocoa butter or coconut oil in a microwave-safe bowl. Heat in 30-second bursts, stirring between each interval. This gradual approach prevents overheating, which can cause grainy texture. Once your cocoa butter or oil has melted, gradually add chocolate, stirring constantly. The residual heat melts the chocolate smoothly. Monitor the temperature carefully dark chocolate should stay under 92°F, milk chocolate under 86°F. A food thermometer helps ensure you don’t overheat the mixture.
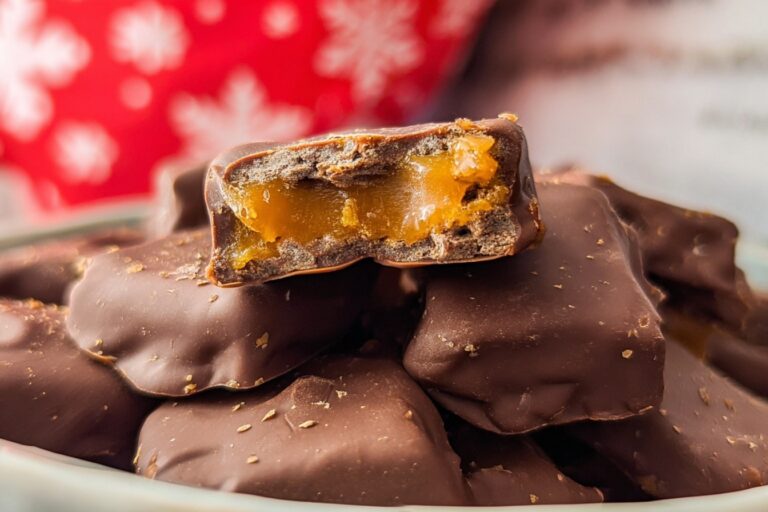
7-Breaking and Dipping the Candy: Once completely cool and firm, remove the candy from the pan using the parchment paper edges. The candy should feel hard and sound hollow when tapped. Score the surface with a knife in a grid pattern this guides where it breaks. Then gently snap the candy into pieces using your hands. Some irregular shapes add character; don’t worry about perfect squares. Now comes the fun part dipping! Using a fork, lower each piece into the melted chocolate, turning to coat all sides. Lift and tap gently against the bowl edge to remove excess chocolate. Place on a cooling rack or parchment-lined surface. Let the chocolate set completely at room temperature. If your kitchen runs warm, pop the rack in the refrigerator for 10-15 minutes to help the chocolate harden.
Notes
📄 Always use parchment, never wax paper, to prevent sticking.
🥄 Use a large pan – mixture foams up 6x volume with baking soda.
🌡️ Don’t stir after sugar dissolves to avoid grainy candy.
- Prep Time: 15 minutes
- Cooling: 2 hours
- Cook Time: 20 minutes
- Category: Dessert
- Method: Boiling
- Cuisine: American
- Diet: Vegetarian
Nutrition
- Serving Size: 1 piece
- Calories: 150
- Sugar: 18g
- Sodium: 100mg
- Fat: 6g
- Saturated Fat: 4g
- Unsaturated Fat: 2g
- Trans Fat: 0g
- Carbohydrates: 25g
- Fiber: 1g
- Protein: 1g
- Cholesterol: 0mg